iOS
This document aims to introduce how to set up Apple authentication so that your game can log in through the Apple channel using Player Network login authentication services.
Prerequisites
1. Configure iOS app on Apple Developer
1. Create App ID
Create a client_id as the request source sent to Apple. The client_id for the iOS app is App ID (Bundle ID).
If you are using an existing App ID, simply click the corresponding App ID on the Identifiers page and open Sign in with Apple under Edit your App ID Configuration.
-
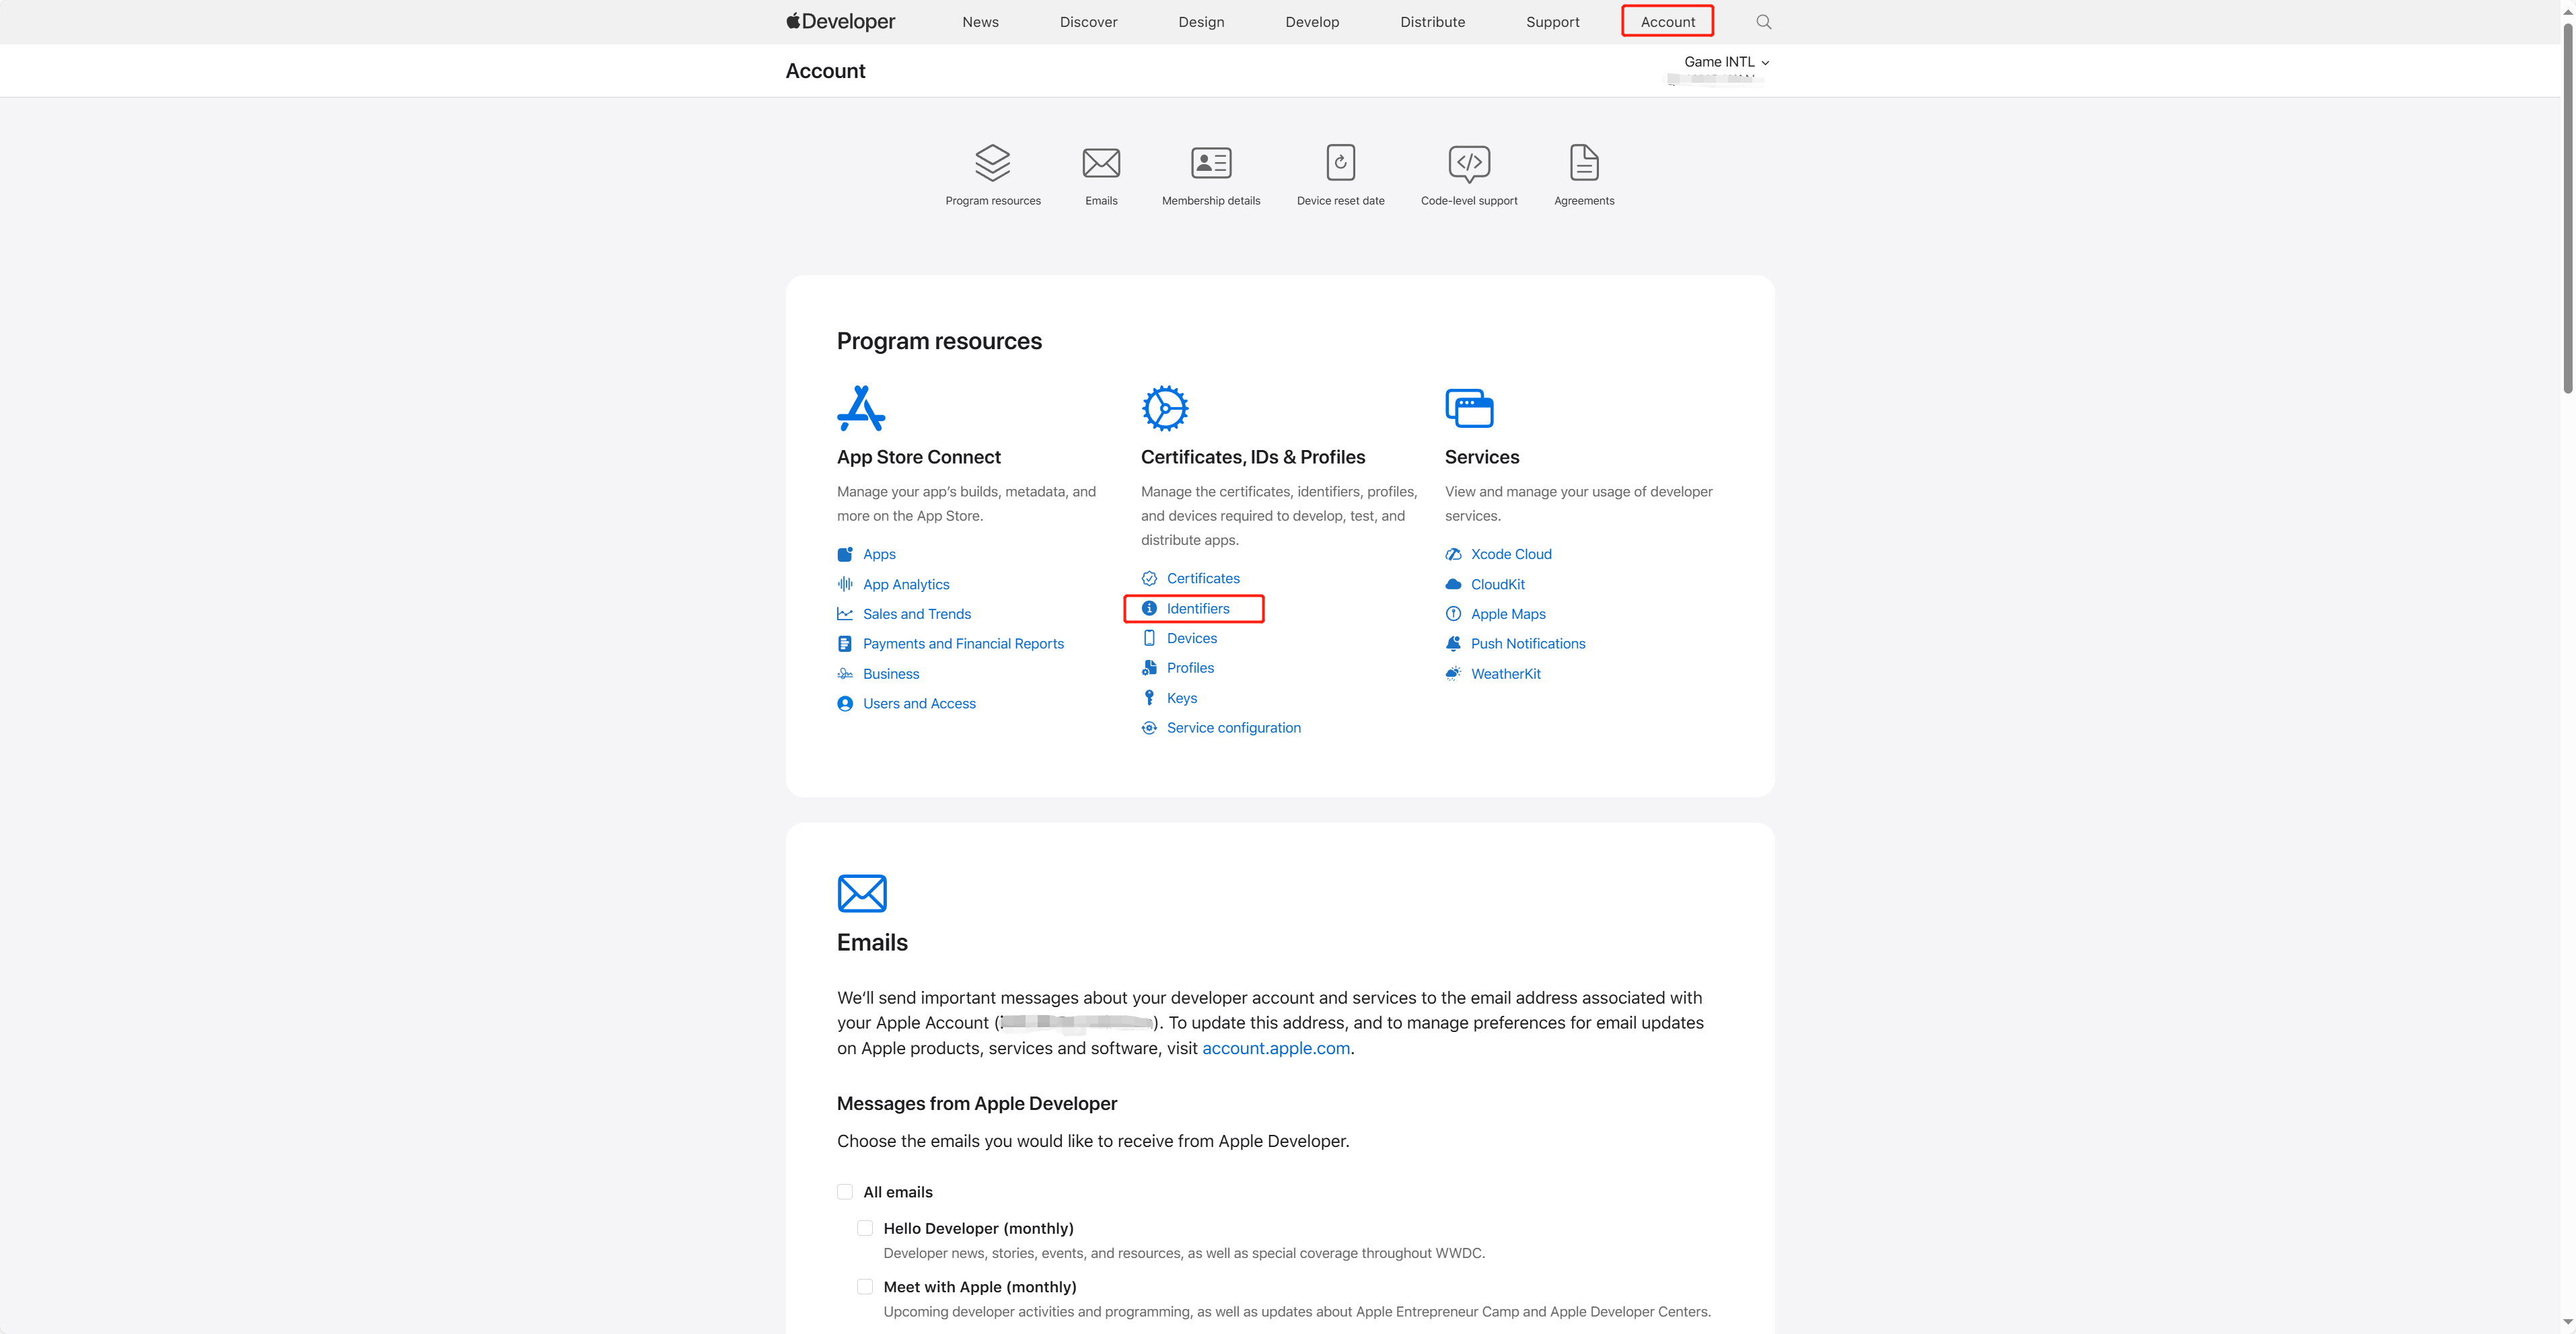
Log in to Apple Developer, click Account in the top navigation bar, and select Certificates, IDs & Profiles under Identifiers.
-
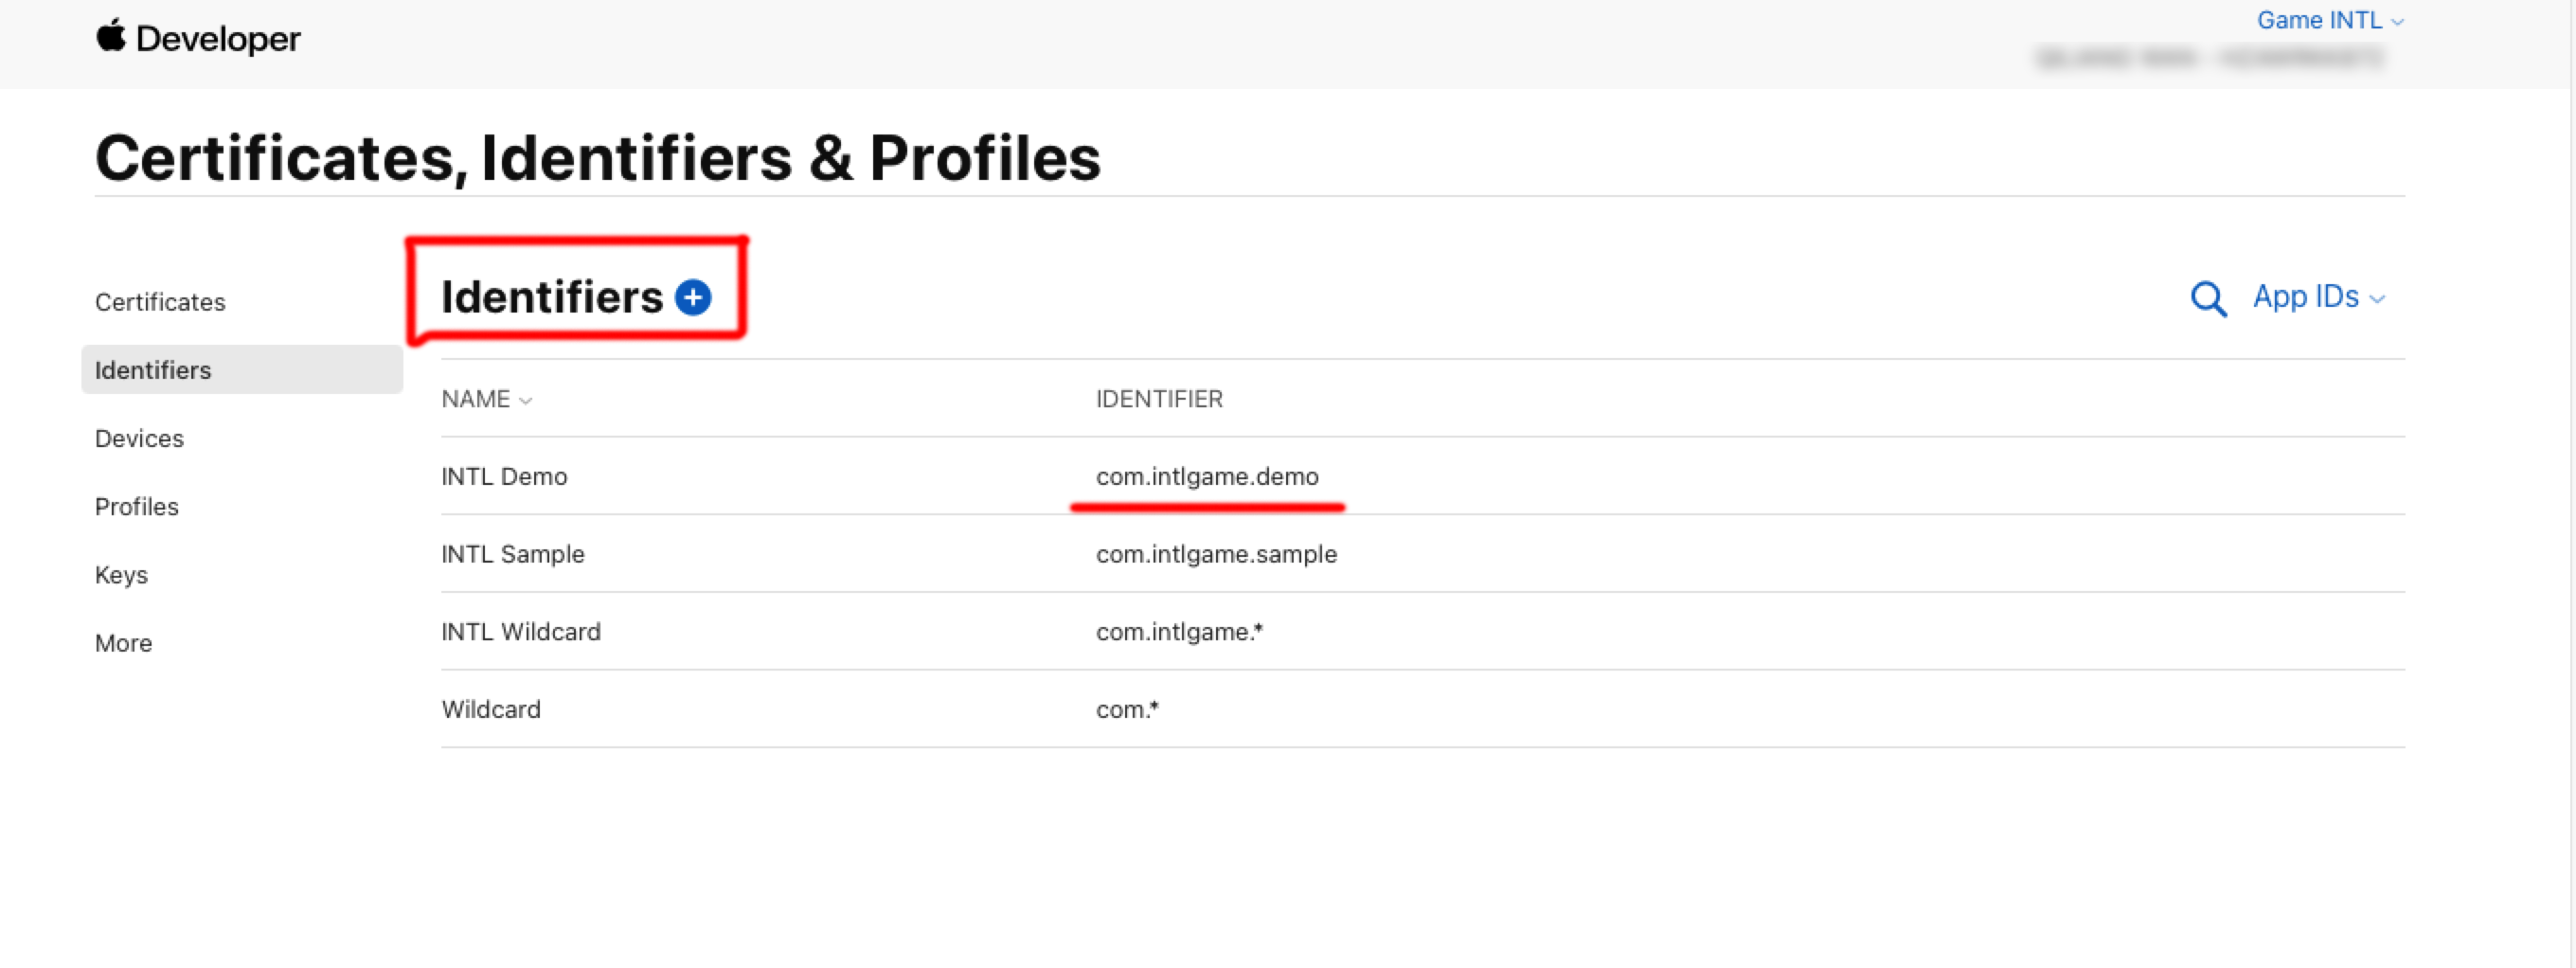
Click the blue add icon ( + ).
-
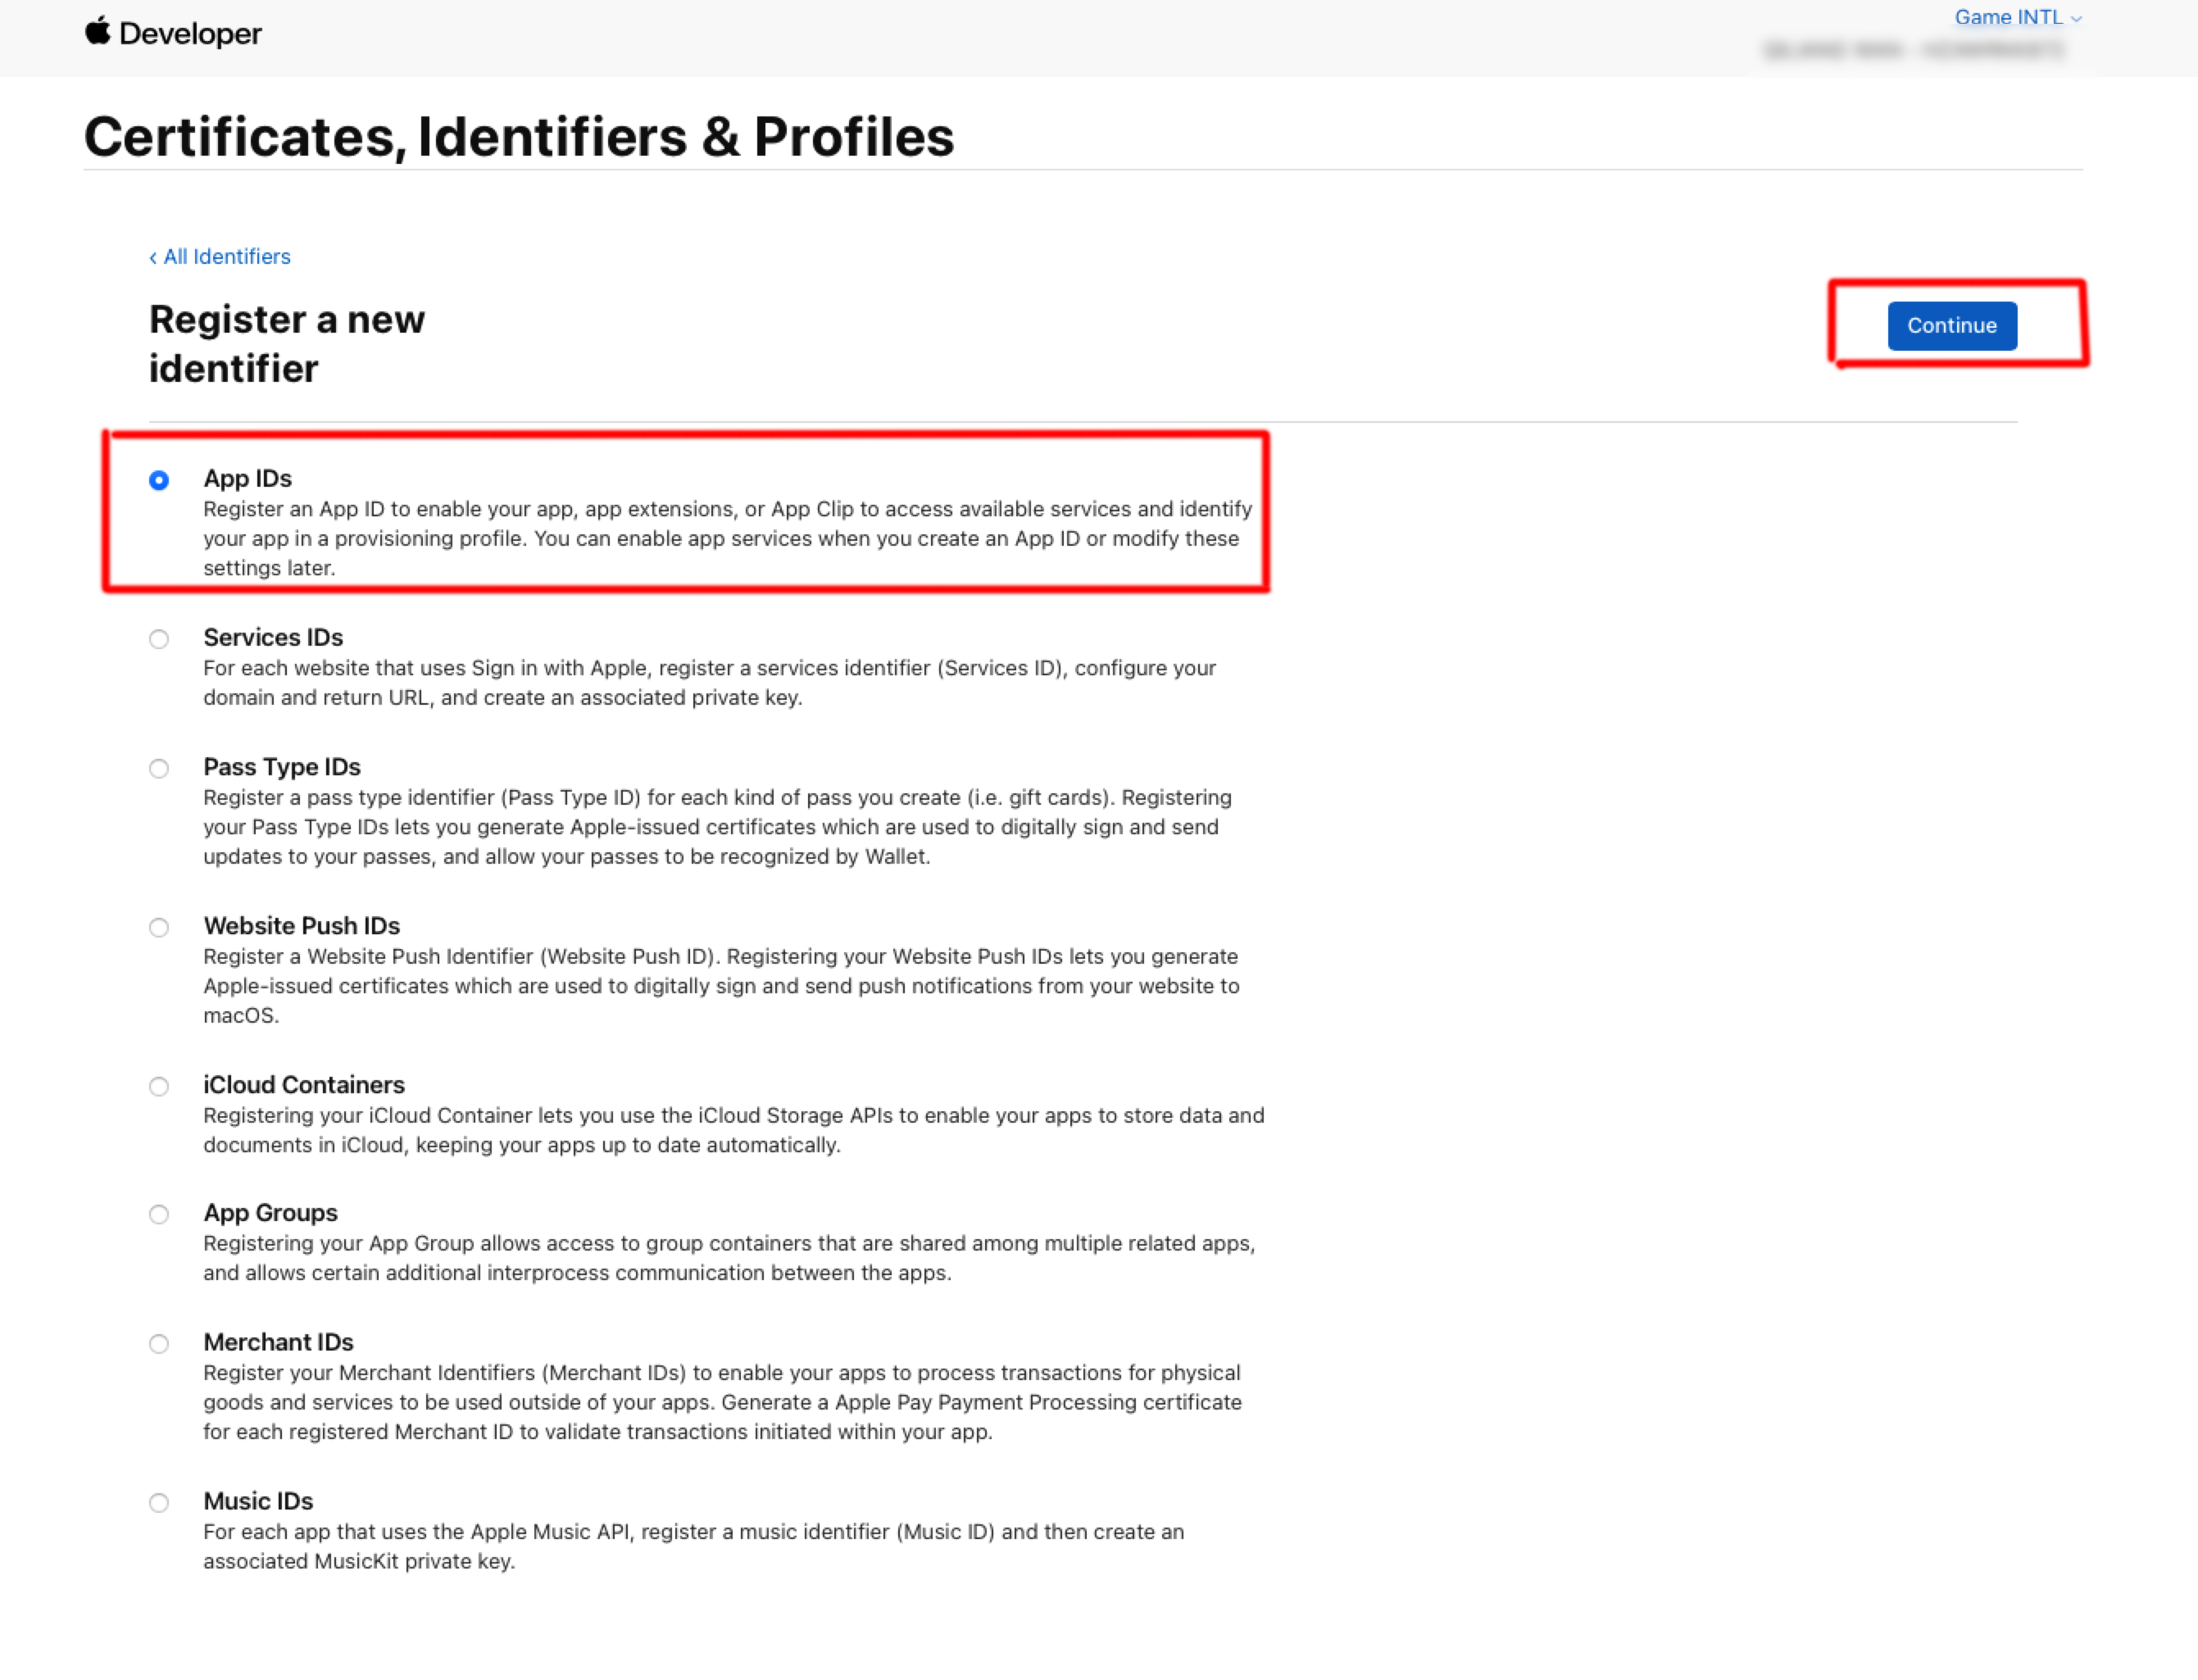
Select App IDs and then click Continue.
-
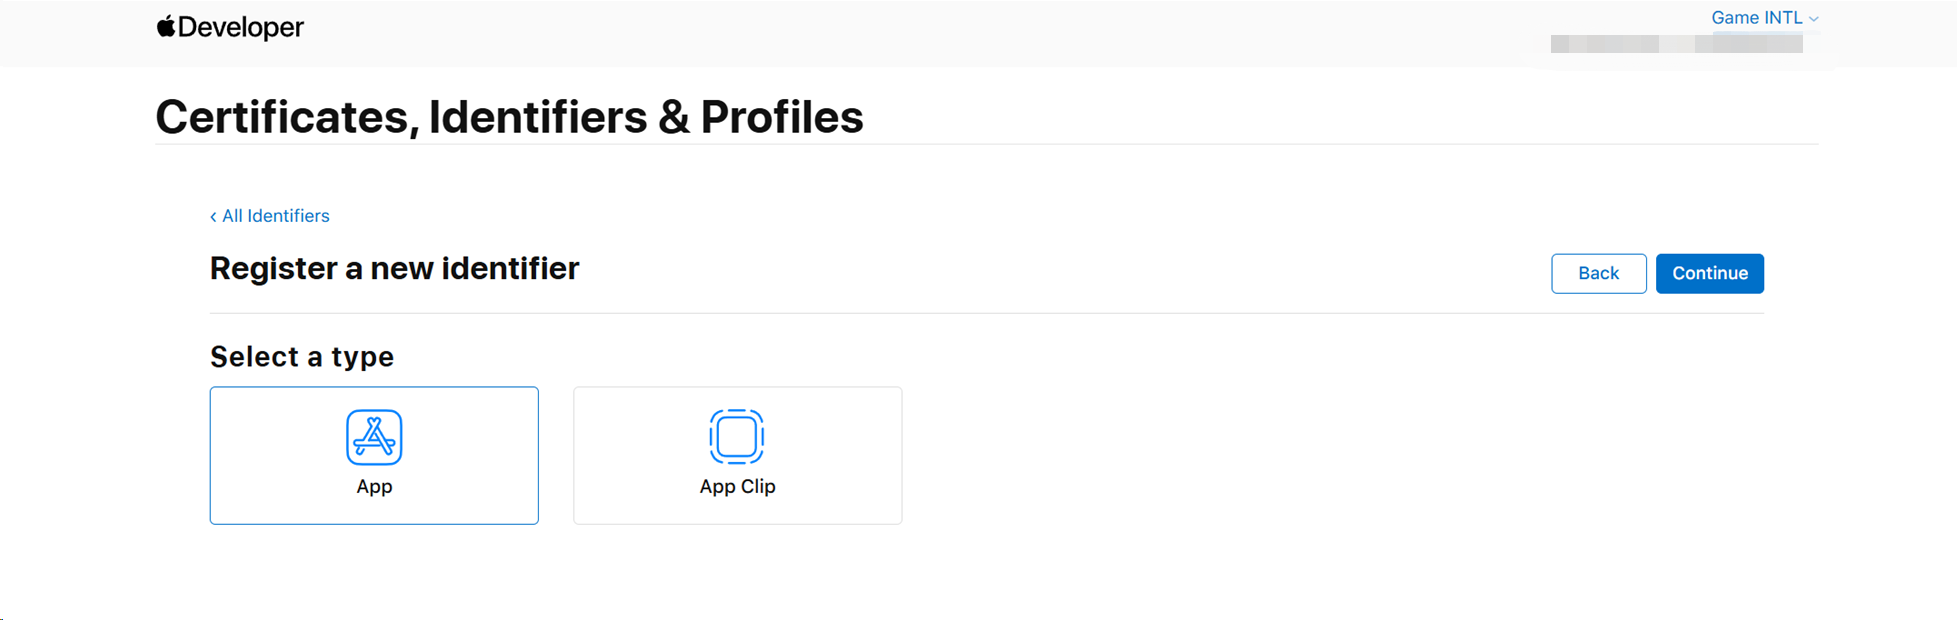
Select App and then click Continue.
-
Enter Description and Bundle ID.
- Description: The name or description of the game app.
- Bundle ID: The unique identifier of the game app included in the App ID.
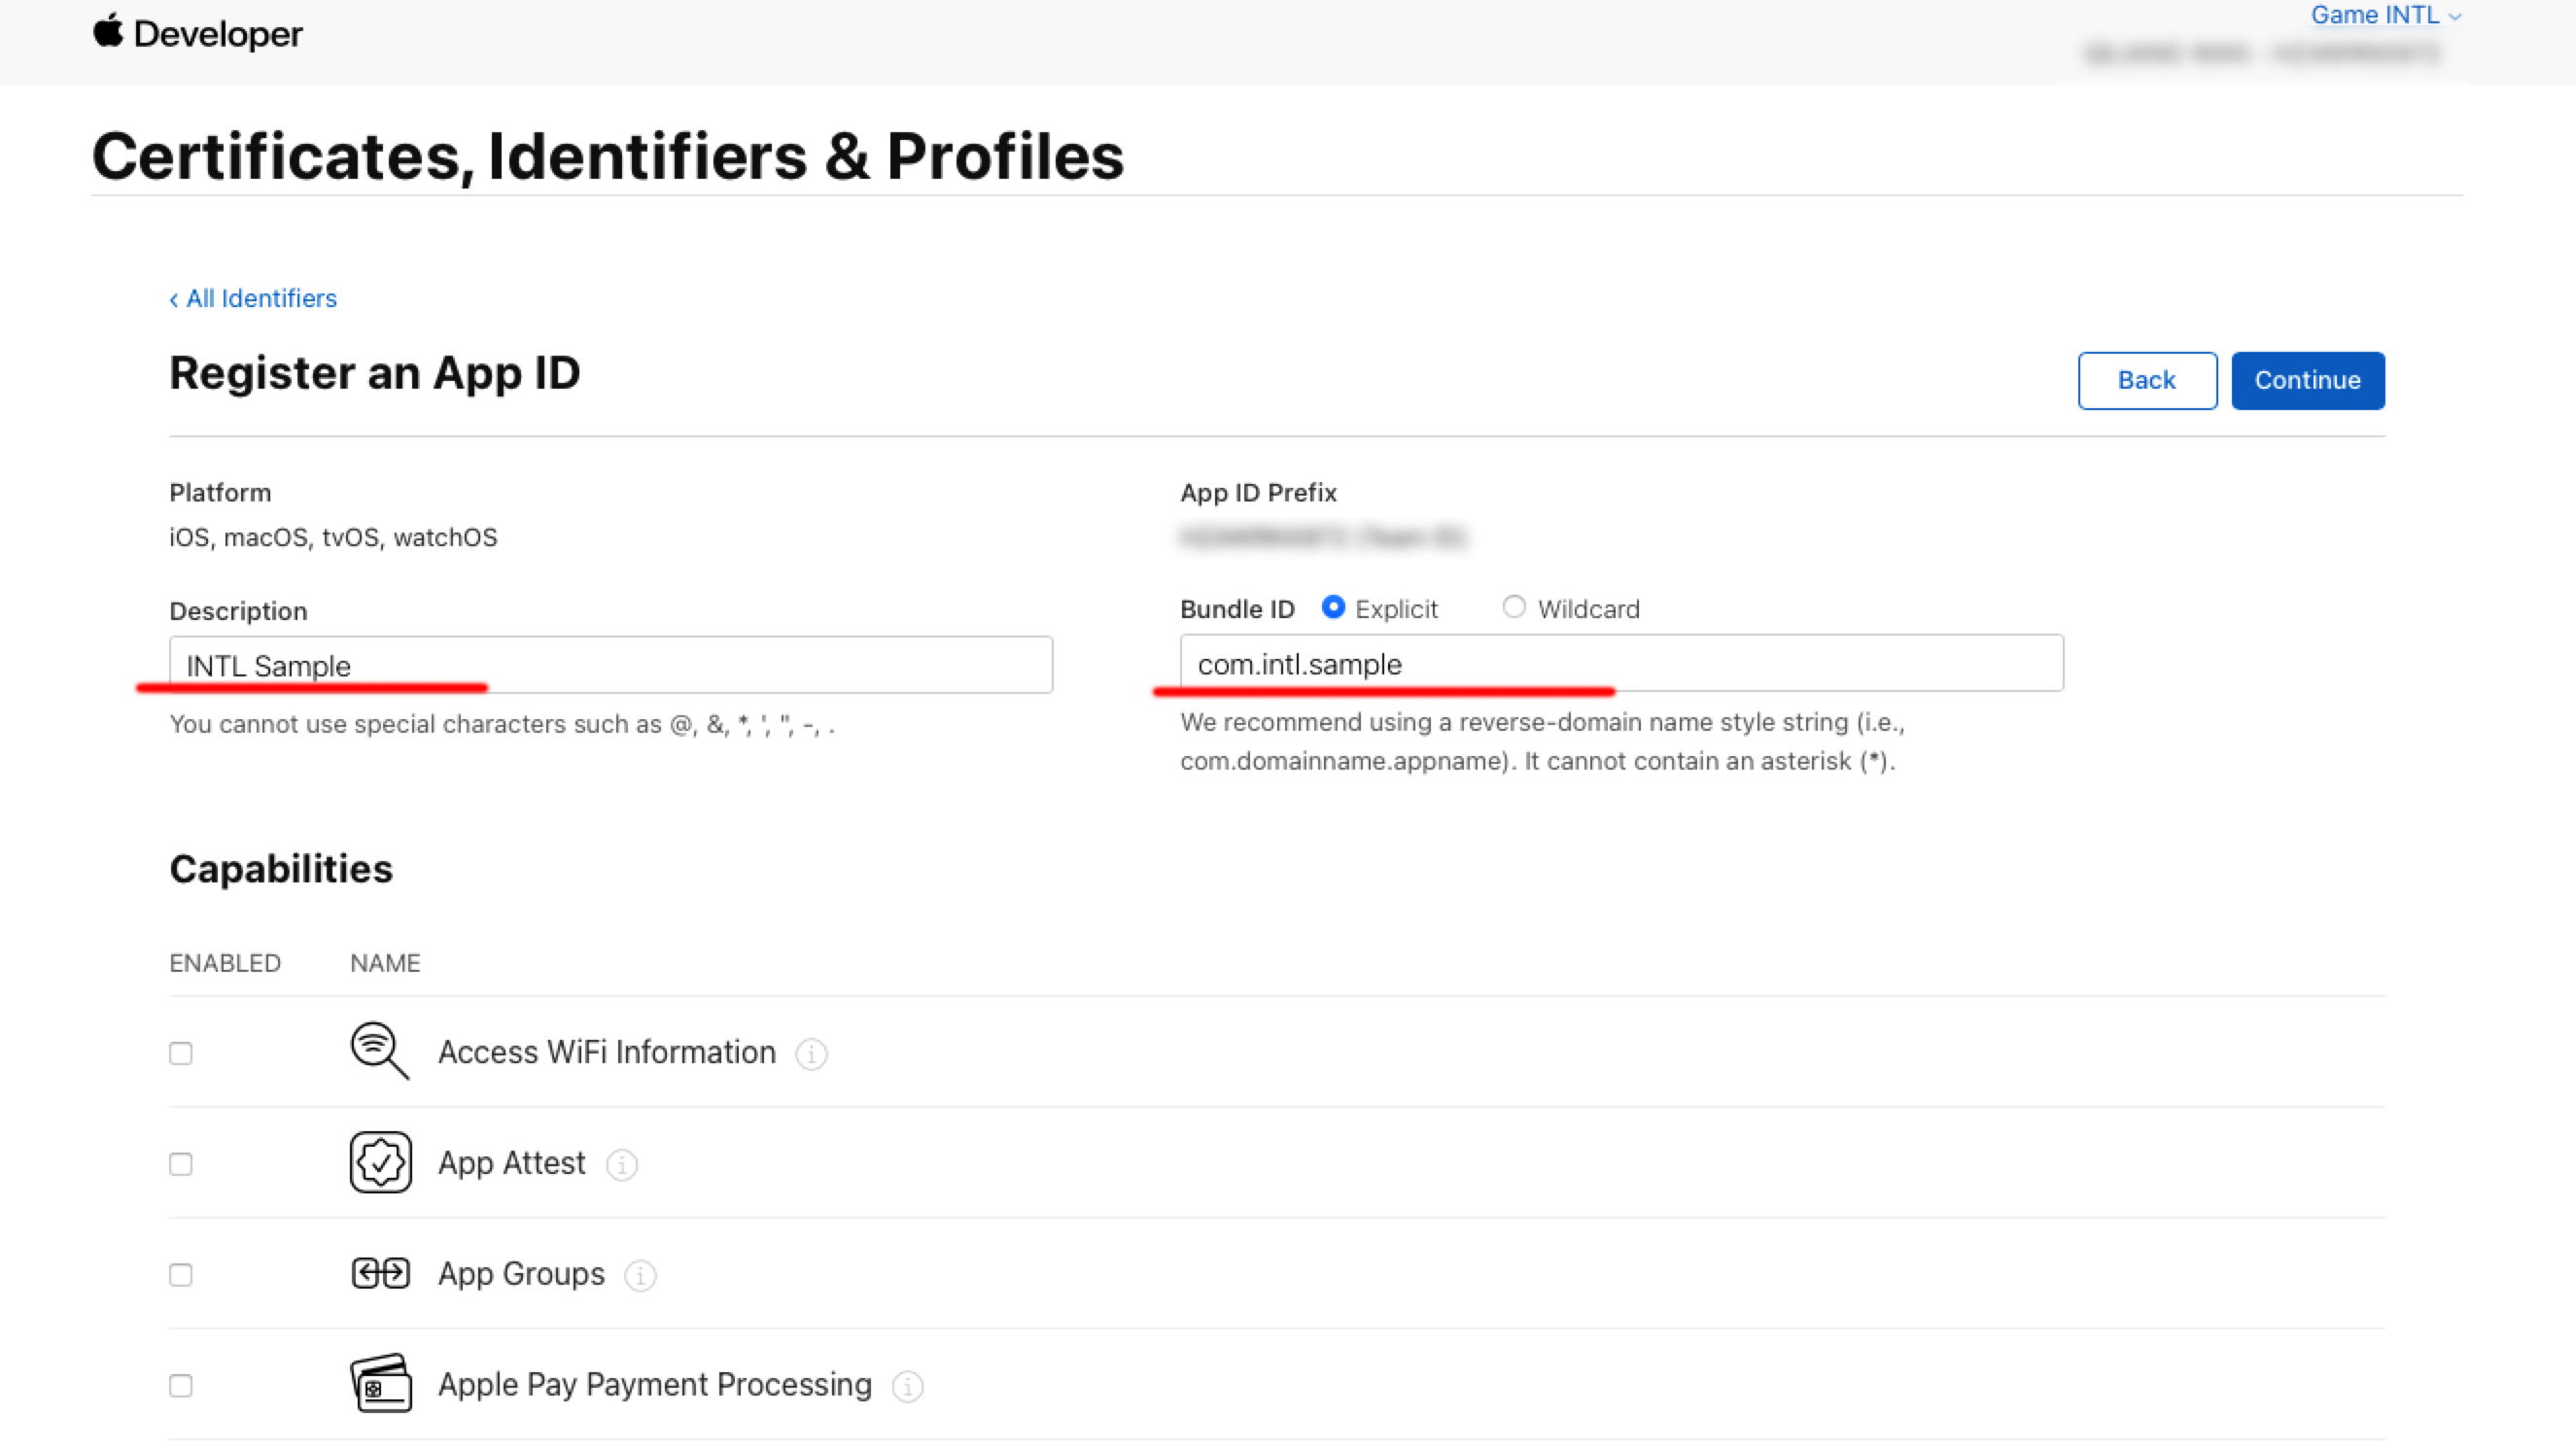
-
Open Sign in with Apple under Capabilities.
-
Click Continue > Register to create App ID.
2. Create a key for accessing services
Create the key for calculating client_secret and the corresponding Key ID.
-
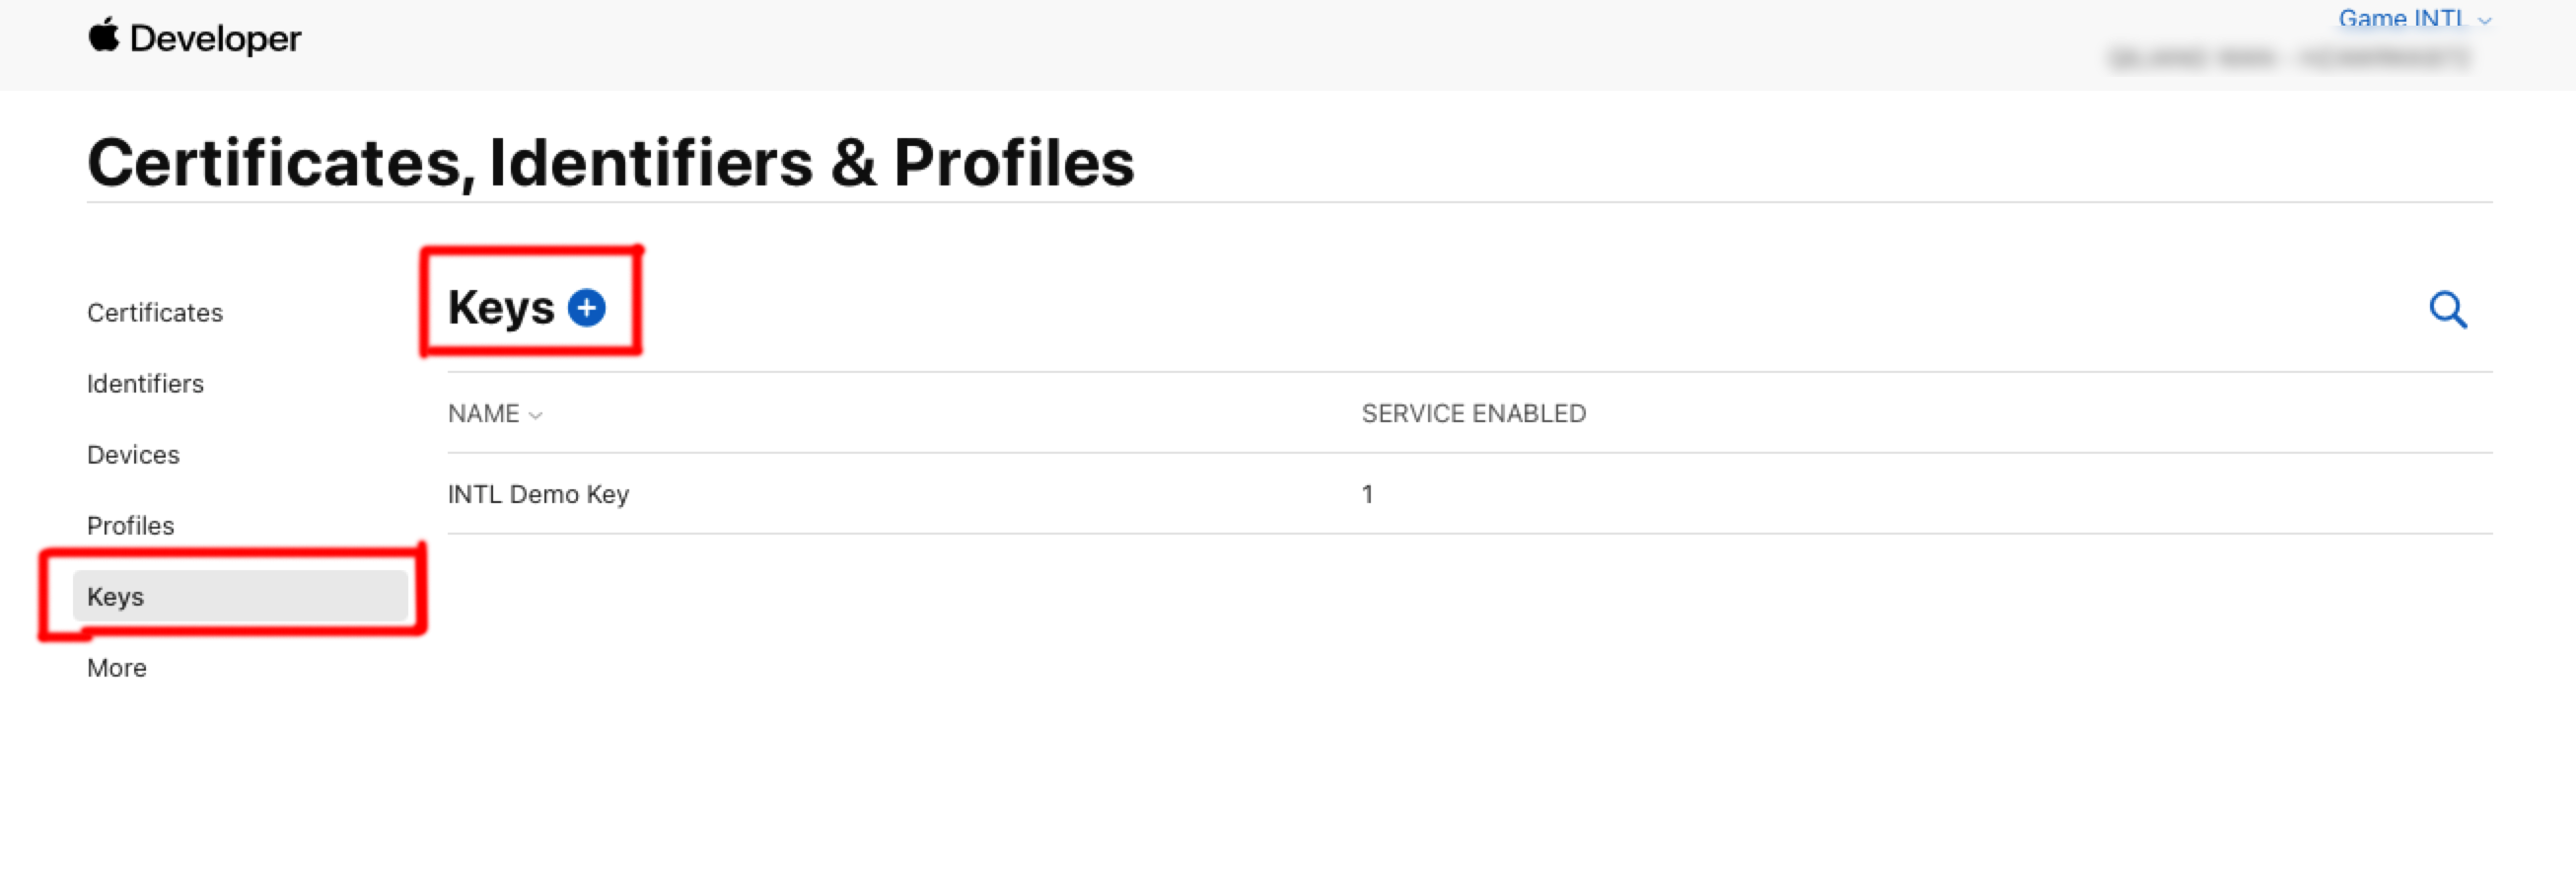
In the Certificates, Identifiers & Profiles sidebar, click Keys.
-
Click the blue add icon ( + ).
-
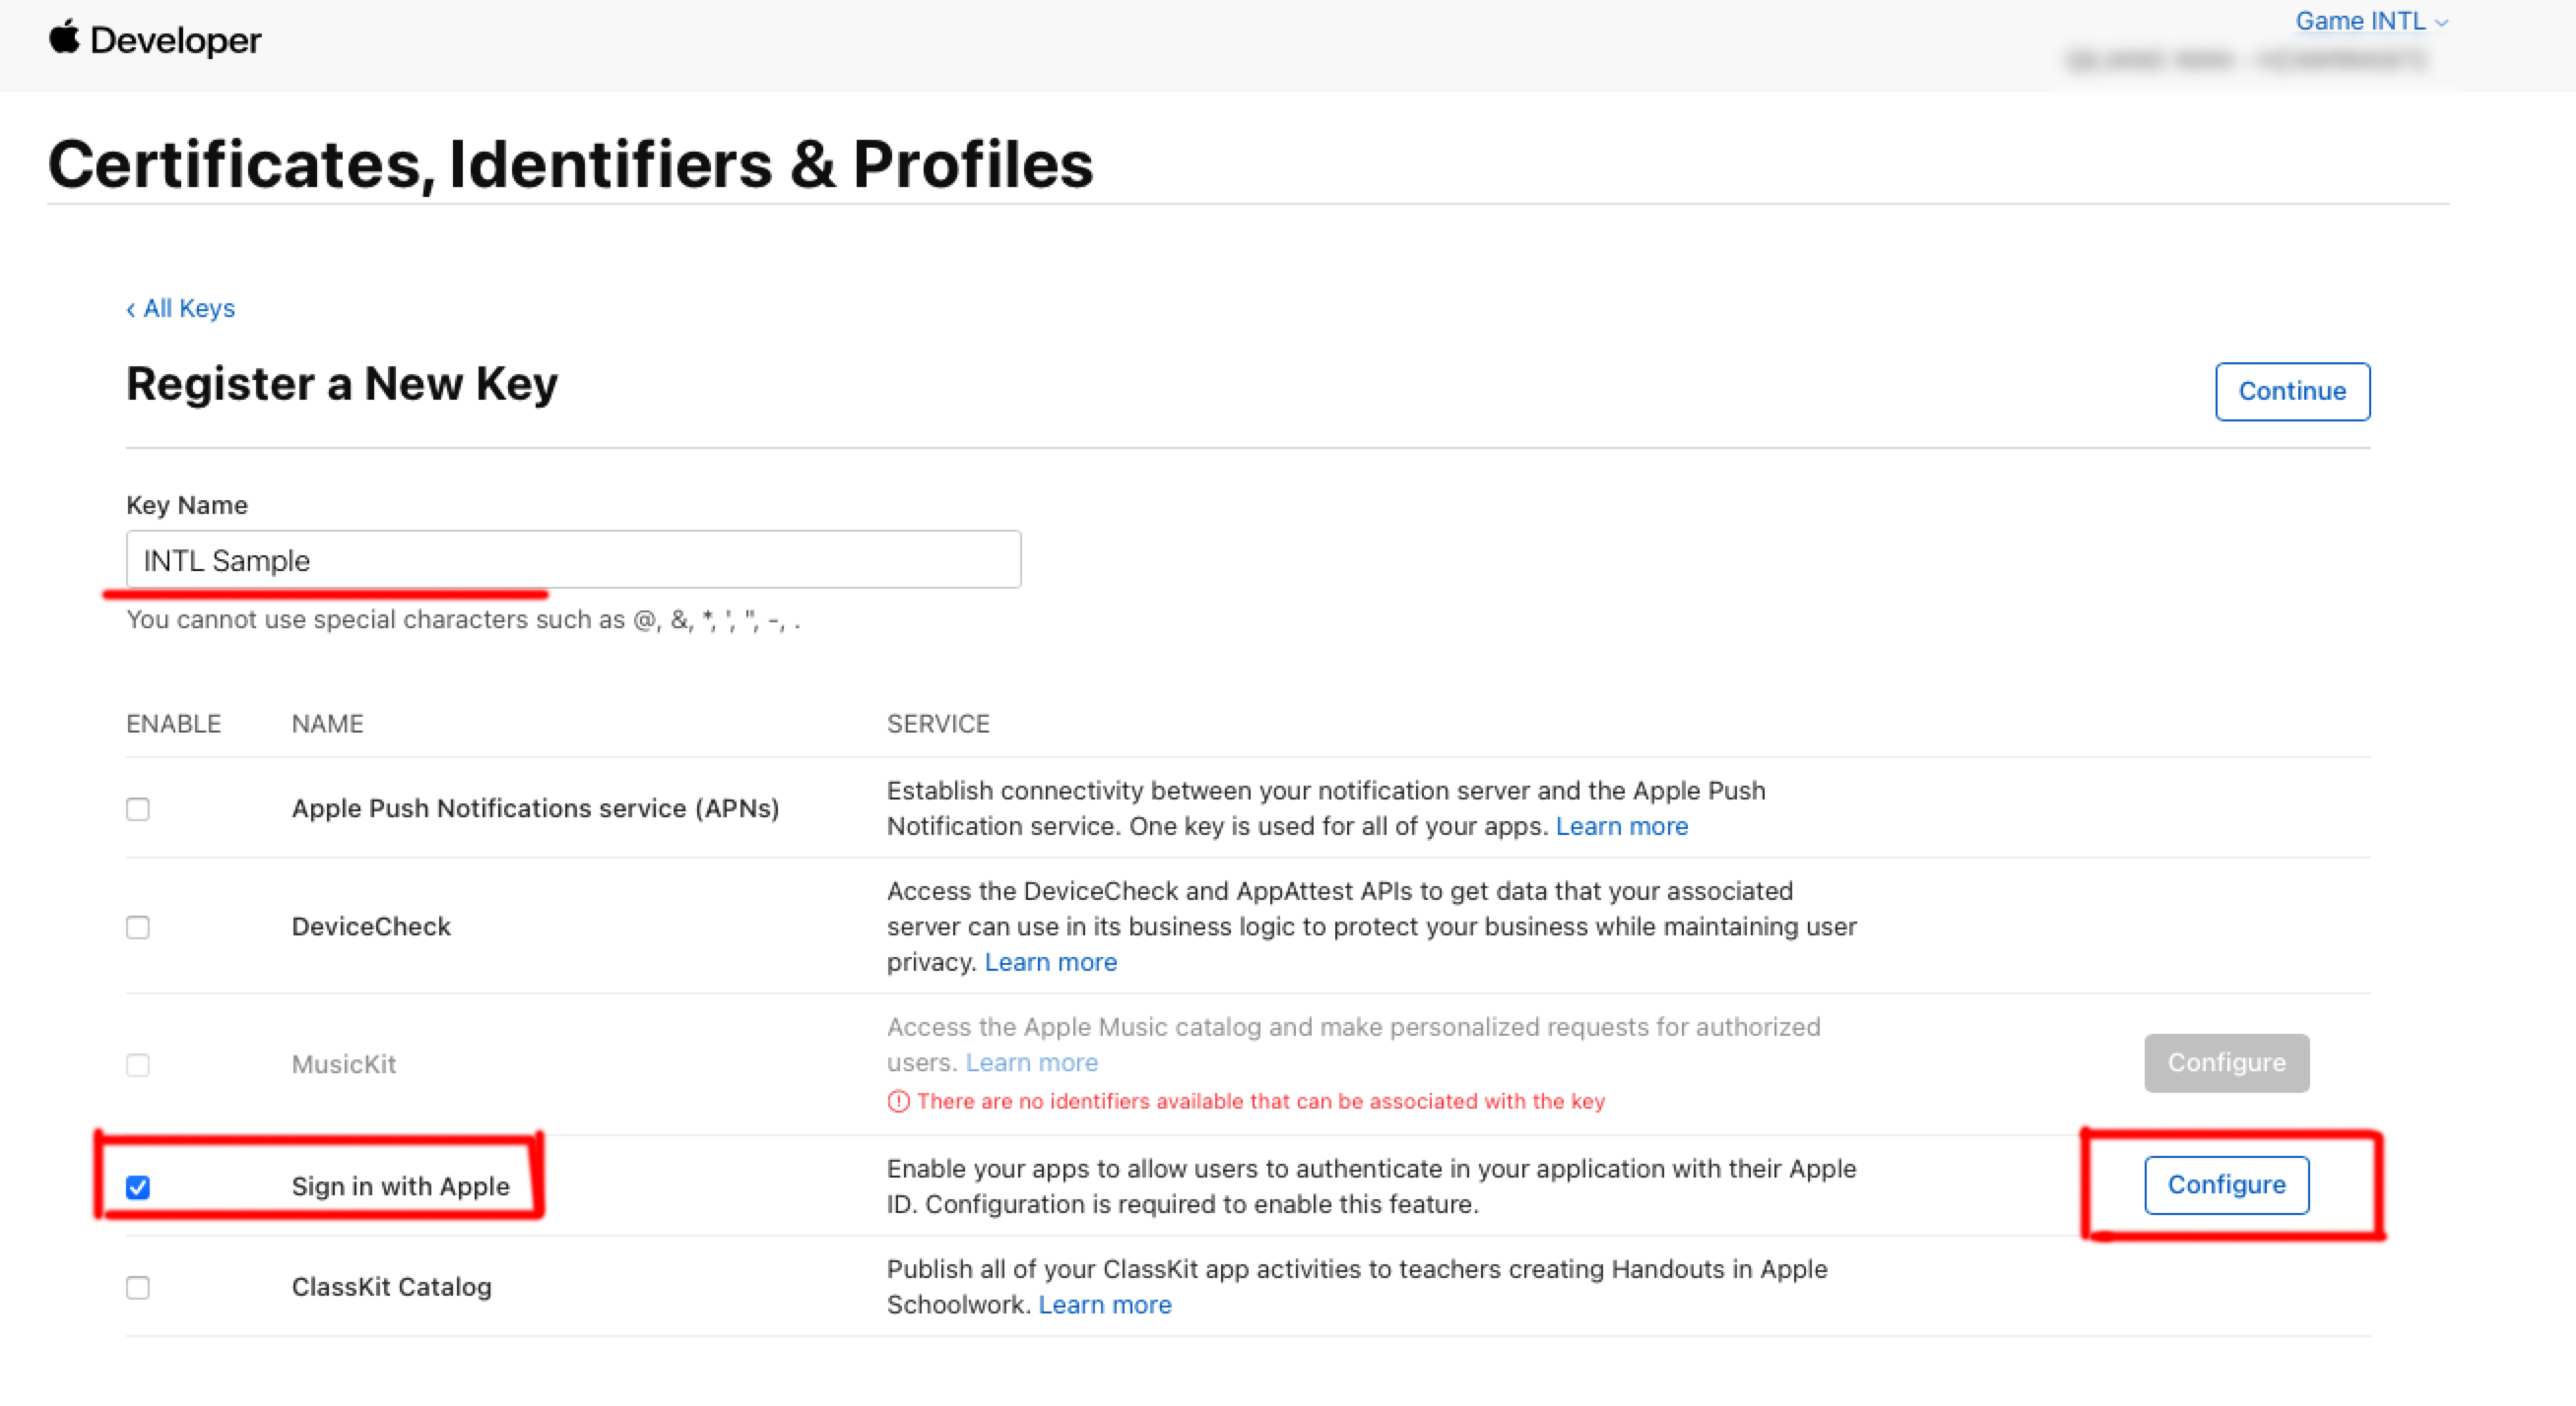
Under Key Name, enter a unique name for the key.
-
Select the checkbox next to Sign in with Apple and then click Configure.
-
Under Primary App ID, choose the App ID created in the previous step, then click Save.
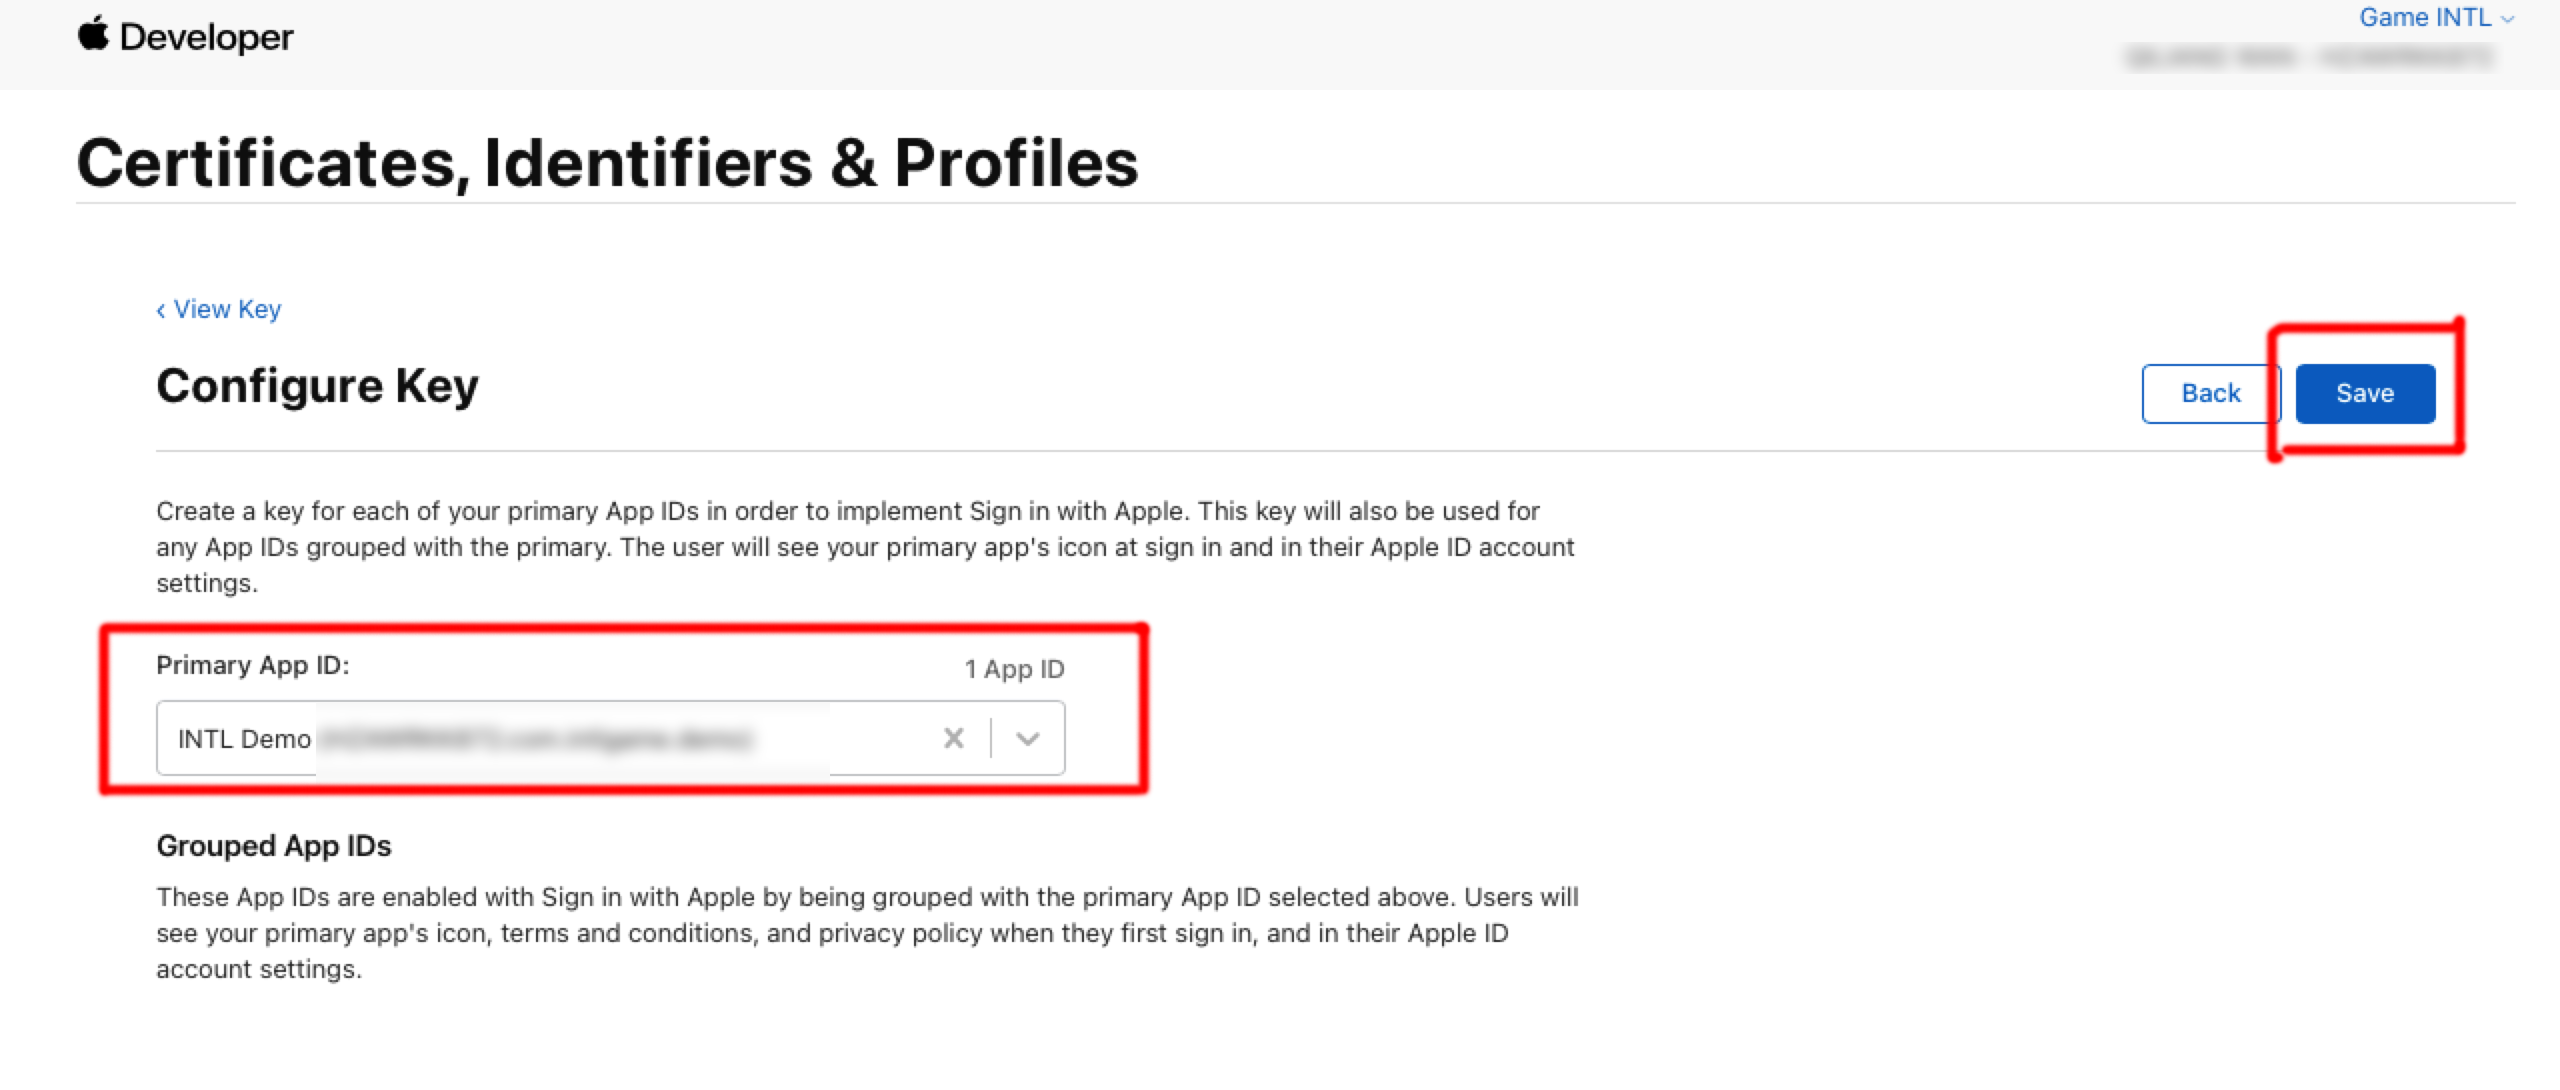
-
Click Continue.
-
Click Register to generate the key and note down the Key ID.
-
Click Download to download the key file ( download only once, do not lose it ). The file is saved as a text file with the .p8 suffix.
3. Create preset development profile
-
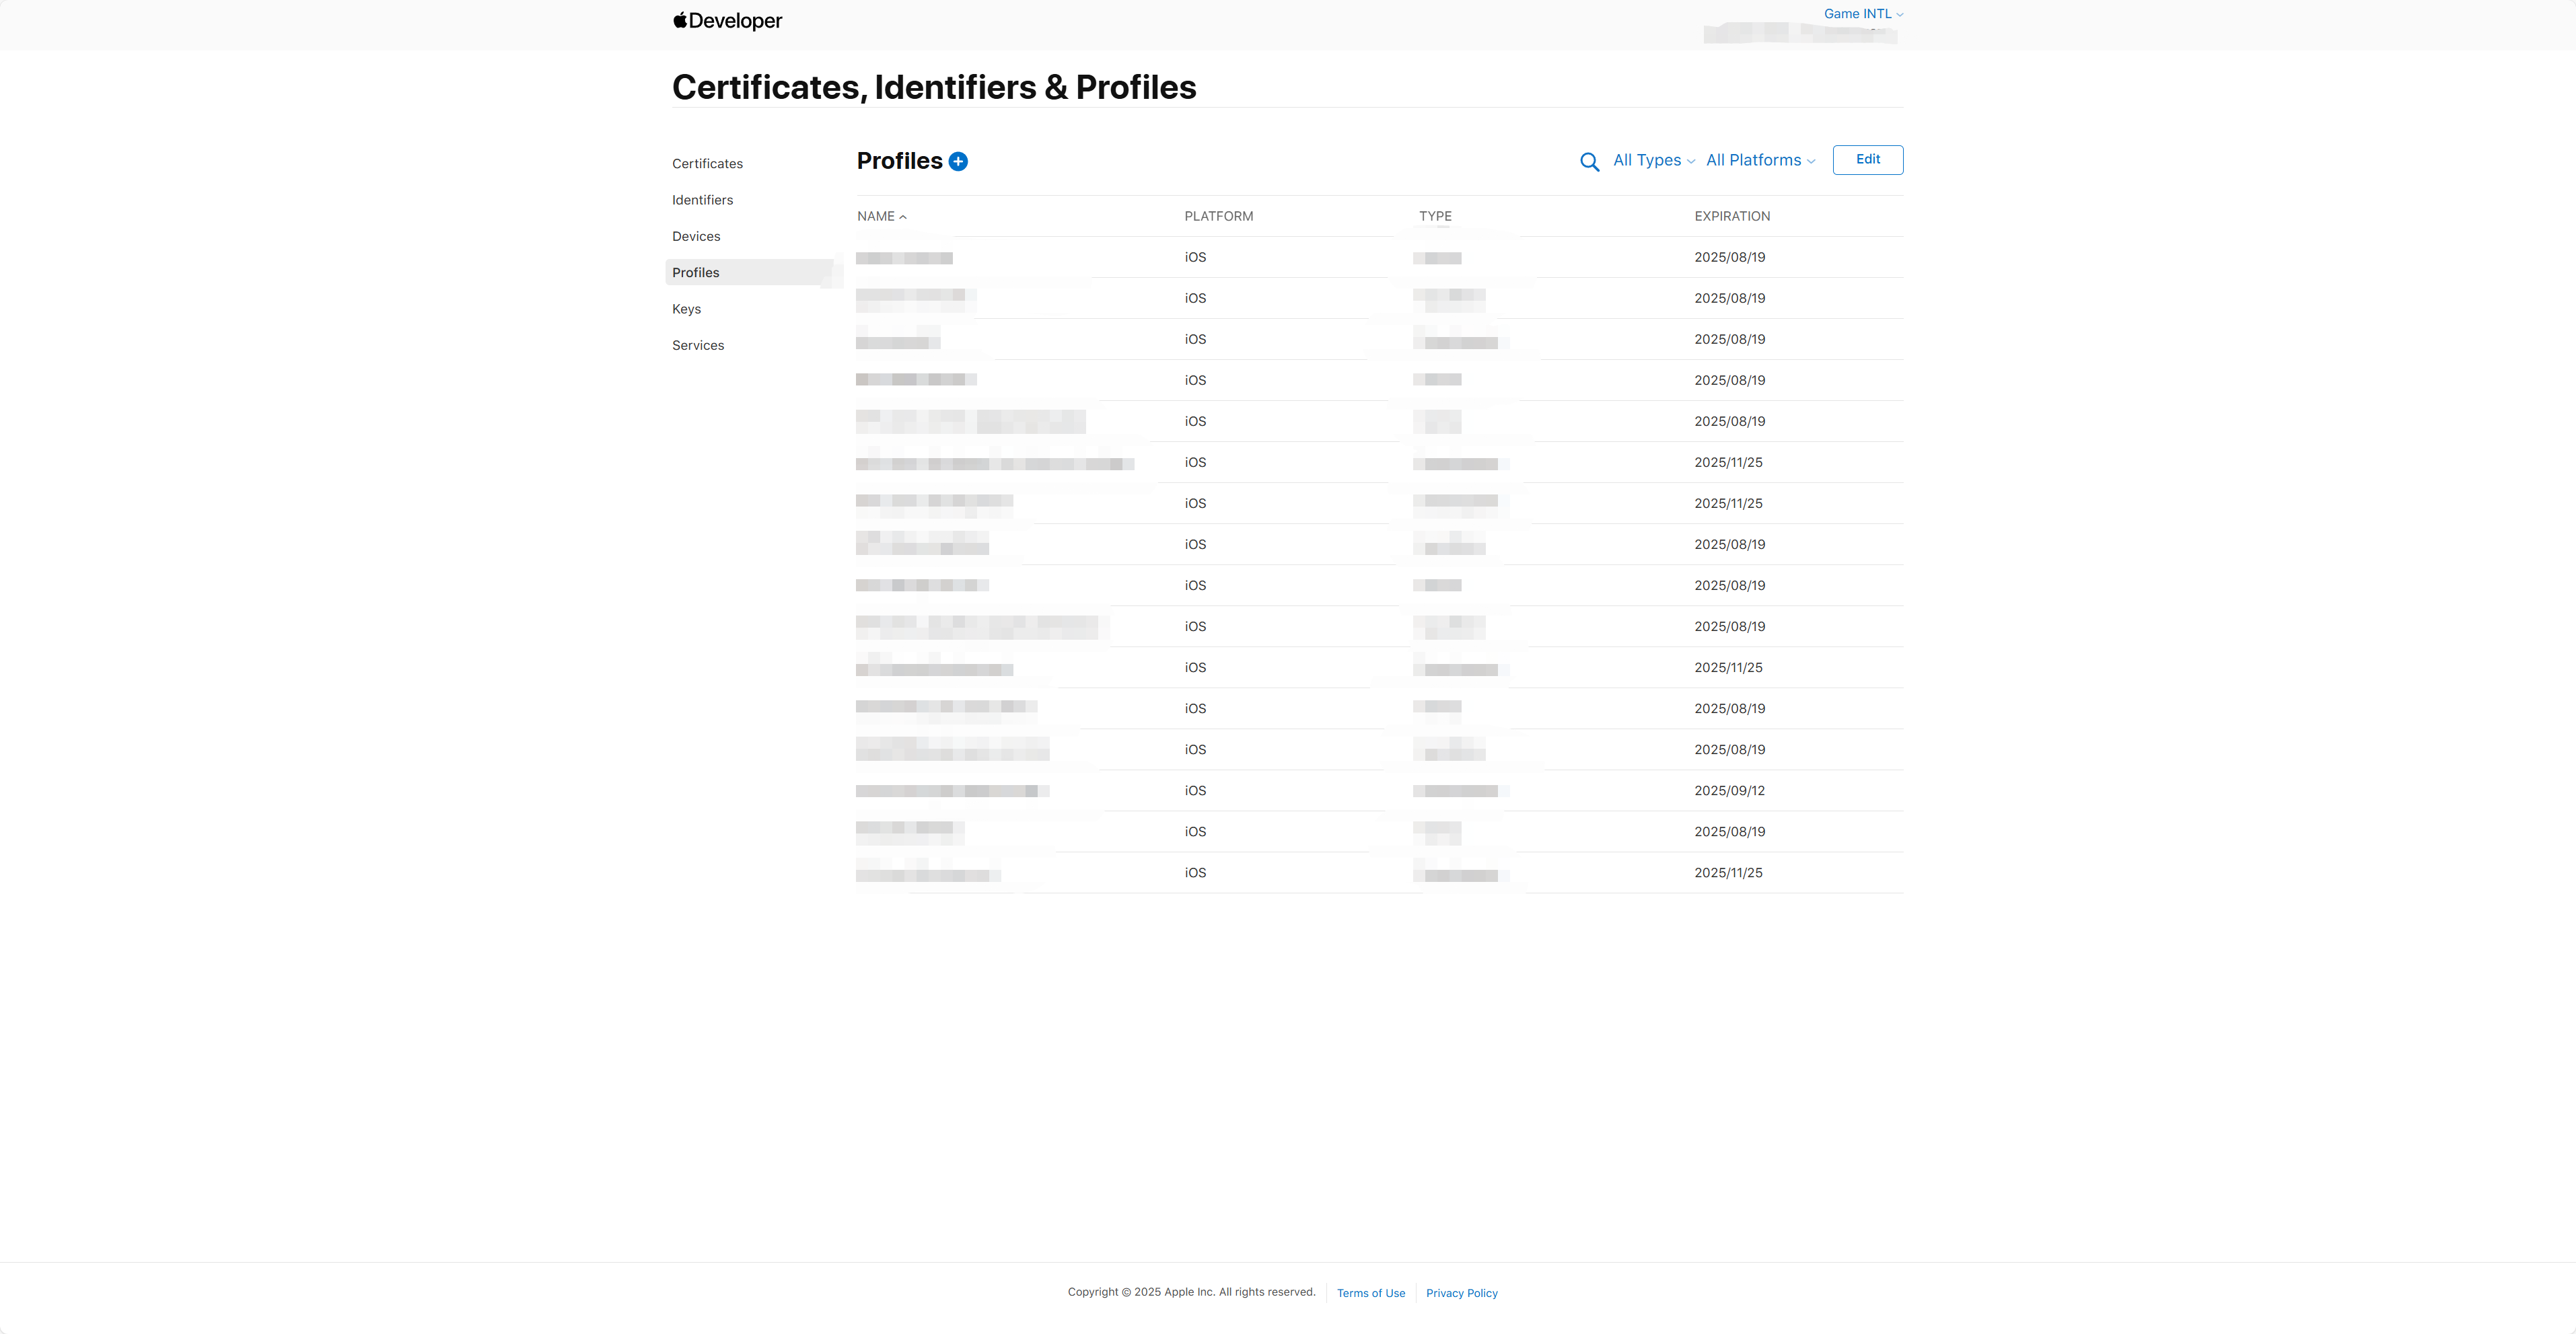
Click Profiles in the Certificates, Identifiers & Profiles sidebar.
Profiles are development profiles. -
Click the blue add icon ( + ).
-
Under Development, choose the type of preset profile you want to create and click Continue.
-
Select the App ID to use for development and click Continue.
-
Choose one or more development certificates and click Continue.
-
Select one or more devices and click Continue.
-
Enter profile name and click Generate.
-
Click Download.
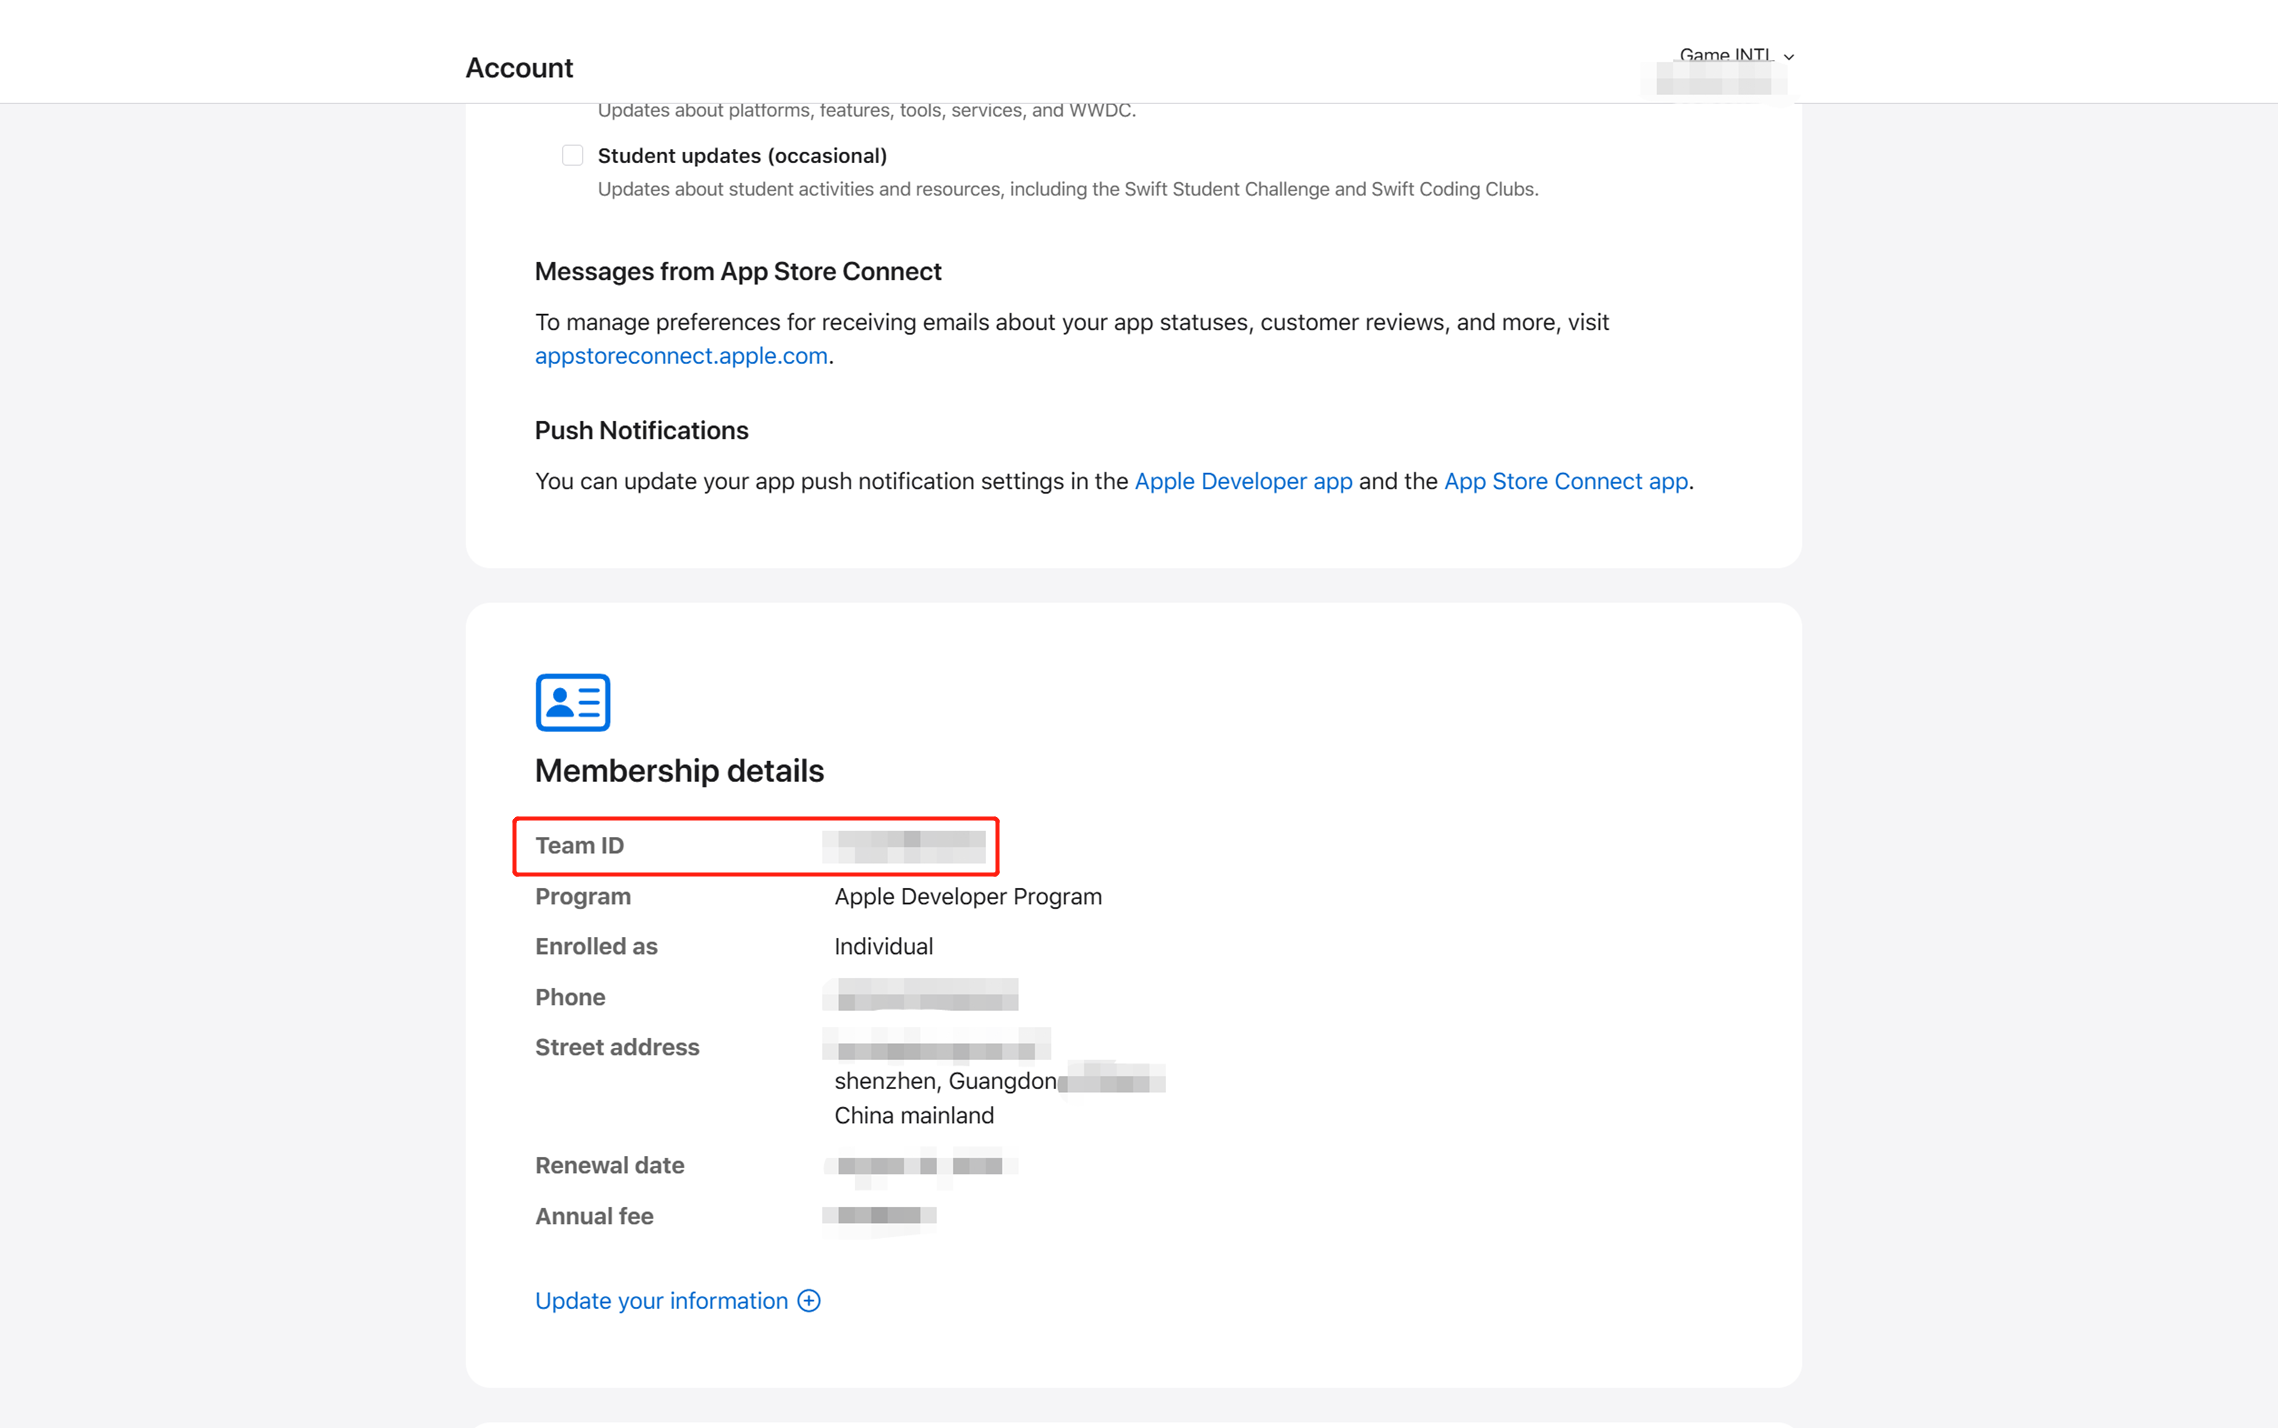
4. Obtain Team ID
-
Log in to Apple Developer.
-
In the top navigation bar of the developer account, click Account, scroll to find Membership details to view Team ID.
For more information about Apple Developer configuration, refer to What the Heck is Sign In with Apple?.
- Obtain your Player Network Console login account.
- Create a new project for your game, or join an existing project.
- Download SDK.
- Integrate SDK.
- Add Apple as a login authentication method in Player Network Console.
Step 1: Configure SDK for Apple login
iOS 12.0 and above
1. Swift SDK Bridging
If the module uses Swift version SDK, this involves the integration of iOS' Swift and Objective-C. Xcode requires a bridging layer to align the class names, etc., of the two languages for compatibility. Follow these steps.
-
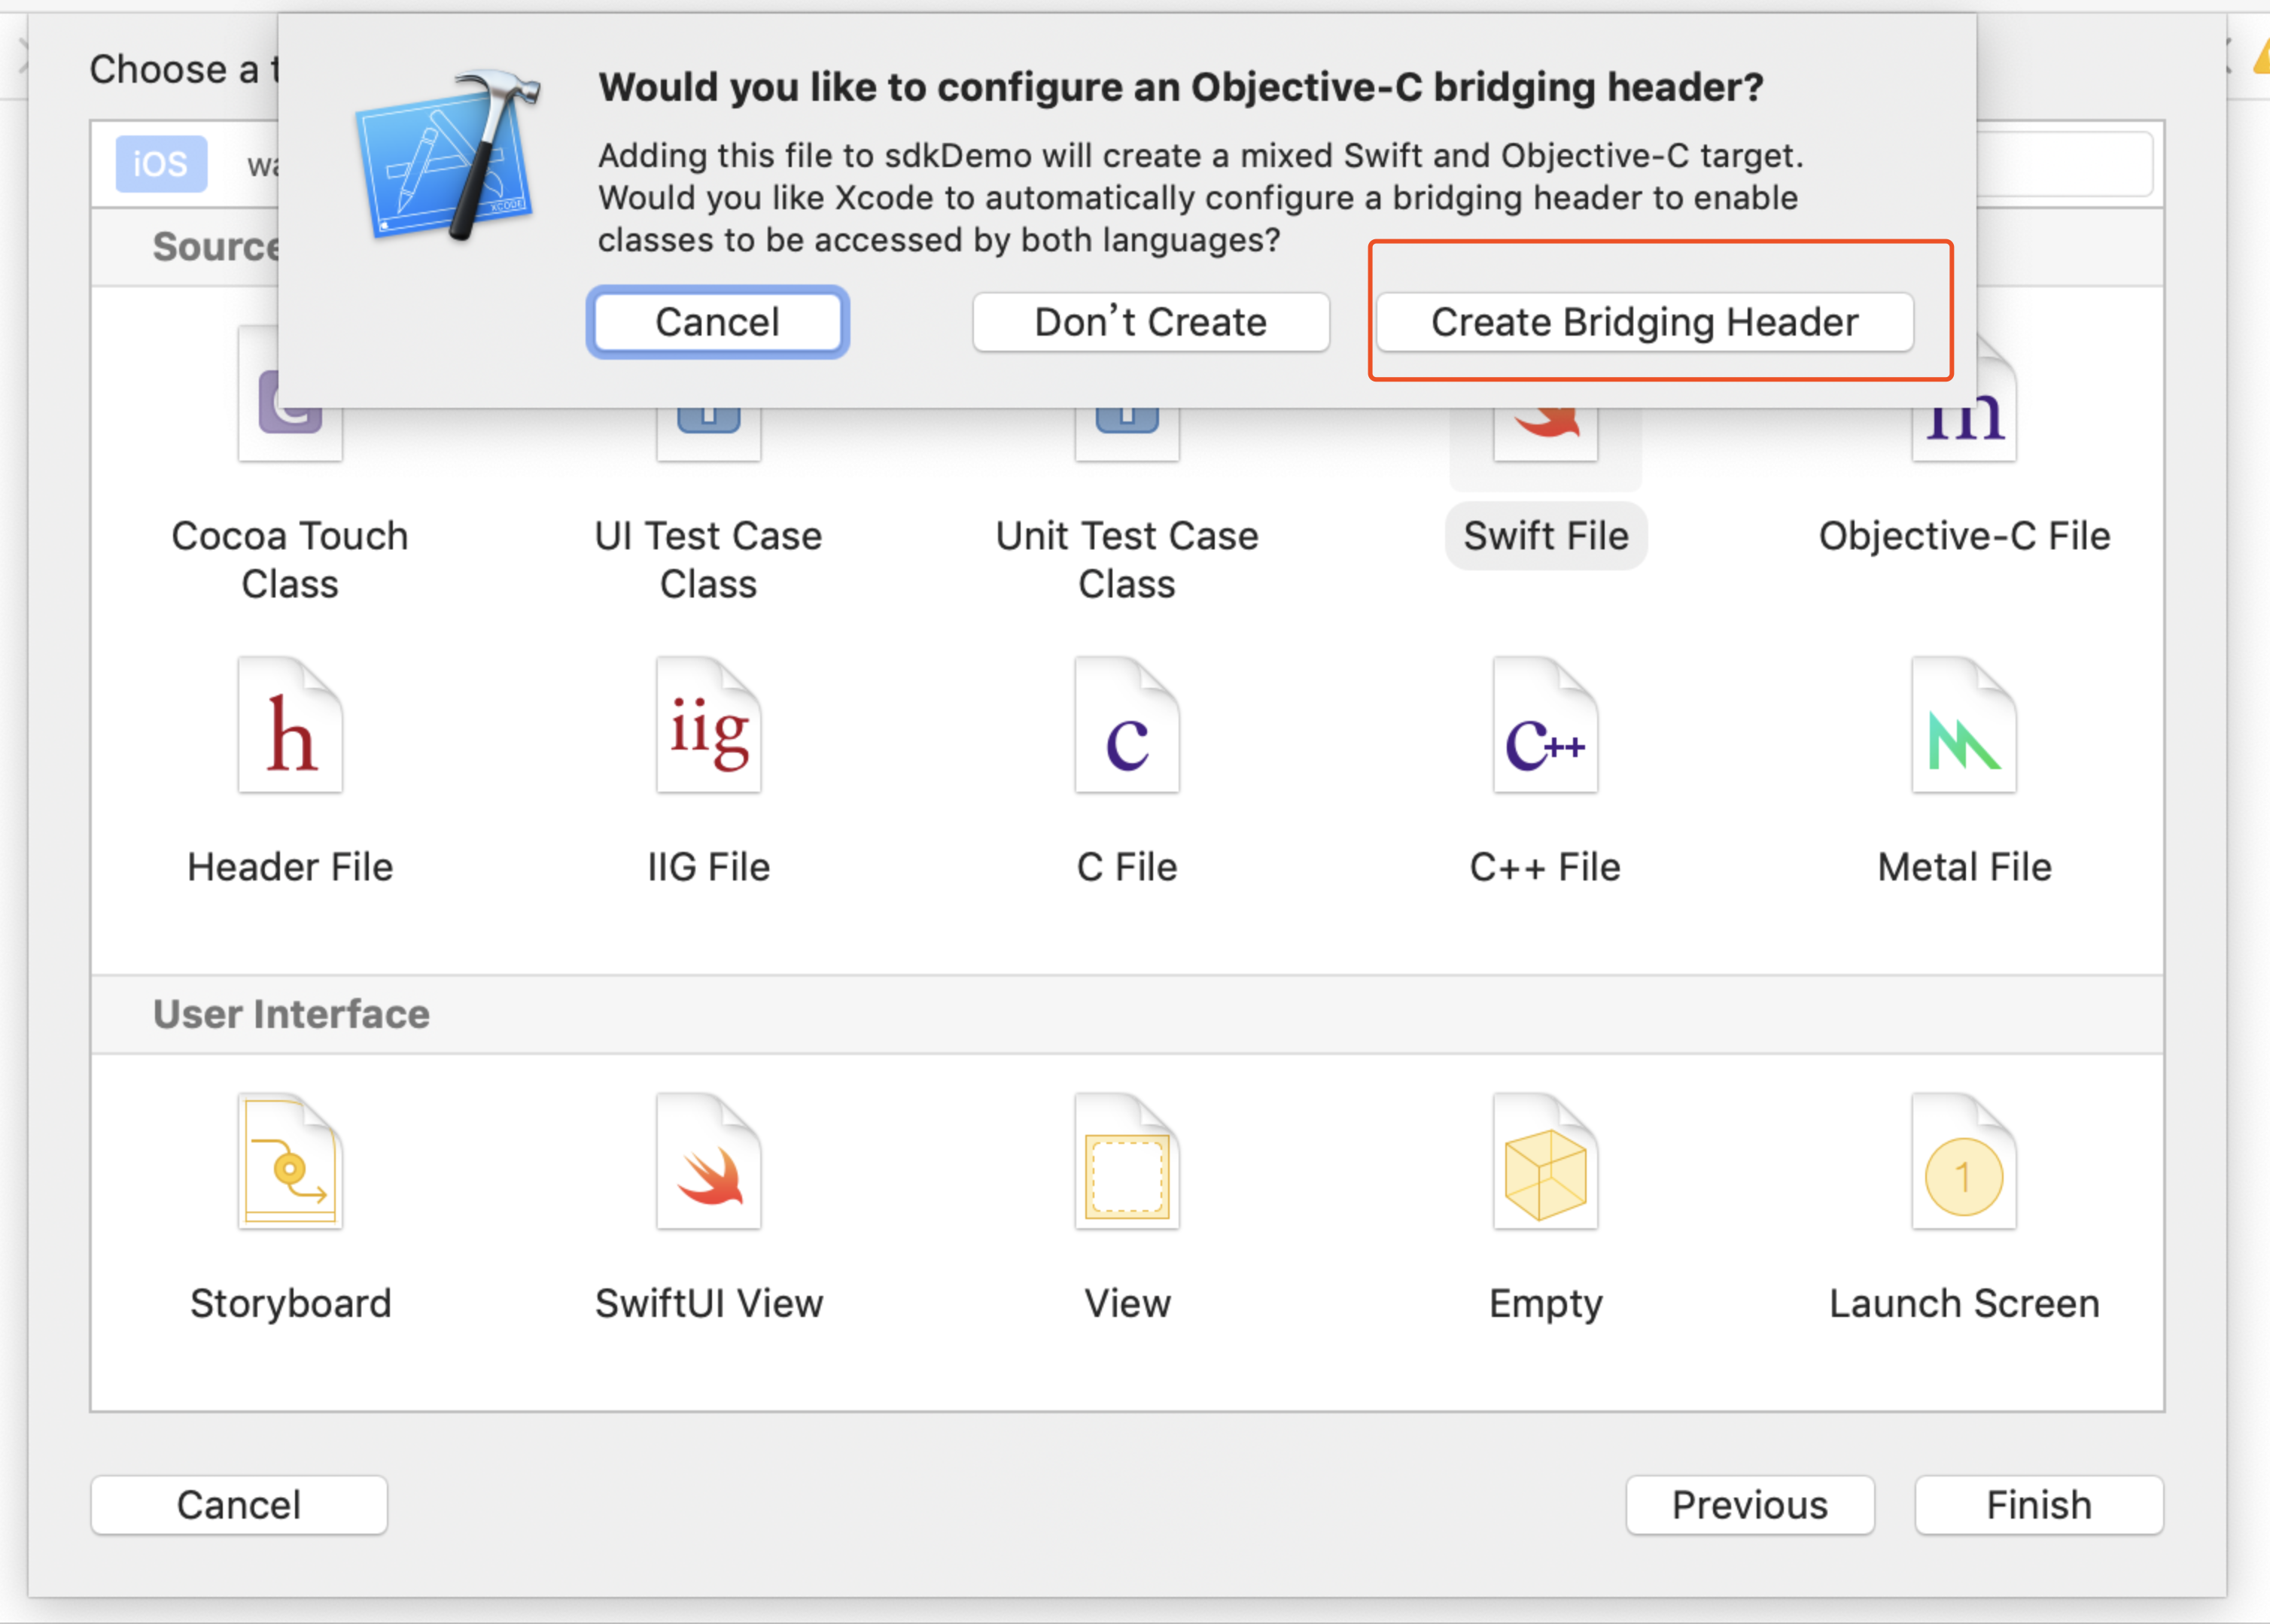
Create a new file, select Swift File type.
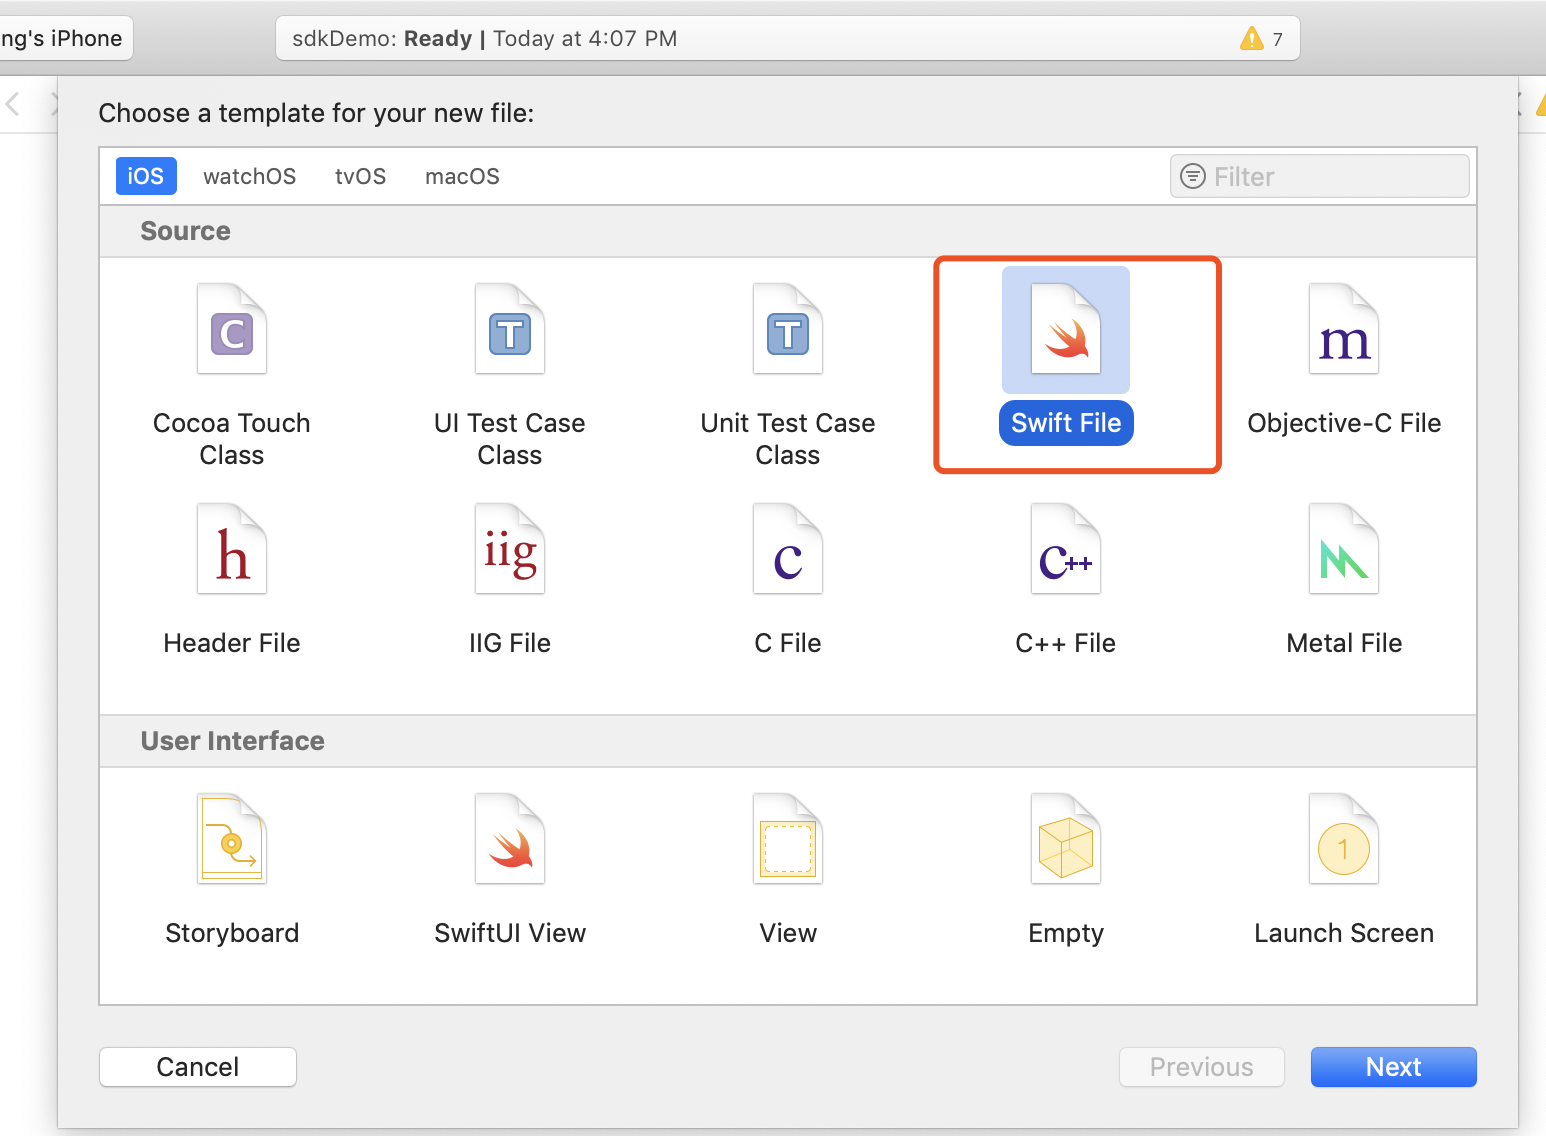
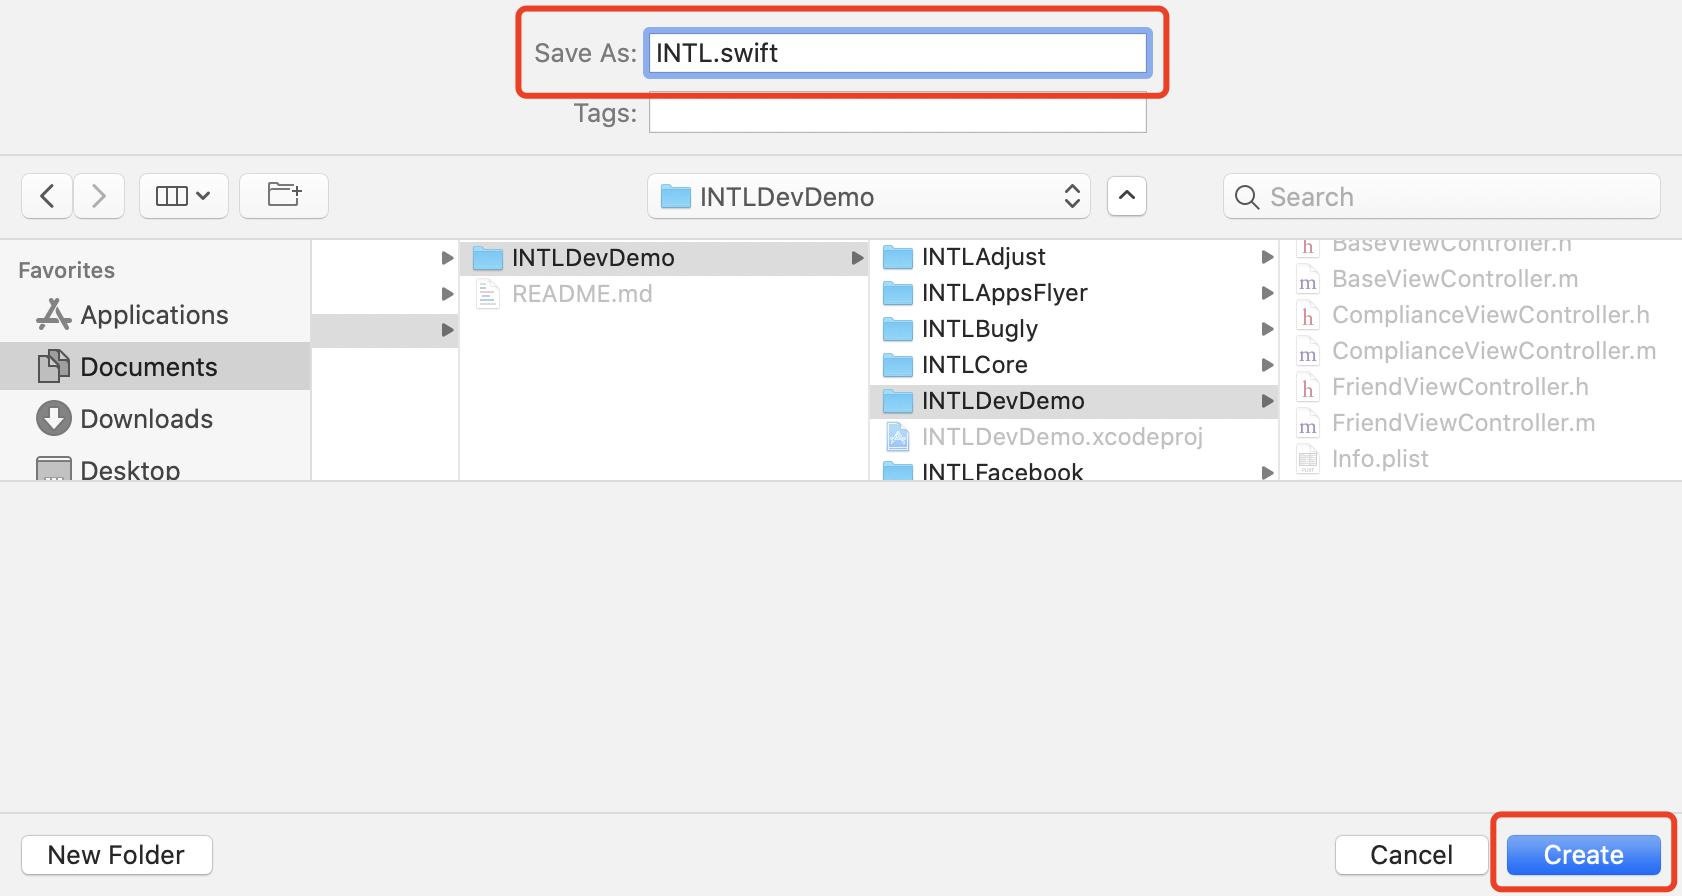
-
Name it according to your needs and ensure the file suffix is .swift, then click Create.
-
Click Create Bridging Header.
Make sure to select Create Bridging Header.Otherwise, Xcode will not create the bridging file.
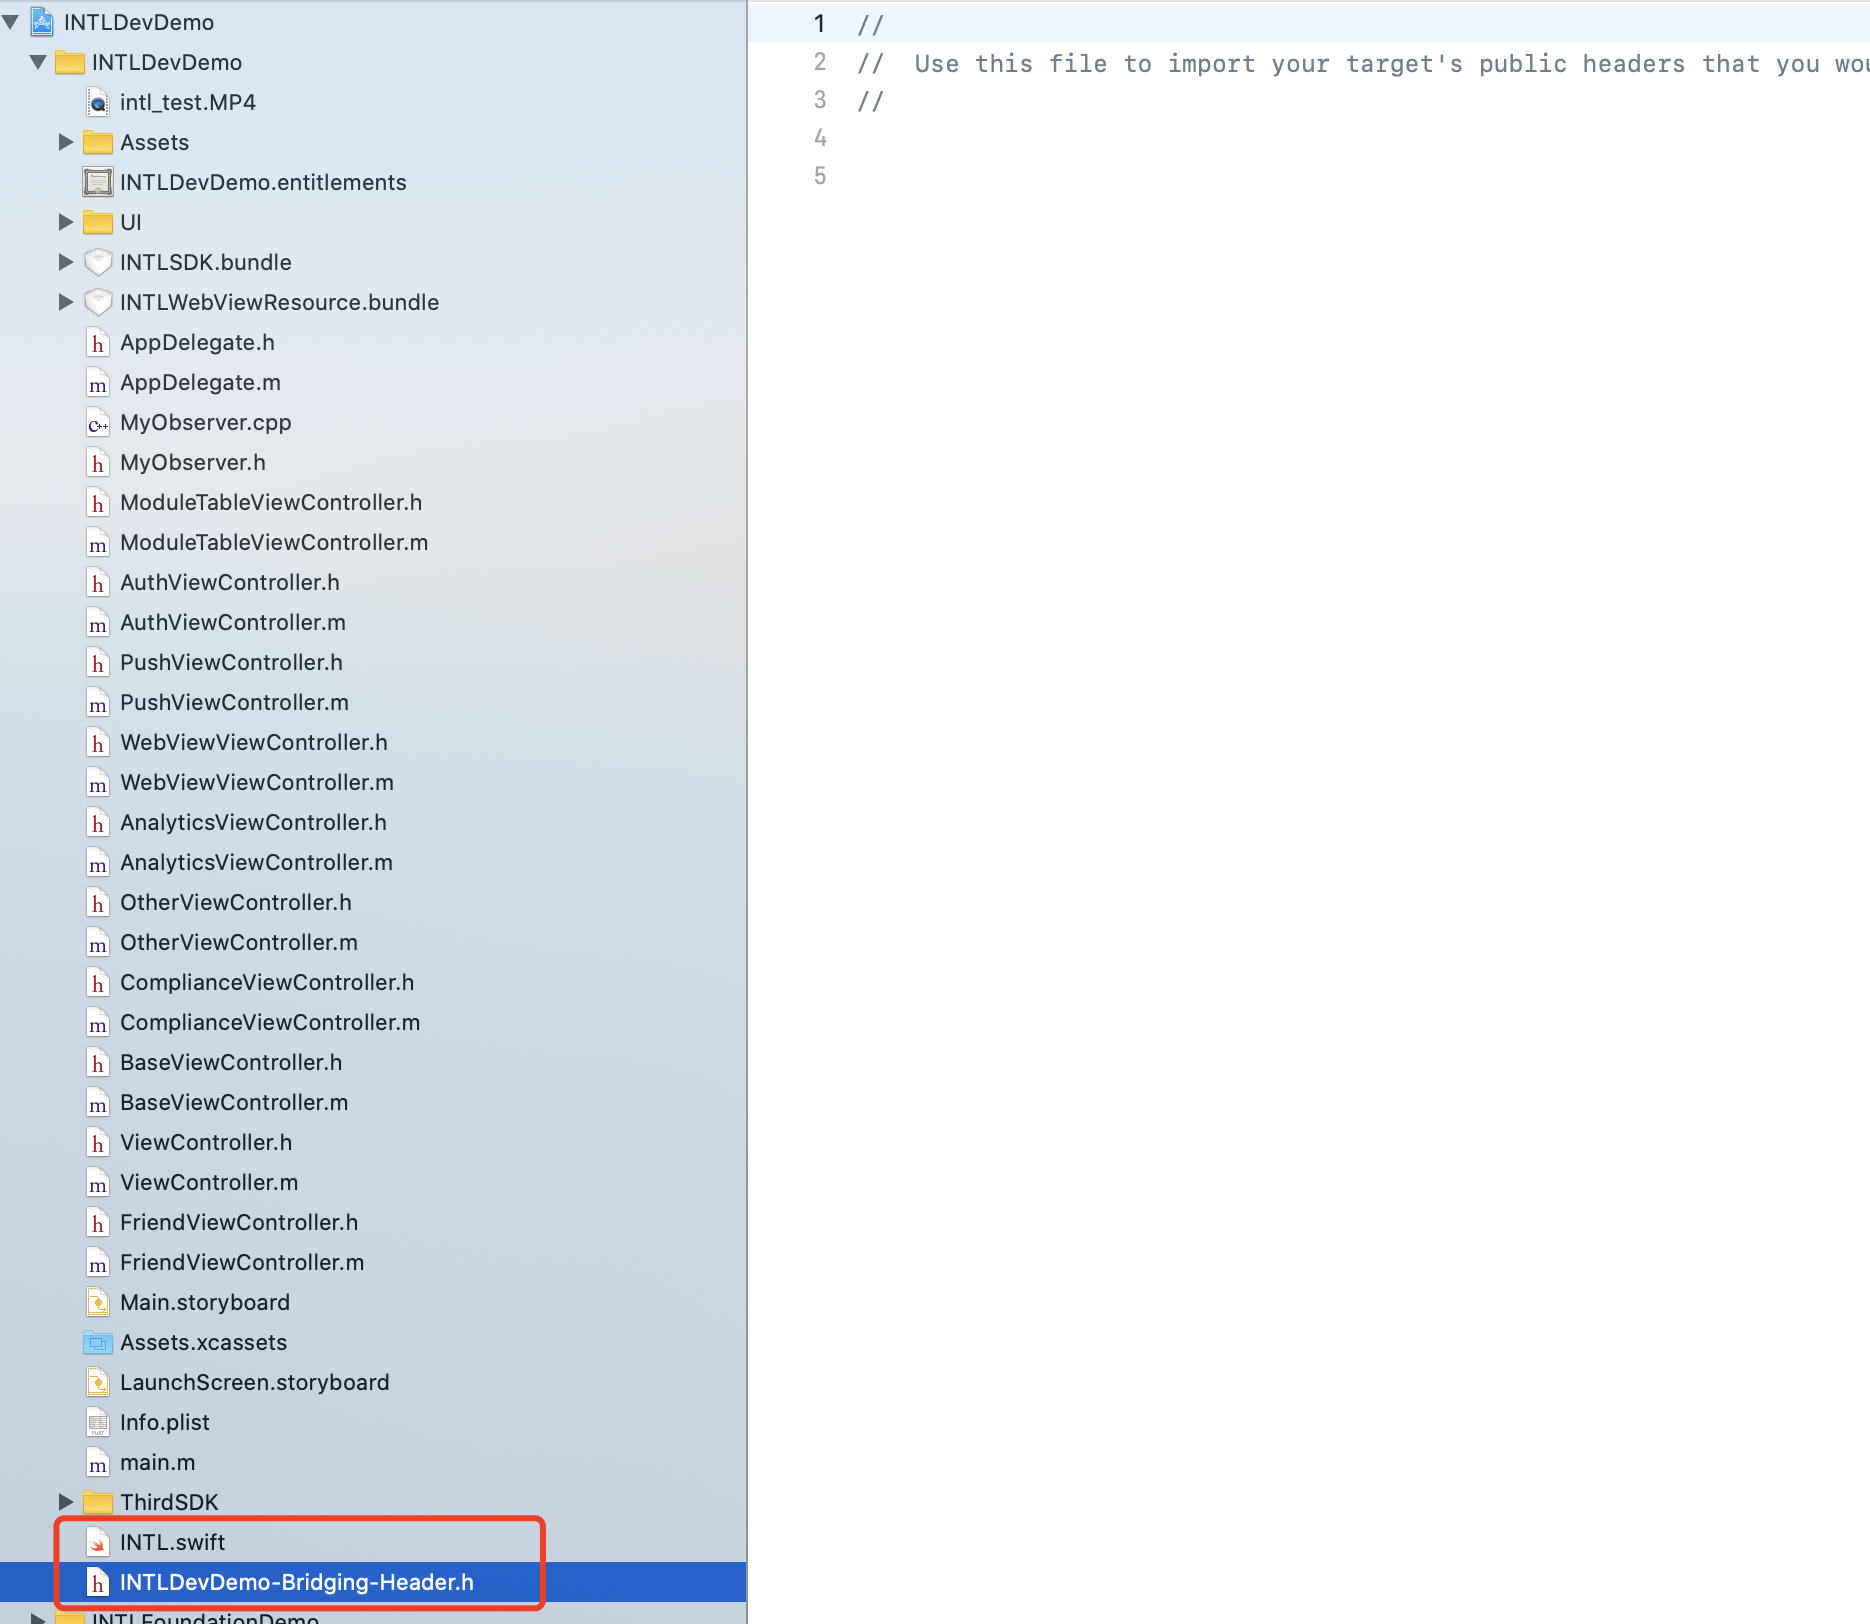
- Ensure two files are created in the Xcode project (one is the .swift file from step two, and the other is the automatically created project_name-Bridging-Header.h file).
No changes needed to file content.
- Unity
- Unreal Engine
Not applicable.
In Unreal Engine, iOS Swift module can't be directly added, engine configuration needs modification.
-
For Xcode 12 and later versions, add the following code in
/Plugins/INTLSDK/Source/INTLCore/INTLCore.Build.cs.PublicSystemLibraryPaths.Add("/Applications/Xcode.app/Contents/Developer/Toolchains/XcodeDefault.xctoolchain/usr/lib/swift/iphoneos");
PublicSystemLibraryPaths.Add("/Applications/Xcode.app/Contents/Developer/Toolchains/XcodeDefault.xctoolchain/usr/lib/swift-5.0/iphoneos");
This step can be omitted when using other versions of Xcode since the Player Network SDK has already configured it.
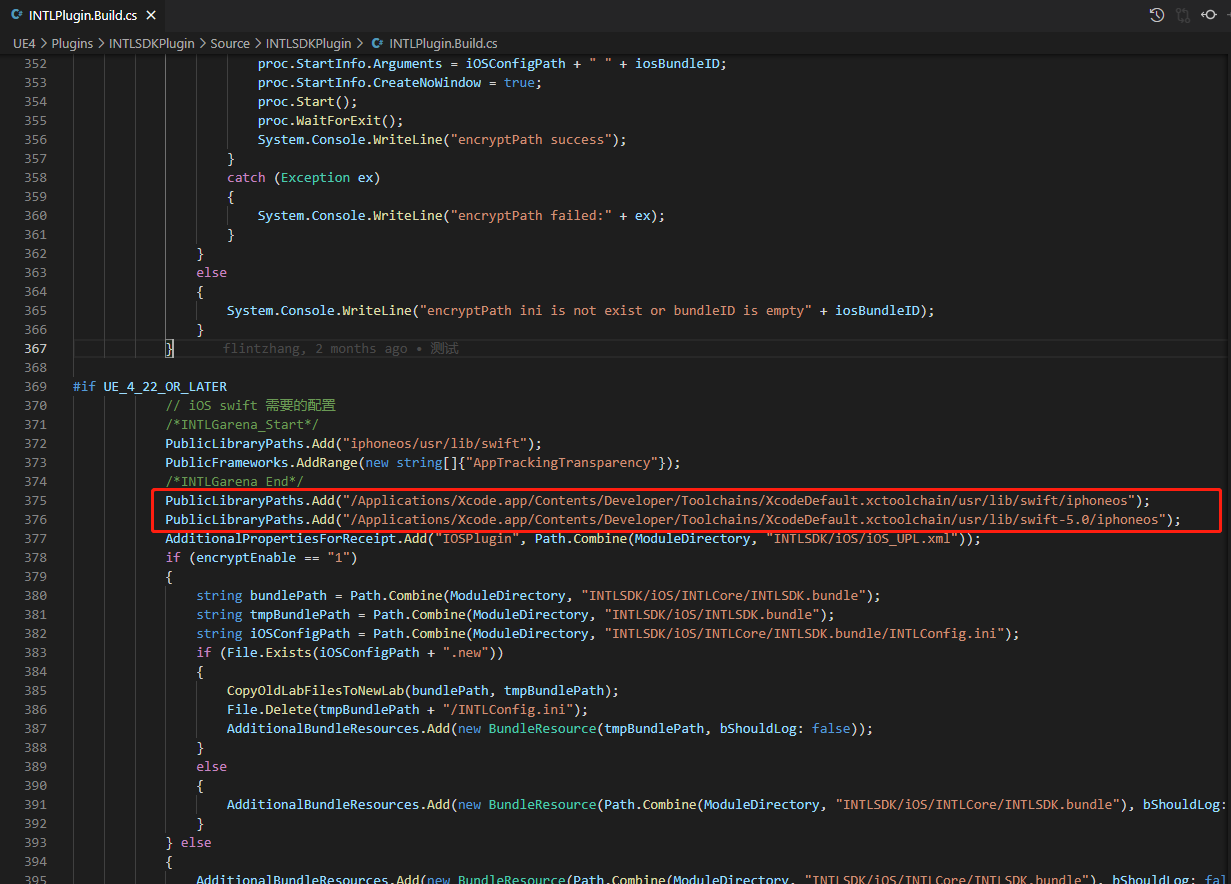
Since using Swift lib from Xcode 12 and later versions will result in compilation errors in Unreal Engine, only perform this step for Xcode 12 and later versions.

-
Modify the local source code of Unreal Engine.
In /Your_UE_Installation_Path/Engine/Source/Programs/UnrealBuildTool/ProjectFiles/Xcode/XcodeProject.cs, add the following code in the
private void AppendProjectBuildConfiguration(StringBuilder Content, string ConfigName, string ConfigGuid)function.// Enable Swift
Content.Append("\t\t\t\tCLANG_ENABLE_MODULES = YES;" + ProjectFileGenerator.NewLine);
Content.Append("\t\t\t\tSWIFT_VERSION = 5.0;" + ProjectFileGenerator.NewLine);
Content.Append("\t\t\t\tLIBRARY_SEARCH_PATHS = \"$(TOOLCHAIN_DIR)/usr/lib/swift/$(PLATFORM_NAME)\";" + ProjectFileGenerator.NewLine);
if (ConfigName == "Debug")
{
Content.Append("\t\t\t\tSWIFT_OPTIMIZATION_LEVEL = \"-Onone\";" + ProjectFileGenerator.NewLine);
}
Content.Append("\t\t\t\tALWAYS_EMBED_SWIFT_STANDARD_LIBRARIES = YES;" + ProjectFileGenerator.NewLine);
Content.Append("\t\t\t\tEMBEDDED_CONTENT_CONTAINS_SWIFT = YES;" + ProjectFileGenerator.NewLine);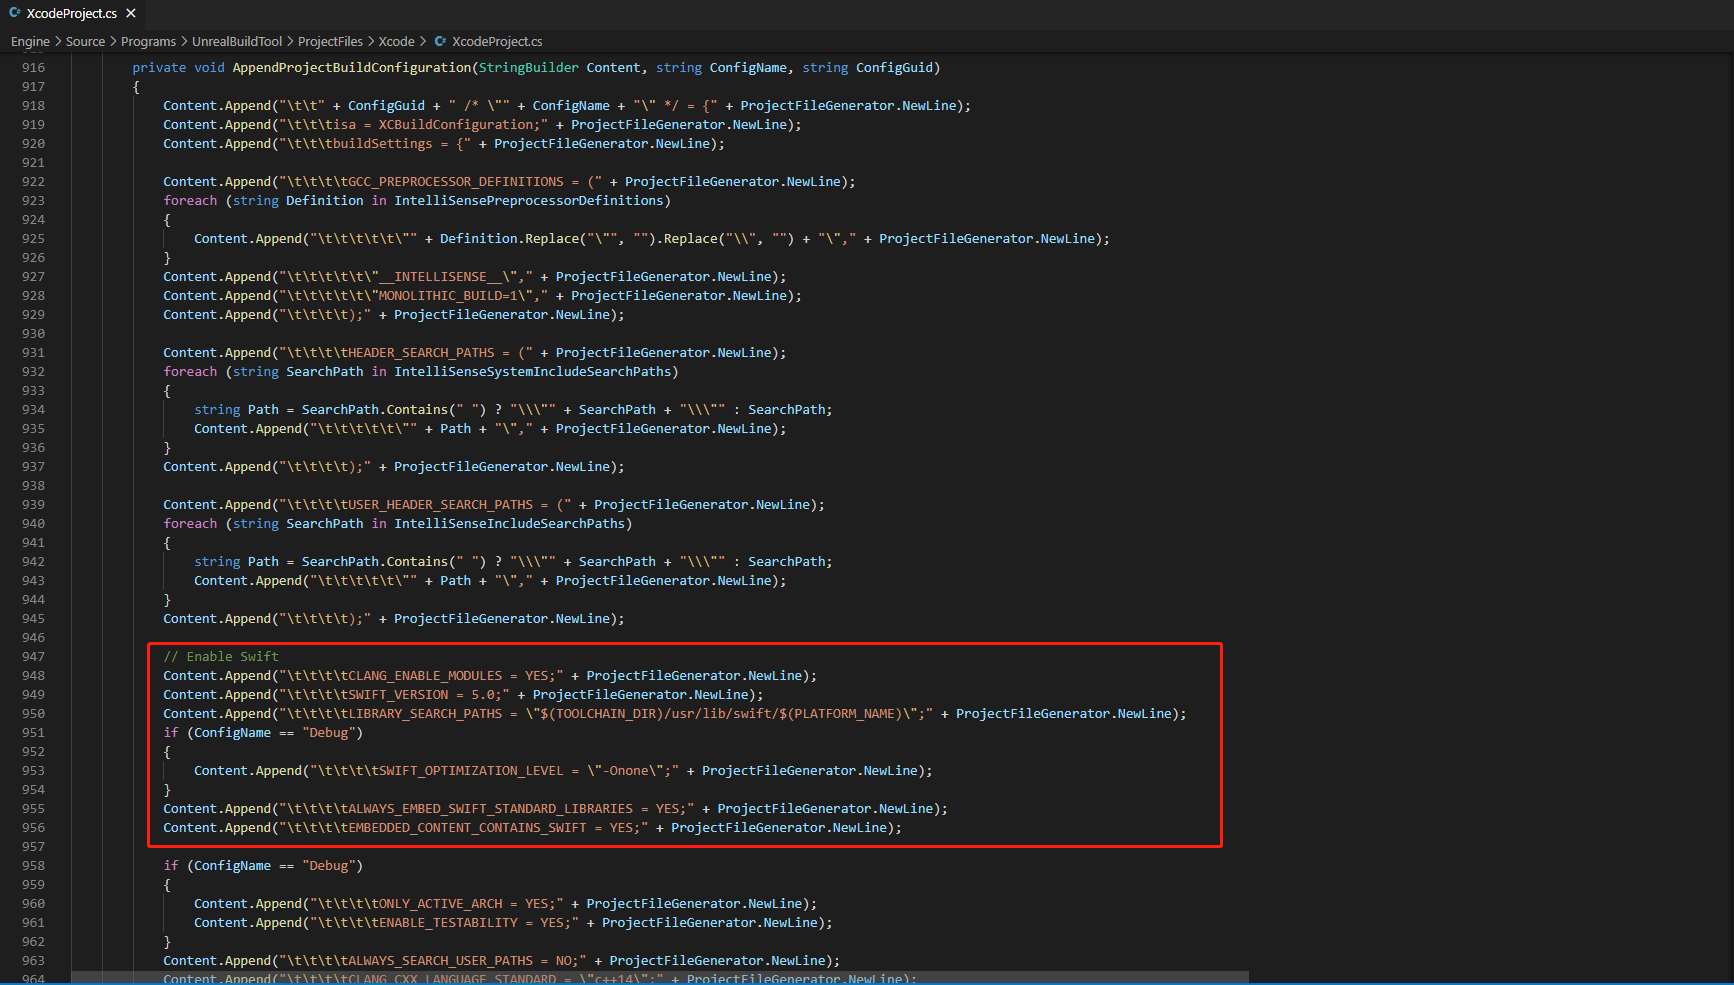
-
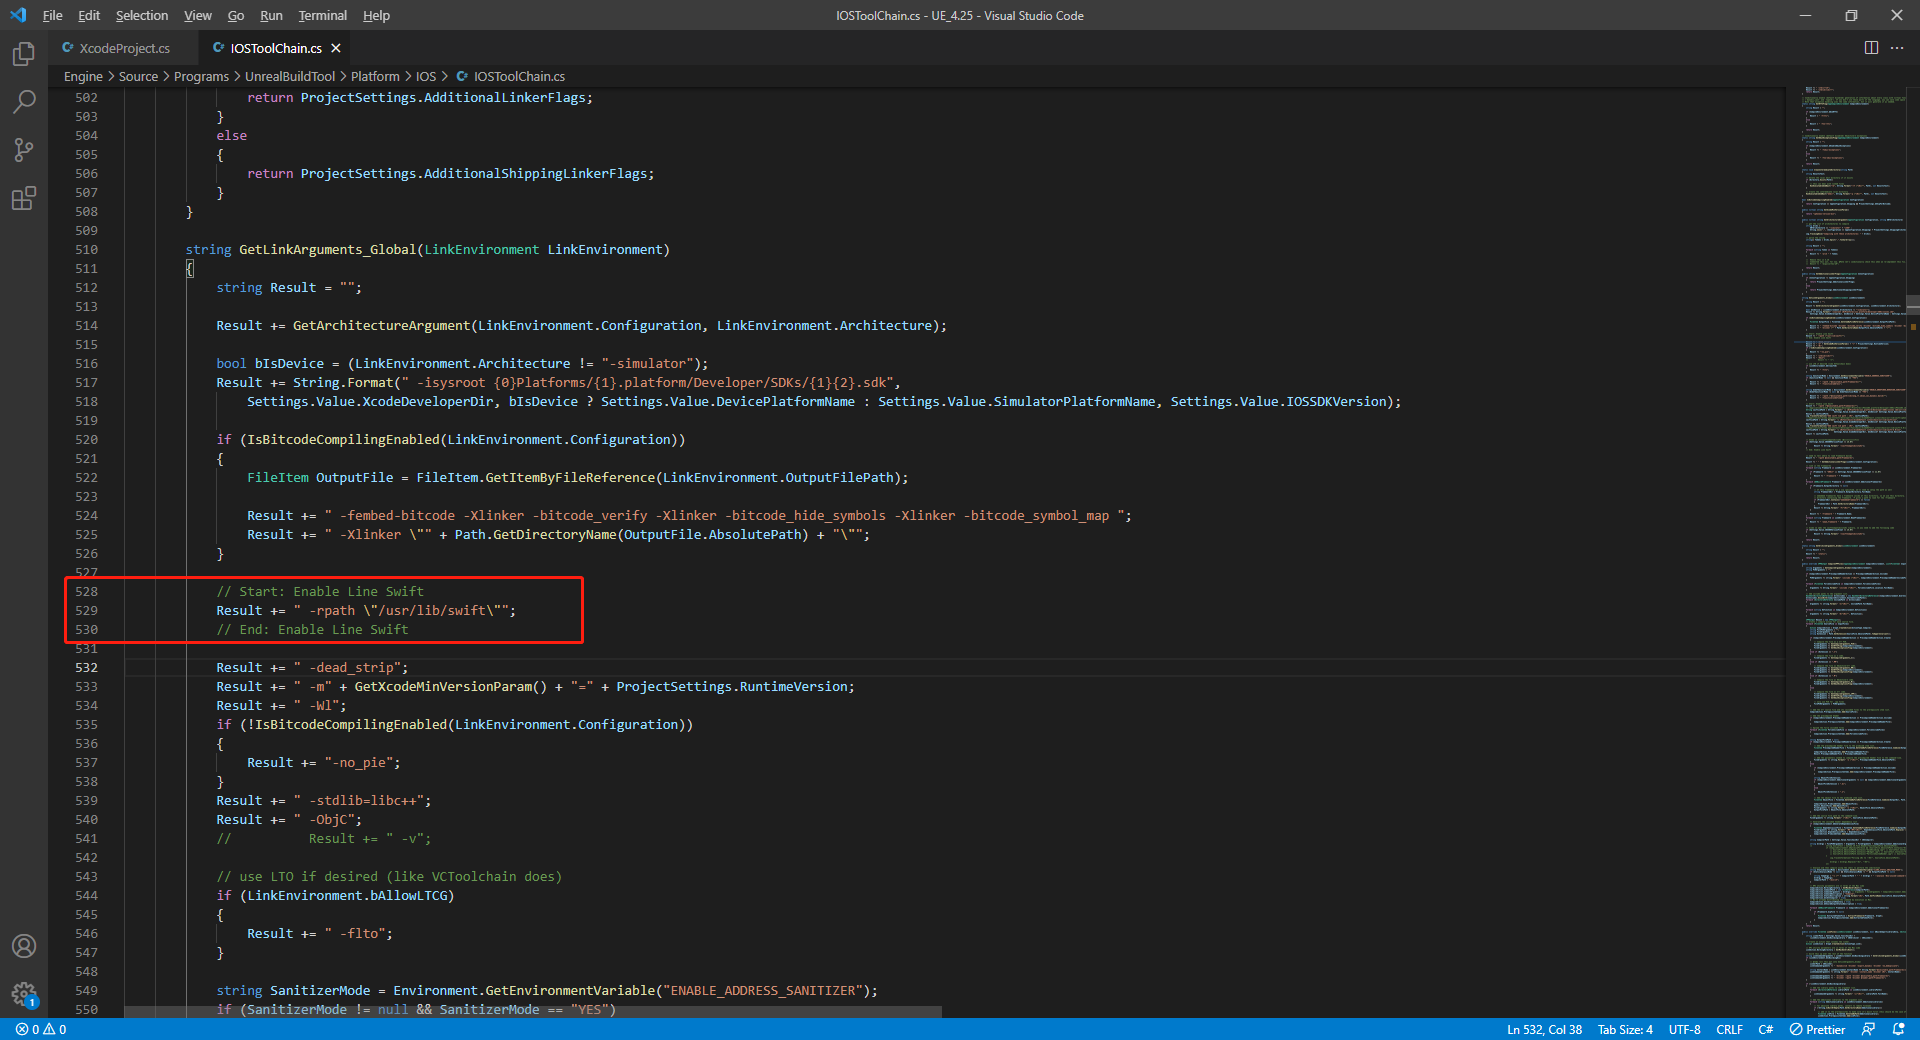
In /Your_UE_Installation_Path/Engine/Source/Programs/UnrealBuildTool/Platform/IOS/IOSToolChain.cs, add the following code in the
string GetLinkArguments_Global(LinkEnvironment LinkEnvironment)function.
- Before XCode 12
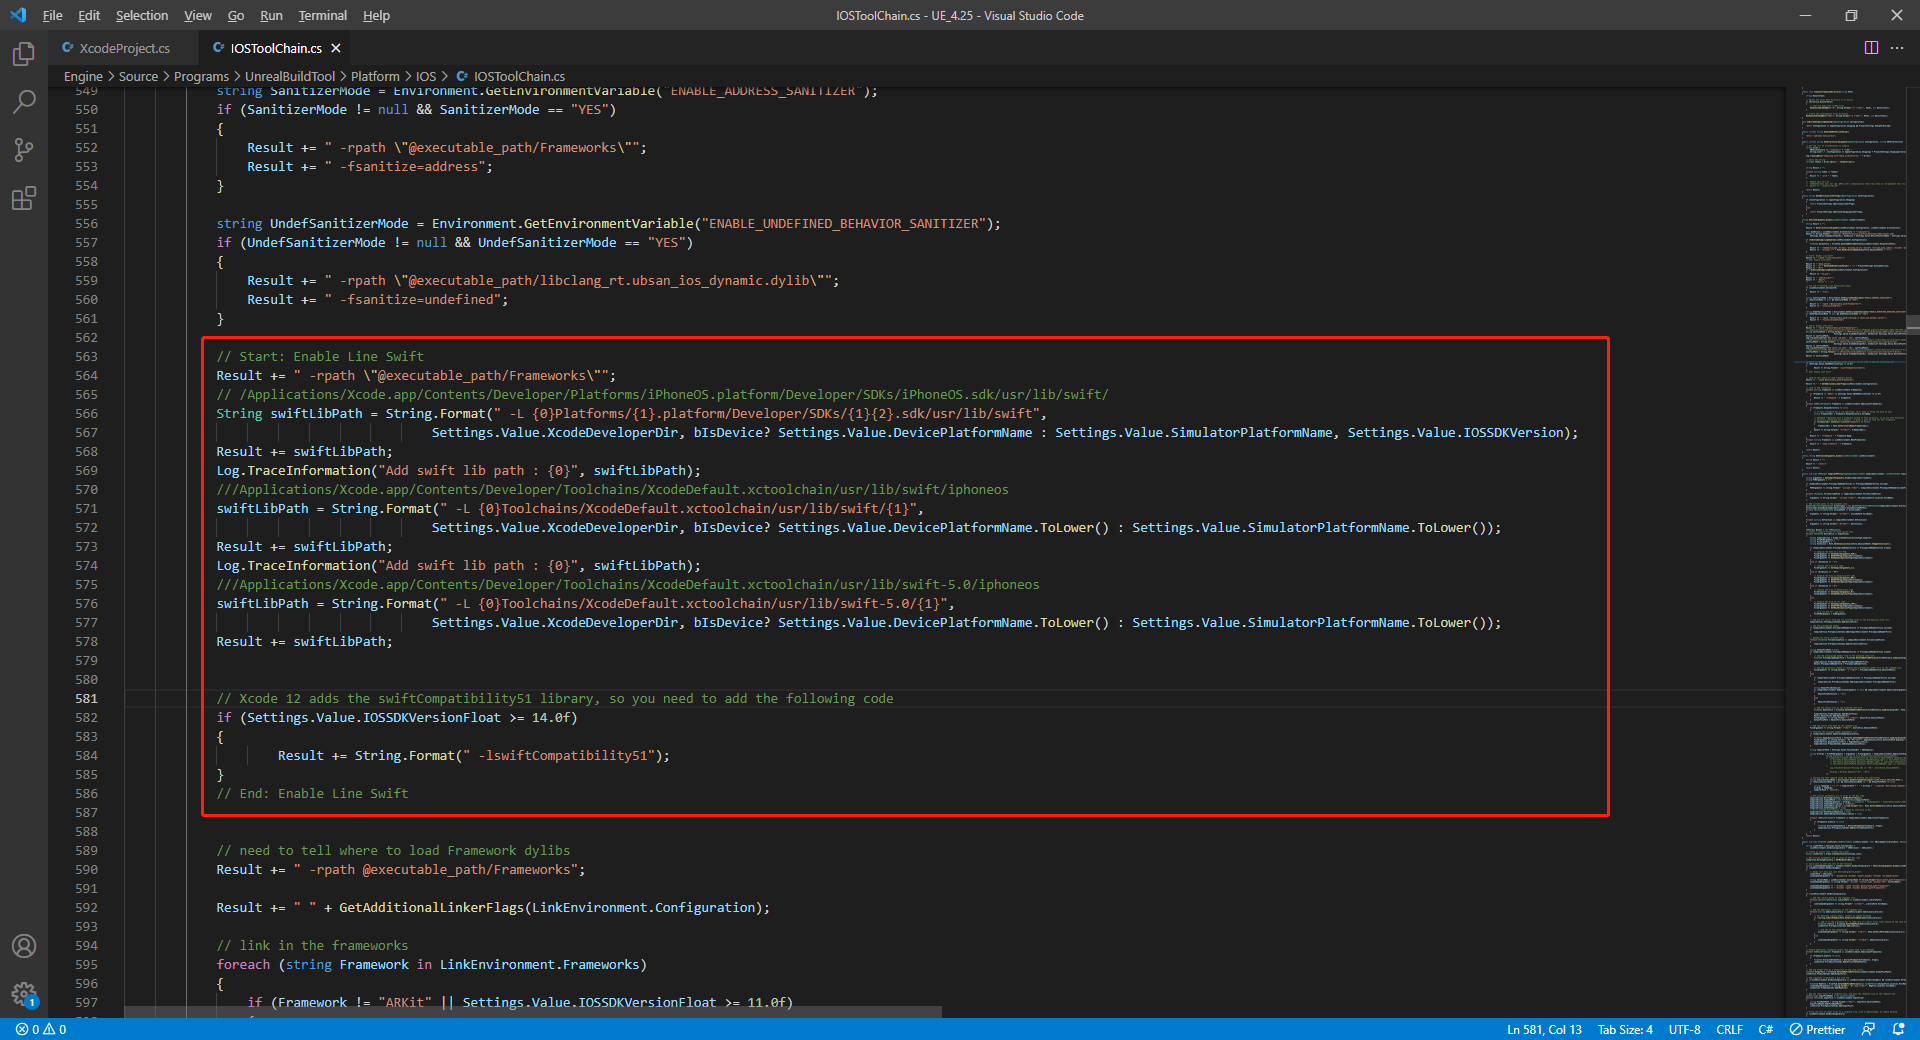
- XCode 12 and later
// enable swift support
Result += " -rpath \"/usr/lib/swift\"";
Result += " -rpath \"@executable_path/Frameworks\"";
// /Applications/Xcode.app/Contents/Developer/Platforms/iPhoneOS.platform/Developer/SDKs/iPhoneOS.sdk/usr/lib/swift/
String swiftLibPath = String.Format(" -L {0}Platforms/{1}.platform/Developer/SDKs/{1}{2}.sdk/usr/lib/swift",
                            Settings.Value.XcodeDeveloperDir, bIsDevice? Settings.Value.DevicePlatformName : Settings.Value.SimulatorPlatformName, Settings.Value.IOSSDKVersion);
Result += swiftLibPath;
Log.TraceInformation("Add swift lib path : {0}", swiftLibPath);
///Applications/Xcode.app/Contents/Developer/Toolchains/XcodeDefault.xctoolchain/usr/lib/swift/iphoneos
swiftLibPath = String.Format(" -L {0}Toolchains/XcodeDefault.xctoolchain/usr/lib/swift/{1}",
                            Settings.Value.XcodeDeveloperDir, bIsDevice? Settings.Value.DevicePlatformName.ToLower() : Settings.Value.SimulatorPlatformName.ToLower());
Result += swiftLibPath;
Log.TraceInformation("Add swift lib path : {0}", swiftLibPath);
///Applications/Xcode.app/Contents/Developer/Toolchains/XcodeDefault.xctoolchain/usr/lib/swift-5.0/iphoneos
swiftLibPath = String.Format(" -L {0}Toolchains/XcodeDefault.xctoolchain/usr/lib/swift-5.0/{1}",
                            Settings.Value.XcodeDeveloperDir, bIsDevice? Settings.Value.DevicePlatformName.ToLower() : Settings.Value.SimulatorPlatformName.ToLower());
Result += swiftLibPath;
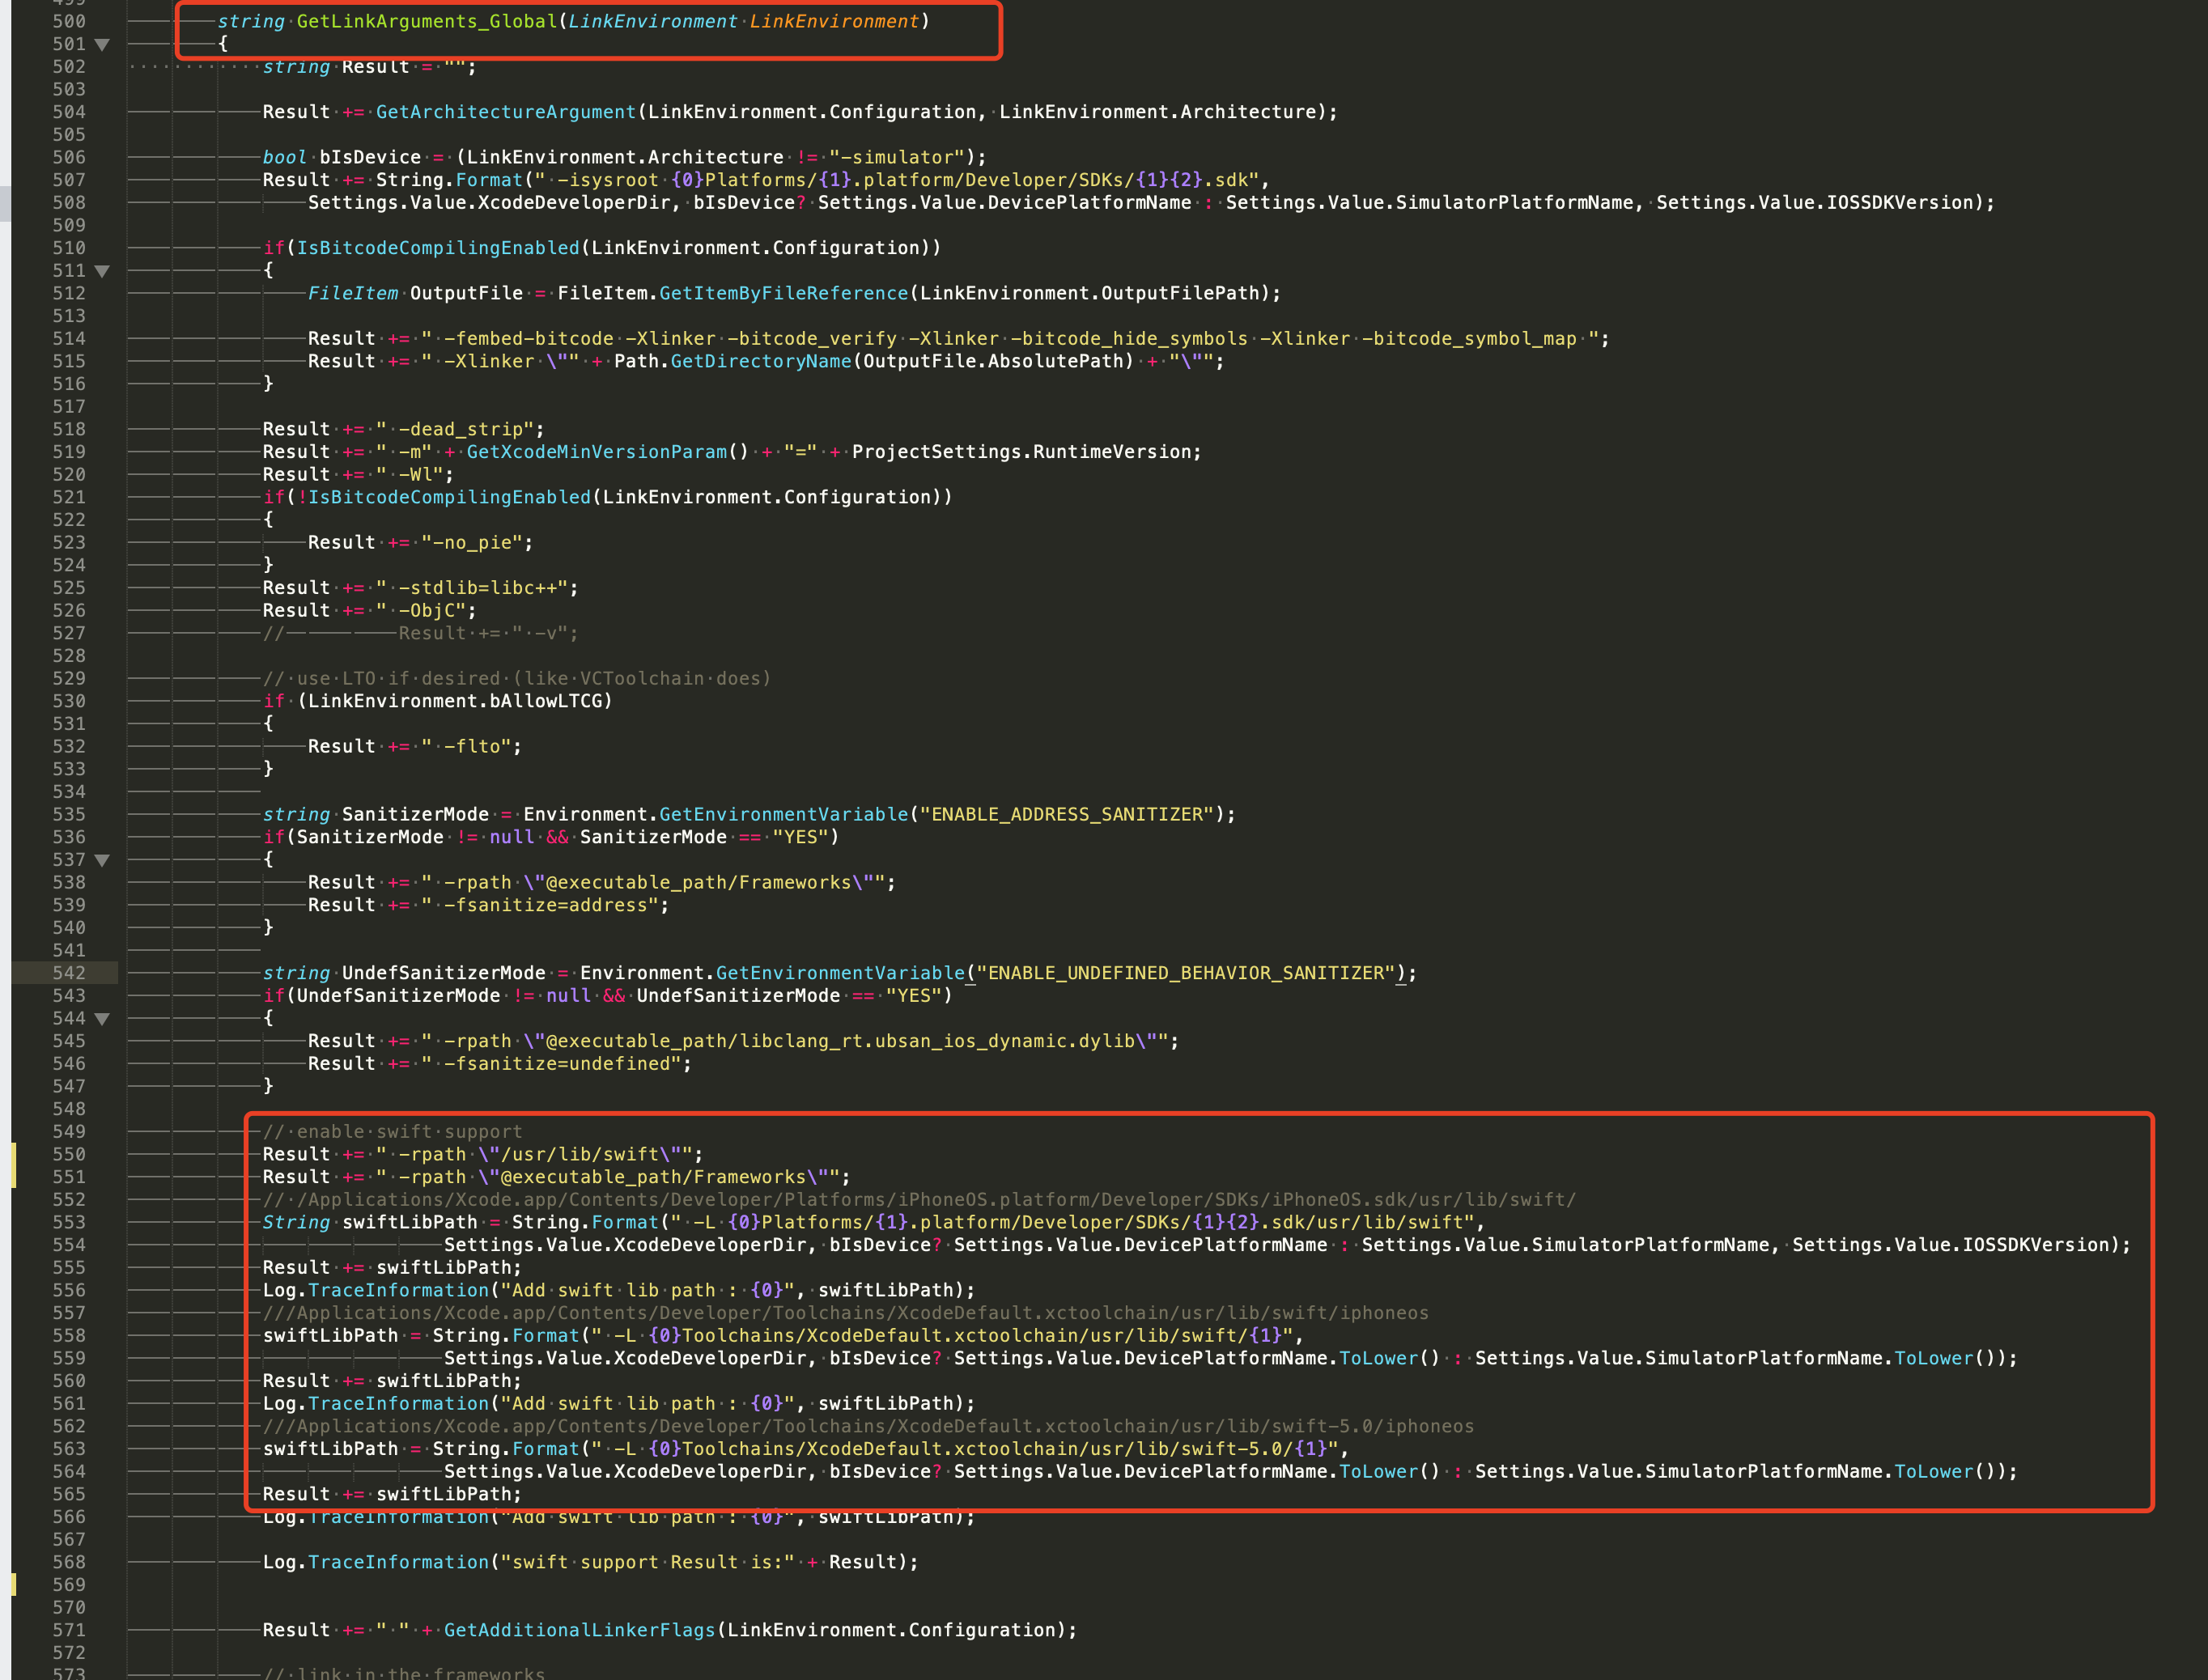
// This line of code needs pre-positioning (see the positioning of pre-placement code in the following example image)
// enable swift support, make sure '/usr/lib/swift' goes before '@executable_path/Frameworks'
Result += " -rpath \"/usr/lib/swift\"";
// enable swift support
Result += " -rpath \"@executable_path/Frameworks\"";
// /Applications/Xcode.app/Contents/Developer/Platforms/iPhoneOS.platform/Developer/SDKs/iPhoneOS.sdk/usr/lib/swift/
String swiftLibPath = String.Format(" -L {0}Platforms/{1}.platform/Developer/SDKs/{1}{2}.sdk/usr/lib/swift",
                            Settings.Value.XcodeDeveloperDir, bIsDevice? Settings.Value.DevicePlatformName : Settings.Value.SimulatorPlatformName, Settings.Value.IOSSDKVersion);
Result += swiftLibPath;
Log.TraceInformation("Add swift lib path : {0}", swiftLibPath);
///Applications/Xcode.app/Contents/Developer/Toolchains/XcodeDefault.xctoolchain/usr/lib/swift/iphoneos
swiftLibPath = String.Format(" -L {0}Toolchains/XcodeDefault.xctoolchain/usr/lib/swift/{1}",
                            Settings.Value.XcodeDeveloperDir, bIsDevice? Settings.Value.DevicePlatformName.ToLower() : Settings.Value.SimulatorPlatformName.ToLower());
Result += swiftLibPath;
Log.TraceInformation("Add swift lib path : {0}", swiftLibPath);
///Applications/Xcode.app/Contents/Developer/Toolchains/XcodeDefault.xctoolchain/usr/lib/swift-5.0/iphoneos
swiftLibPath = String.Format(" -L {0}Toolchains/XcodeDefault.xctoolchain/usr/lib/swift-5.0/{1}",
                            Settings.Value.XcodeDeveloperDir, bIsDevice? Settings.Value.DevicePlatformName.ToLower() : Settings.Value.SimulatorPlatformName.ToLower());
Result += swiftLibPath;

// Xcode 12 adds the swiftCompatibility51 library, so you need to add the following code
if (Settings.Value.IOSSDKVersionFloat >= 14.0f)
{
        Result += String.Format(" -lswiftCompatibility51");
}
- Open the solution and recompile
/Users/intl/UE4/UE_4.25/Engine/Source/Programs/UnrealBuildTool/UnrealBuildTool.sln.
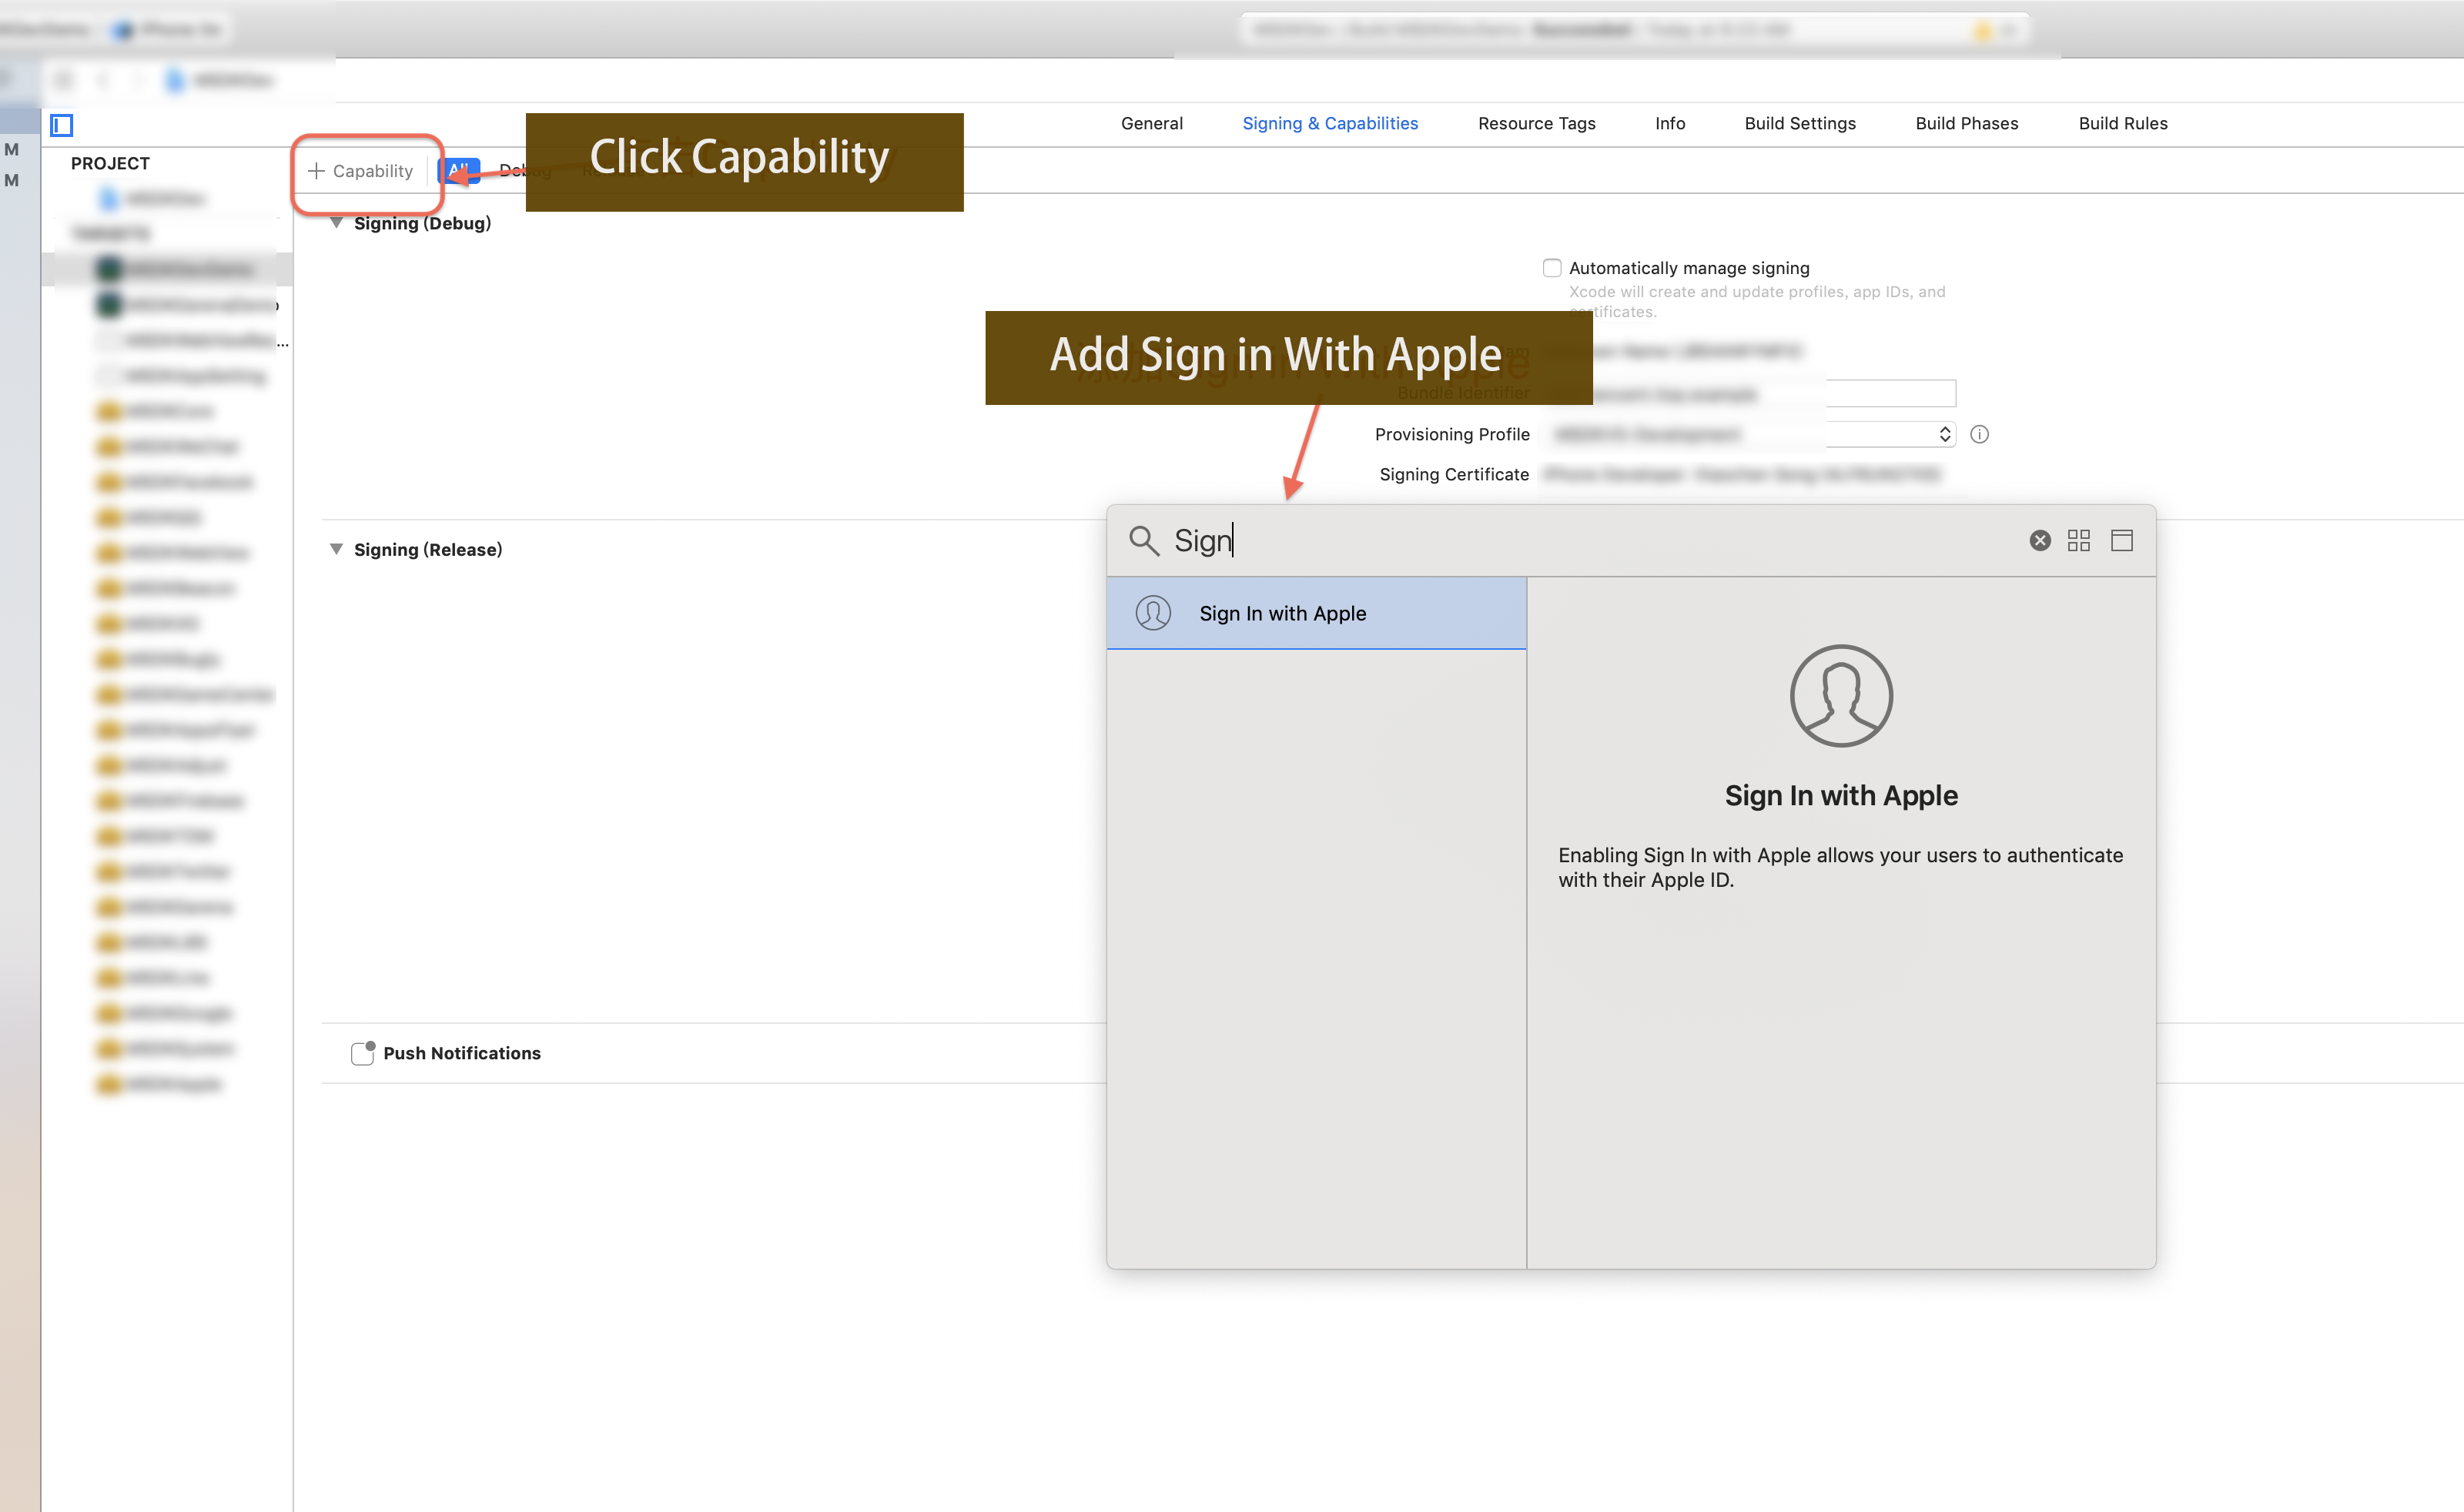
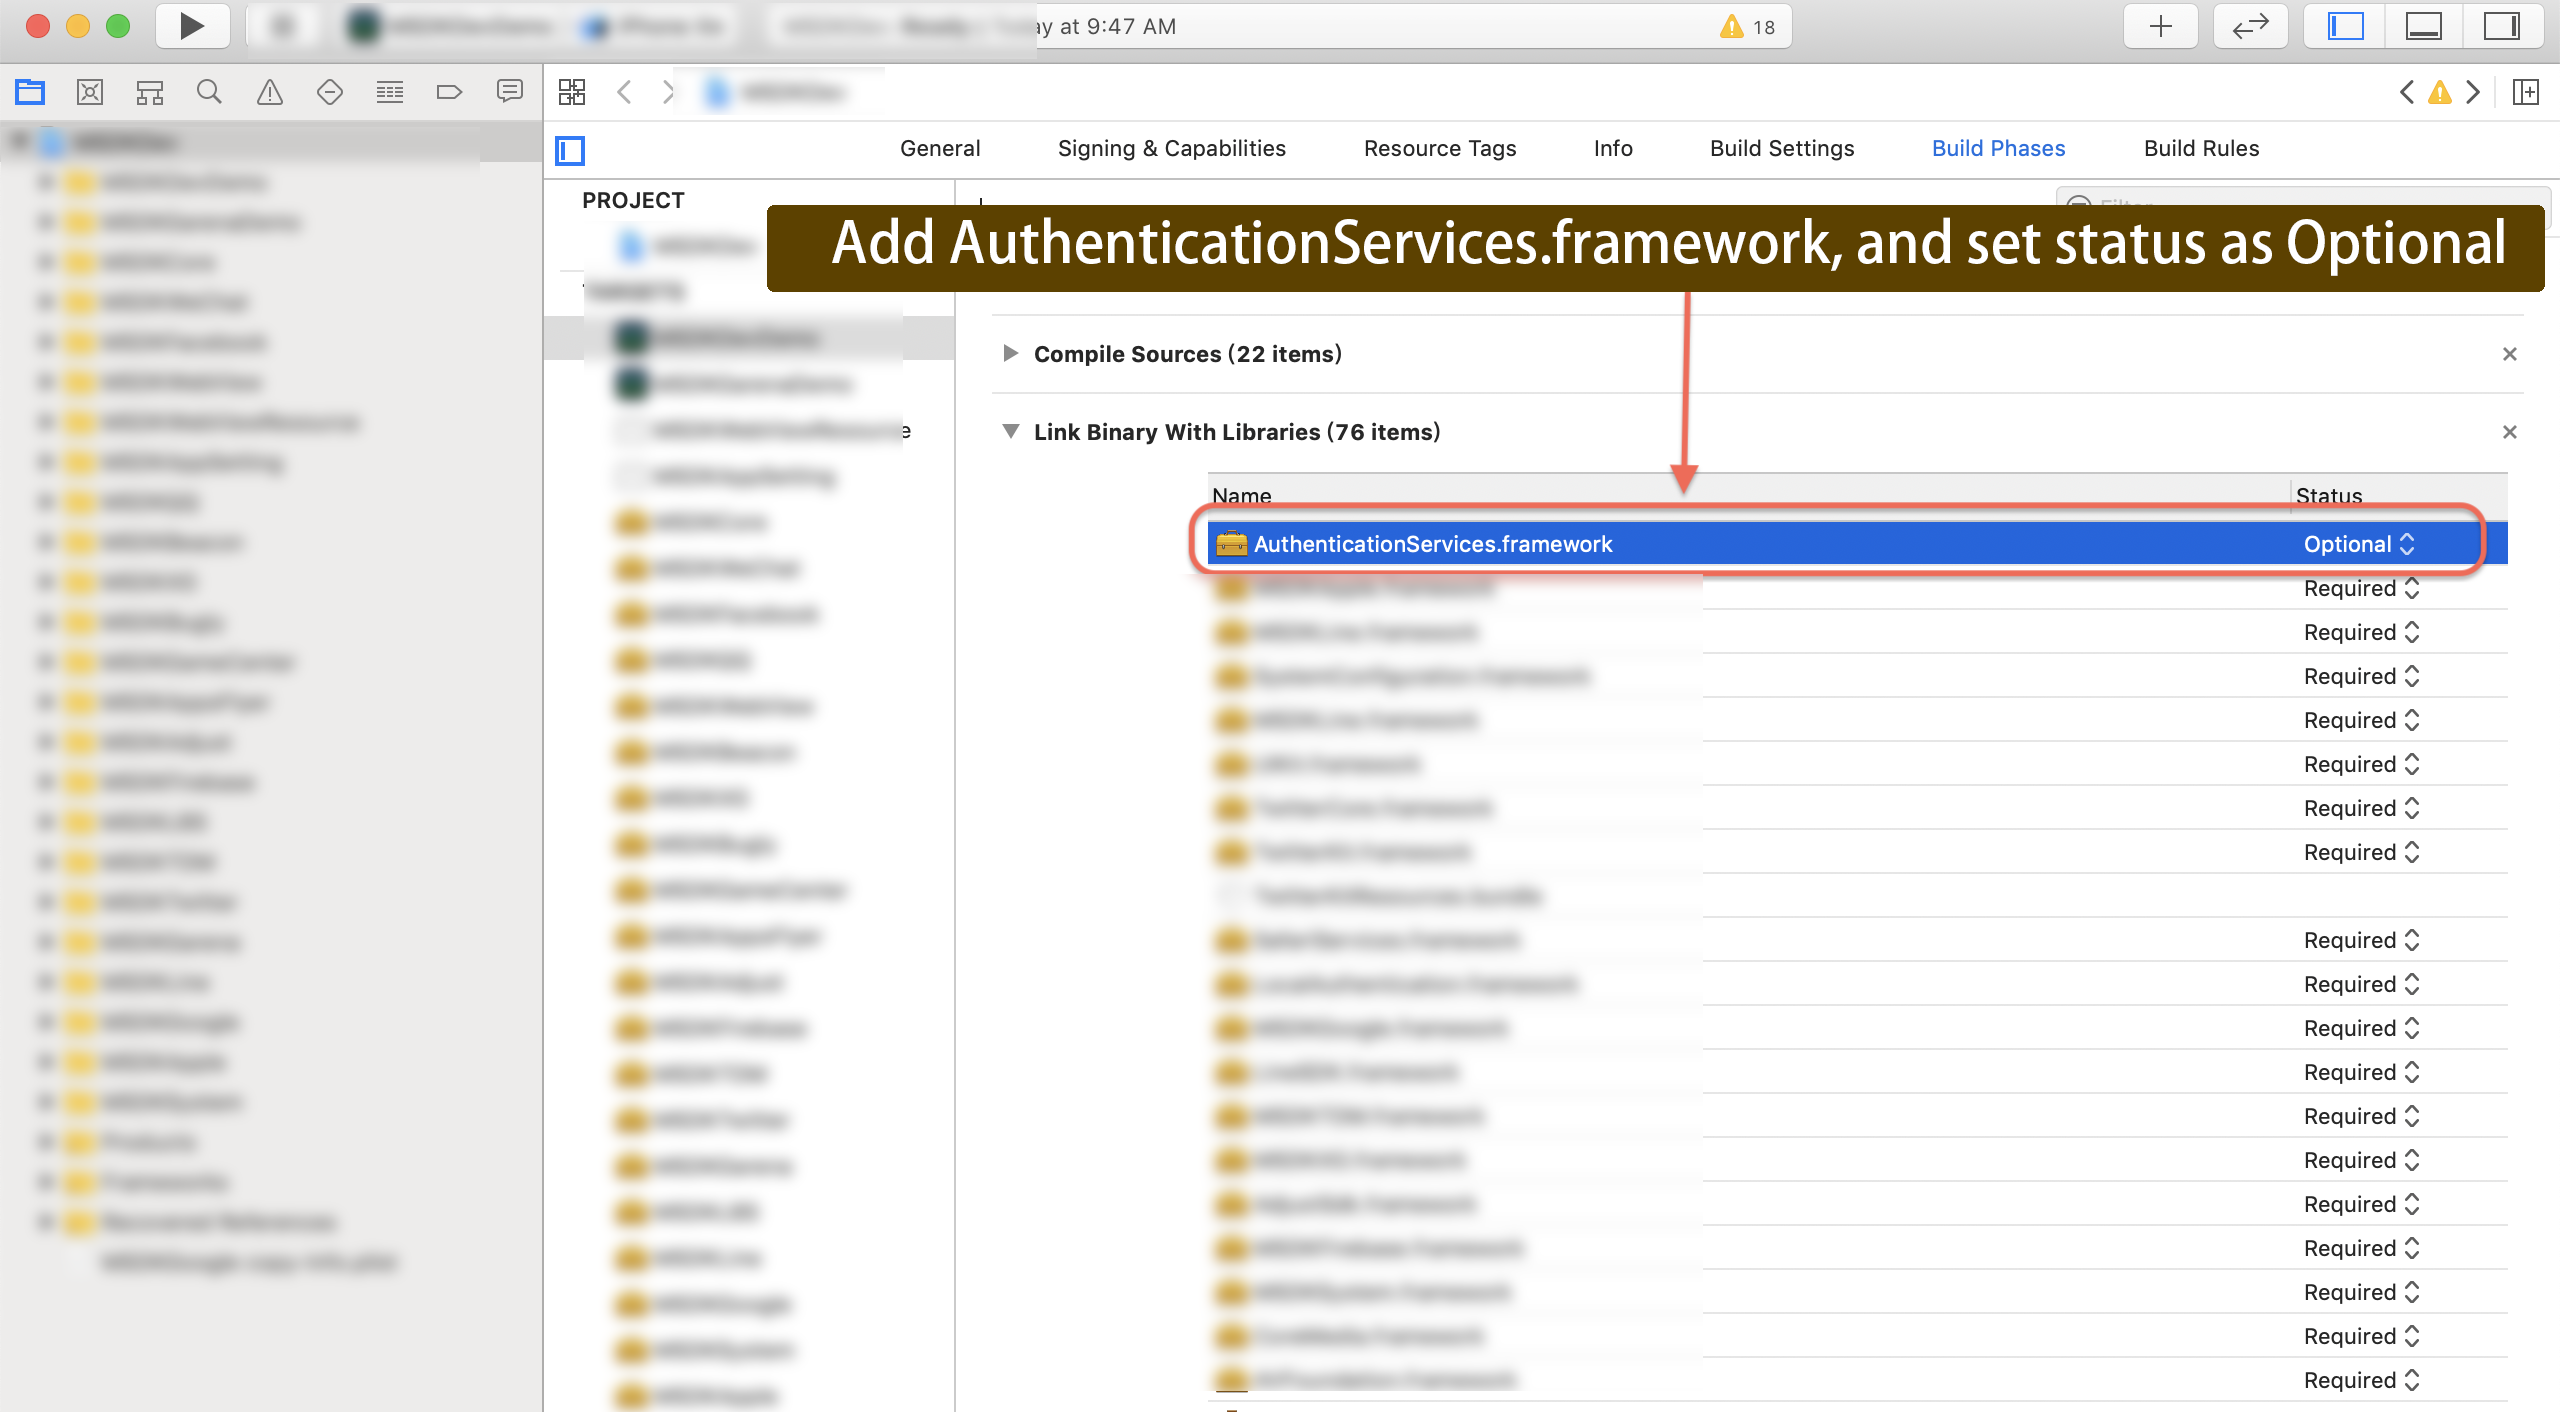
2. Add functionality in Xcode
3. Add AuthenticationServices.framework in Xcode BuildPhases and set its Status to optional.
Other Unity configurations
-
Check the configurations written in
INTLCoreKit.projmods.{
"group": "INTL",
"libs": [],
"frameworks": ["AuthenticationServices.framework:weak"],
"files": [],
"folders": [],
"excludes": [],
"headerpaths":[],
"build_settings": {},
"system_capabilities": {},
"Info.plist":{}
} -
Add entitlement file.
For adding entitlement file to Unity, refer to the solution on Unity Forum.Sample:
INTLDevDemo.entitlements<?xml version="1.0" encoding="UTF-8"?>
<!DOCTYPE plist PUBLIC "-//Apple//DTD PLIST 1.0//EN" "http://www.apple.com/DTDs/PropertyList-1.0.dtd">
<plist version="1.0">
<dict>
<key>com.apple.developer.applesignin</key>
<array>
<string>Default</string>
</array>
</dict>
</plist>
Step 2: Add Apple login
- Apple login cannot be tested through re-sign packages; it is recommended to use TestFlight or Dev packaging.
- Apple login does not provide
PictureUrl(user avatar URL).For more information, see INTLAuthResult for Unity engine or FINTLAuthResult for Unreal Engine.
Pass email and fullName as login permission parameters in the Login interface:
- On the first login screen, options include editing the username and hiding the email (Fig 2).The callback retrieves
emailandfullName.- If players choose to hide email, a random email address is received.
- If players choose to share email, the real email address of the user is obtained.
- Subsequent logins will not obtain
emailandfullName, and the login interface (Fig 2) does not have options to edit the username and hide the email. - If a player logs in again after stopping app with Apple ID, the options shown in Fig 1 will appear.
Players can choose Settings > [Your Username] > Password & Security > Use Apple ID > [App Name] > Stop Using Apple ID to prevent the app from continuing to use Apple ID to login.
When the login permission parameter of the Login interface is an empty string, the login interface doesn't have options to edit the username and hide the email (Fig 2).In the callback, email and fullName are empty.
Fig 1:

Fig 2: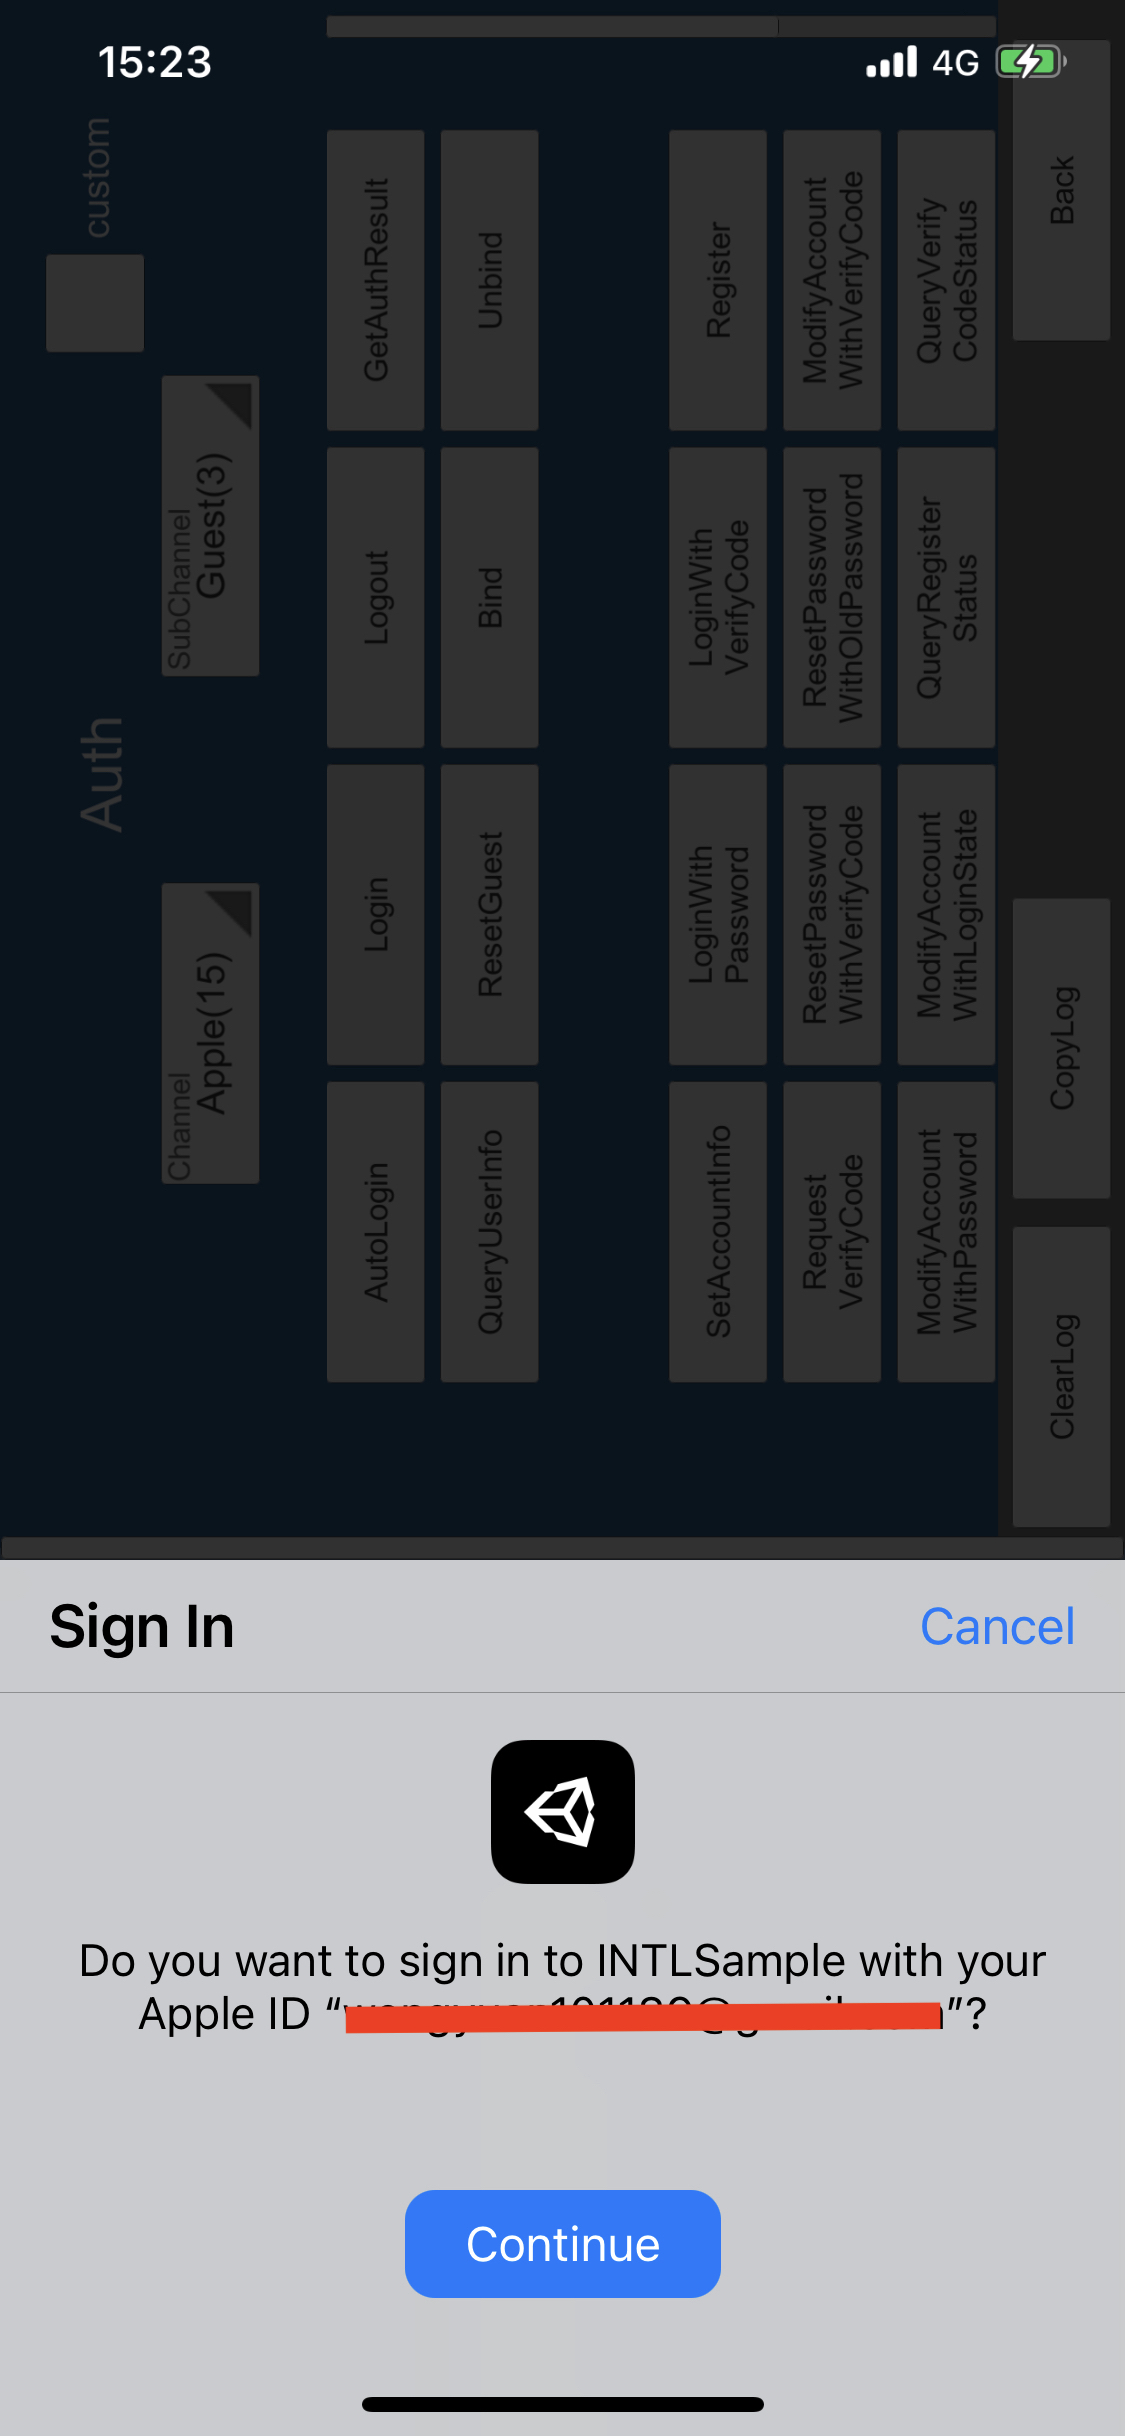
- Register login-related callbacks.
- Unity
- Unreal Engine
// Add callbacks
public void AddAuthObserver()
{
    INTLAPI.AddAuthResultObserver(OnAuthResultEvent);
}

// Remove callbacks
public void RemoveAuthObserver()
{
    INTLAPI.RemoveAuthResultObserver(OnAuthResultEvent);
}

// Process the INTLAuthResult callback
public void OnAuthResultEvent(INTLAuthResult ret)
{
    Debug.Log($"MethodID: {ret.MethodId}");

    string methodTag = "";
    if (authRet.MethodId == (int)INTLMethodID.INTL_AUTH_LOGIN)
    {
        methodTag = "Login";
    }
    else if (authRet.MethodId == (int)INTLMethodID.INTL_AUTH_BIND)
    {
        methodTag = "Bind";
    }
    else if (authRet.MethodId == (int)INTLMethodID.INTL_AUTH_AUTOLOGIN)
    {
        methodTag = "AutoLogin";
    }
    else if (authRet.MethodId == (int)INTLMethodID.INTL_AUTH_QUERY_USER_INFO)
    {
        methodTag = "QueryUserInfo";
    }
    else if (authRet.MethodId == (int)INTLMethodID.INTL_AUTH_GET_AUTH_RESULT)
    {
        methodTag = "GetAuthResult";
    }
}
C++ Event Handling (above v1.15)
//Add callback
FINTLAuthEvent authEvent;
authEvent.AddUObject(this, &OnAuthResult_Implementation);
UINTLSDKAPI::SetAuthResultObserver(authEvent);

// Remove callbacks
UINTLSDKAPI::GetAuthResultObserver().Clear();
void OnAuthResult_Implementation(FINTLAuthResult ret)
{
 UE_LOG(LogTemp, Warning, TEXT("MethodID: %d"), ret.MethodId);
}
Unreal Event Handling
void OnAuthResult_Implementation(FINTLAuthResult ret)
{
    UE_LOG(LogTemp, Warning, TEXT("MethodID: %d"), ret.MethodId);
}
- Call the
AutoLogininterface for automatic login.
- Unity
- Unreal Engine
INTLAPI.AutoLogin();
UINTLSDKAPI::AutoLogin();
- If automatic login fails, call the
Logininterface for players to manually log in.
- Unity
- Unreal Engine
INTLAPI.Login(INTLChannel.Apple);
UINTLSDKAPI::Login(EINTLLoginChannel::kChannelApple);
- Synchronize client authentication status with the game backend, waiting for the final authentication results.
[Optional] Set email permissions
Apple requires player authorization to obtain the player's email. If the player refuses authorization, the email cannot be obtained. Refer to Login interface passing email and fullName.
To obtain the player's email during Apple login, the corresponding permission must be set first. Once enabled, it returns email in AuthResult's ChannelInfo.
- For compliance considerations, a mask can be applied to the returned
emailfrom specific sources. Contact the Player Network assistant to enable this if needed. - In the backend transaction logs, report the hash of
base64(sha256(email)). Contact the Player Network assistant to enable this if needed. - Can be used to verify whether the player's information or binding list includes
emailinformation. Contact the Player Network assistant to enable this if needed. - Can be used for iOS Firebase's Private Set Membership (PSM) feature. See Firebase iOS Project Configuration.
-
When calling the Login interface, add the
emailpermission in thepermissionsparameter. -
Enable the email return feature in the Player Network Console by setting return_email to YES. For details, see Third-Party Channel Configuration.
Step 3: Verifying Login Functionality
Search for the keyword "AuthResult" in the Player Network SDK logs to confirm whether the channel name and OpenID are correctly returned.If correct, it indicates successful integration configuration and the login functionality has been successfully added.
If you encounter problems during the integration process, please refer to Frequently Asked Questions.
