Android
The purpose of this article is to explain how to set up LINE authentication so that your game can be logged in through the LINE channel using the Player Network Login Authentication Service.
Prerequisites
1. Setting up the LINE application on the LINE Developers Console
1. Create LINE application and configure channels
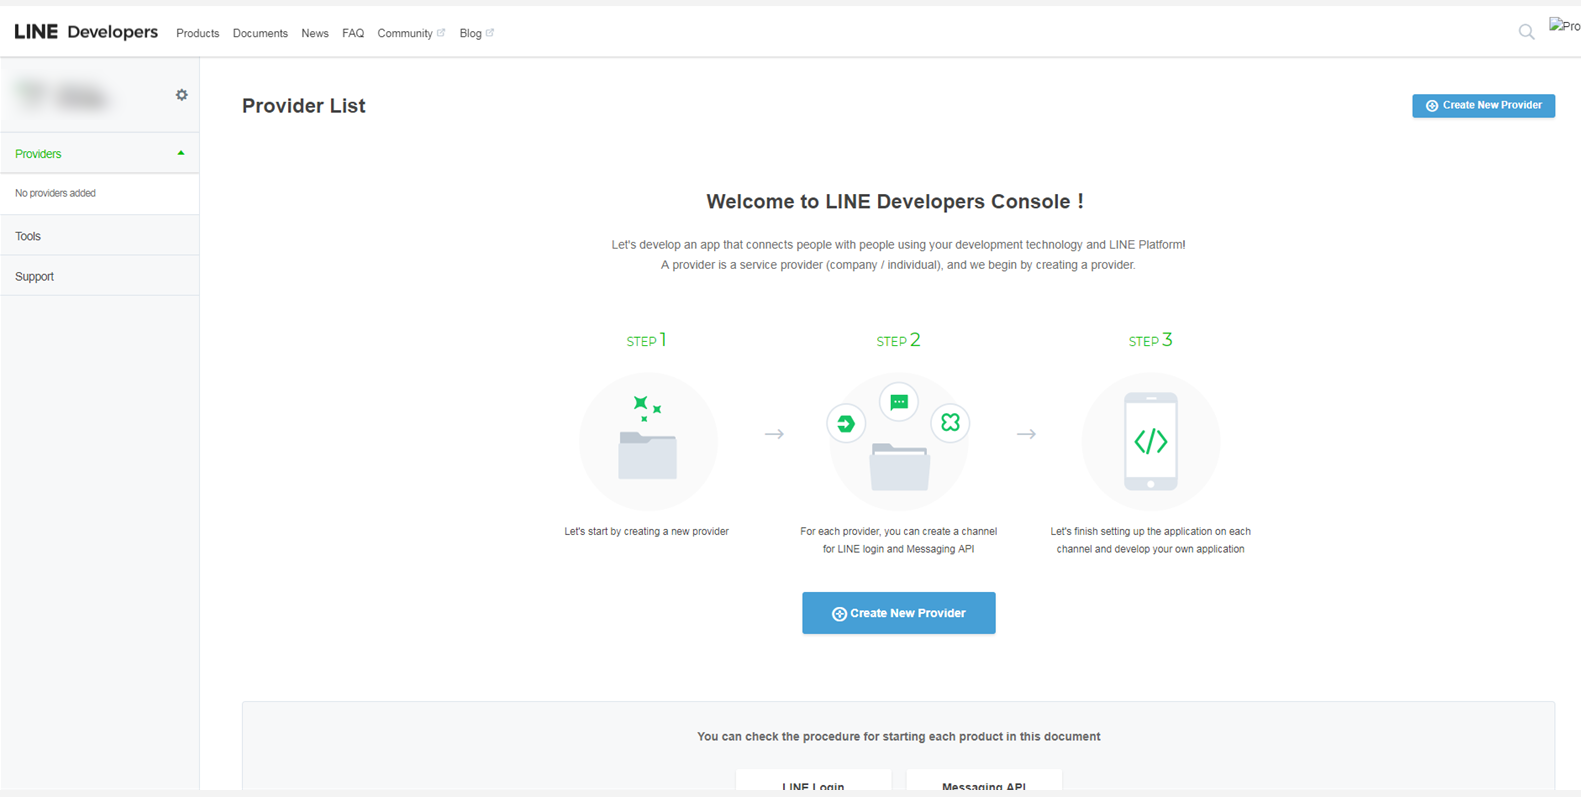
Before configuring the application for the desired platform, log in to the LINE Developers Console and create a developer account.With your developer account, use the LINE Developers Console and create a channel (a communication channel between LINE features and your application).
Create a channel
-
On the Console home page, click Create New Provider and follow the on-screen instructions to create the provider.
-
On the Channels tab of the Providers page, click Create a LINE Login channel.
-
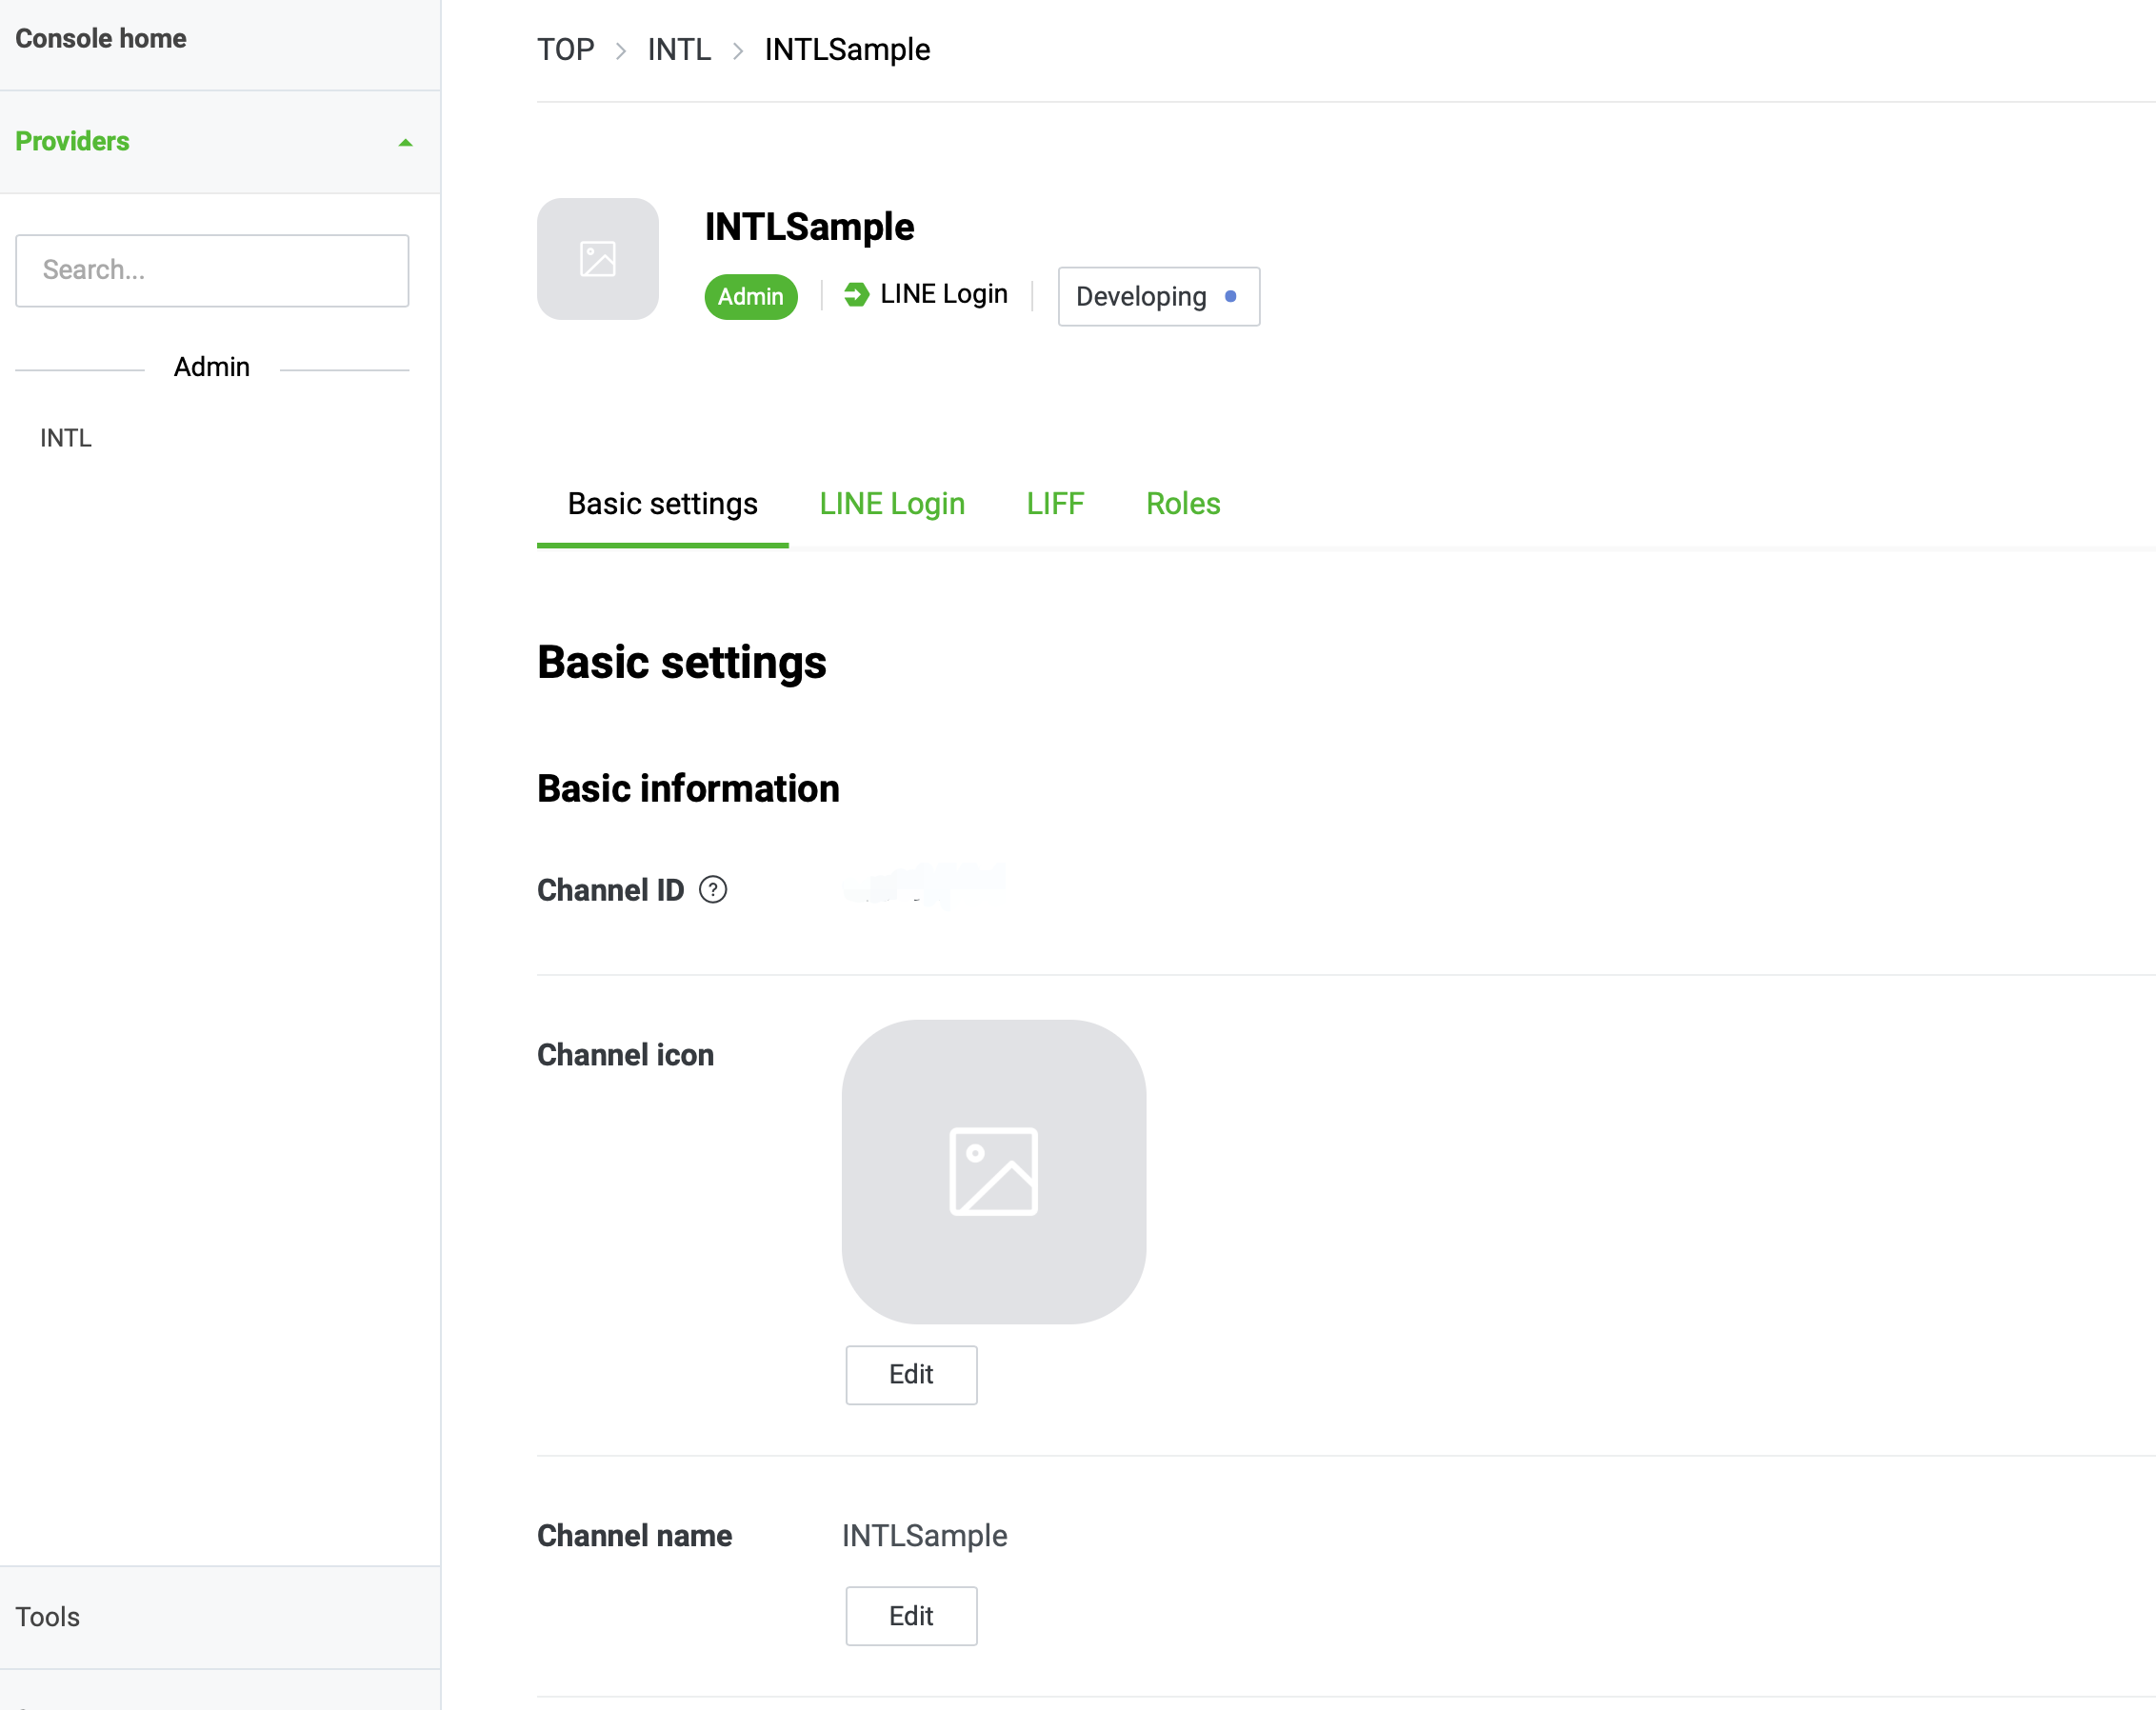
On the New Channel Creation page, enter the required information and click Create.
-
In the Basic settings tab of the Channel page, check Channel ID and other information required for Player Network SDK configuration.
-
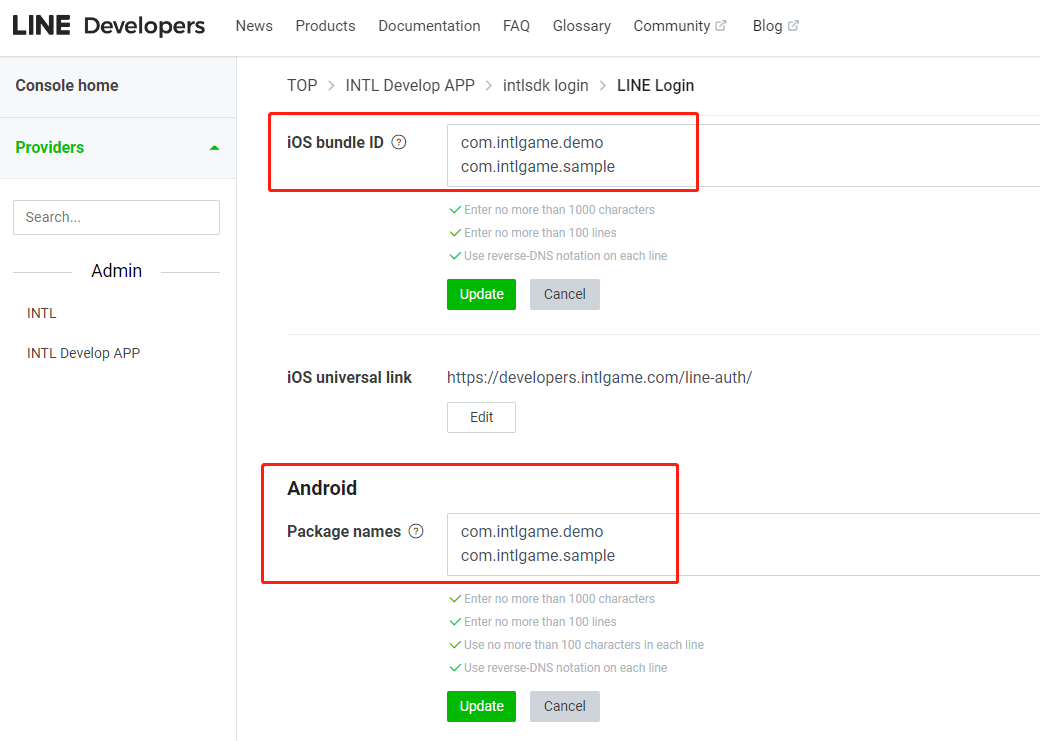
Configuring channels for Android.
In the LINE Login tab on the Channels page, enable Mobile app and enter the required information.
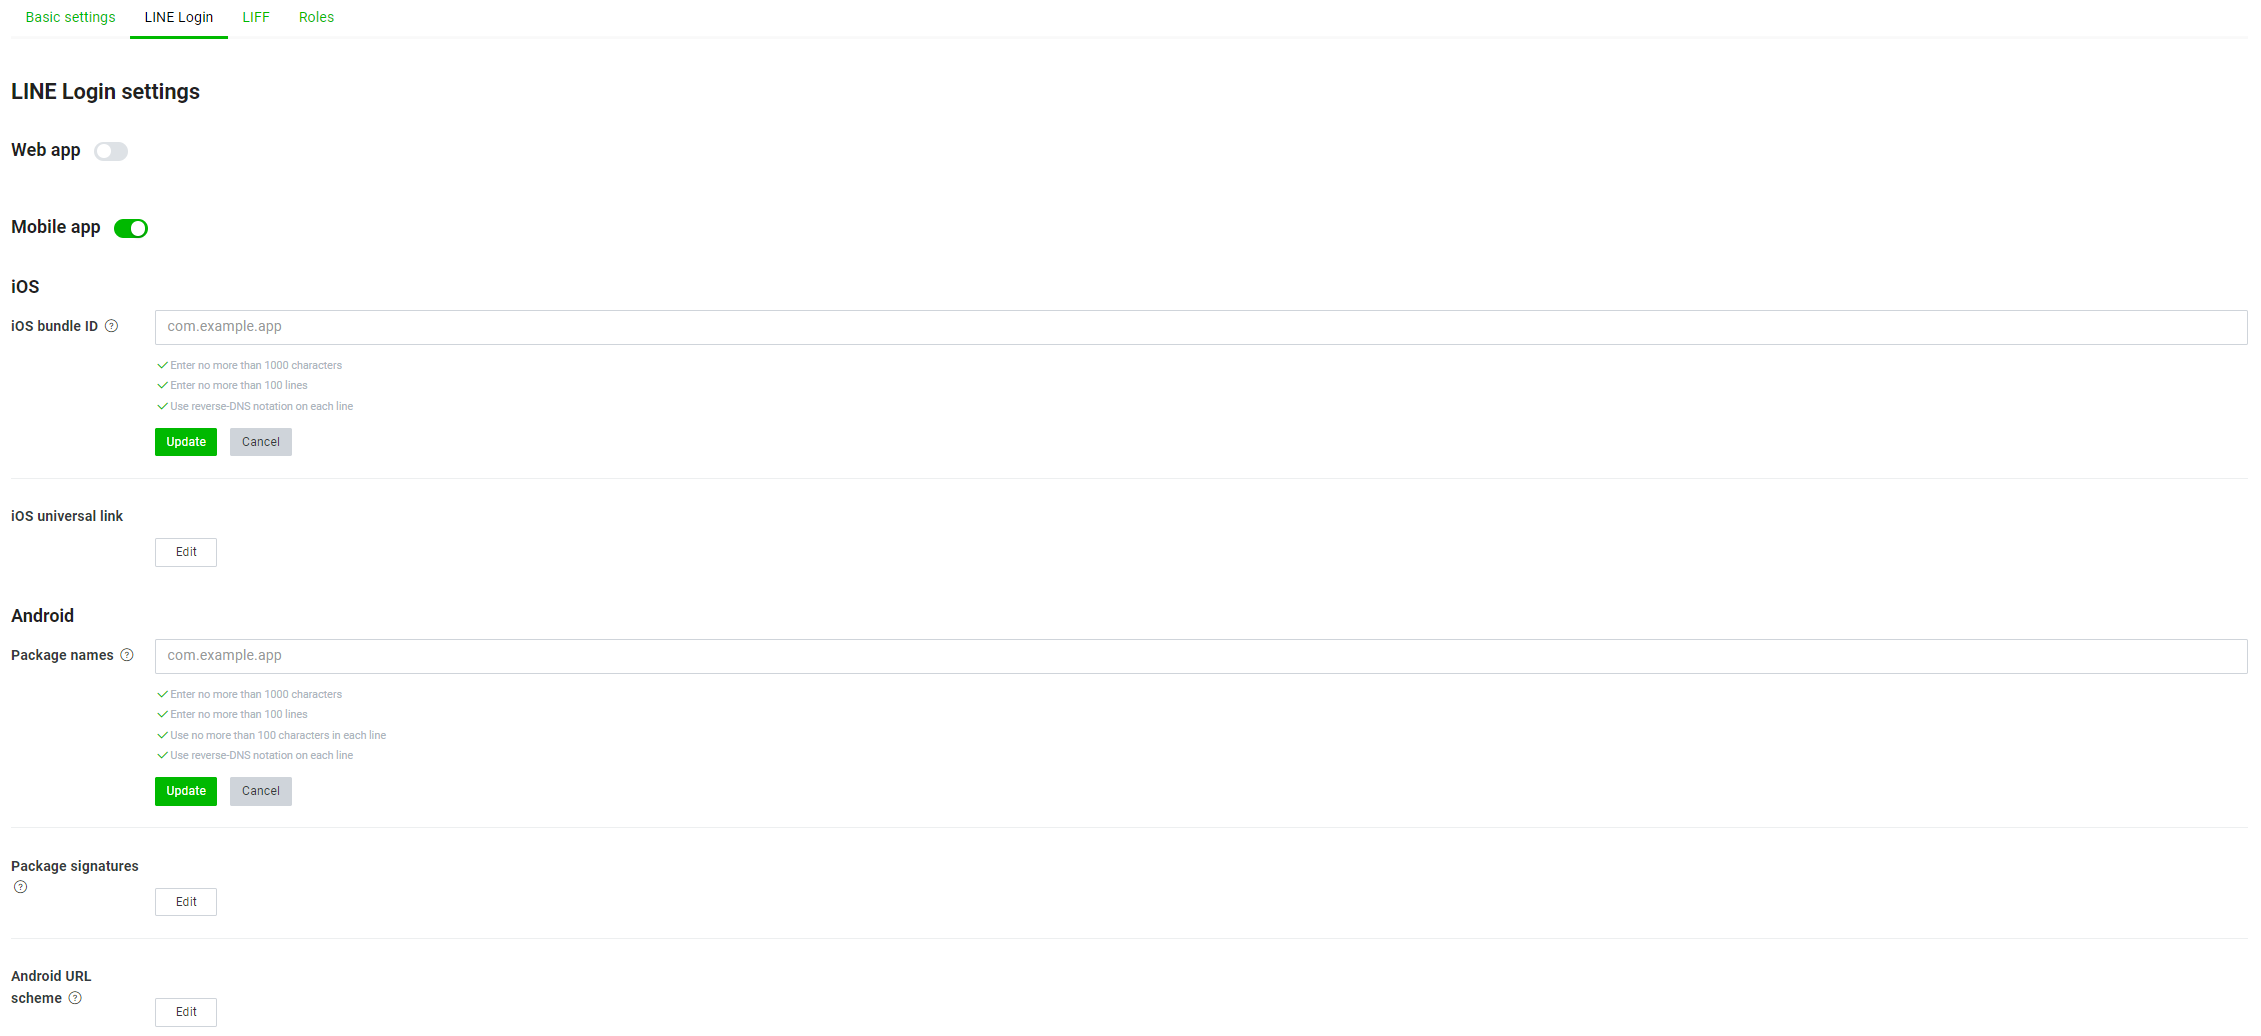
To add a new channel pack name and corresponding signature to support multi-store channel packs, add a new line input message.
-
Click Update to save the configuration.
2. Adding user rights
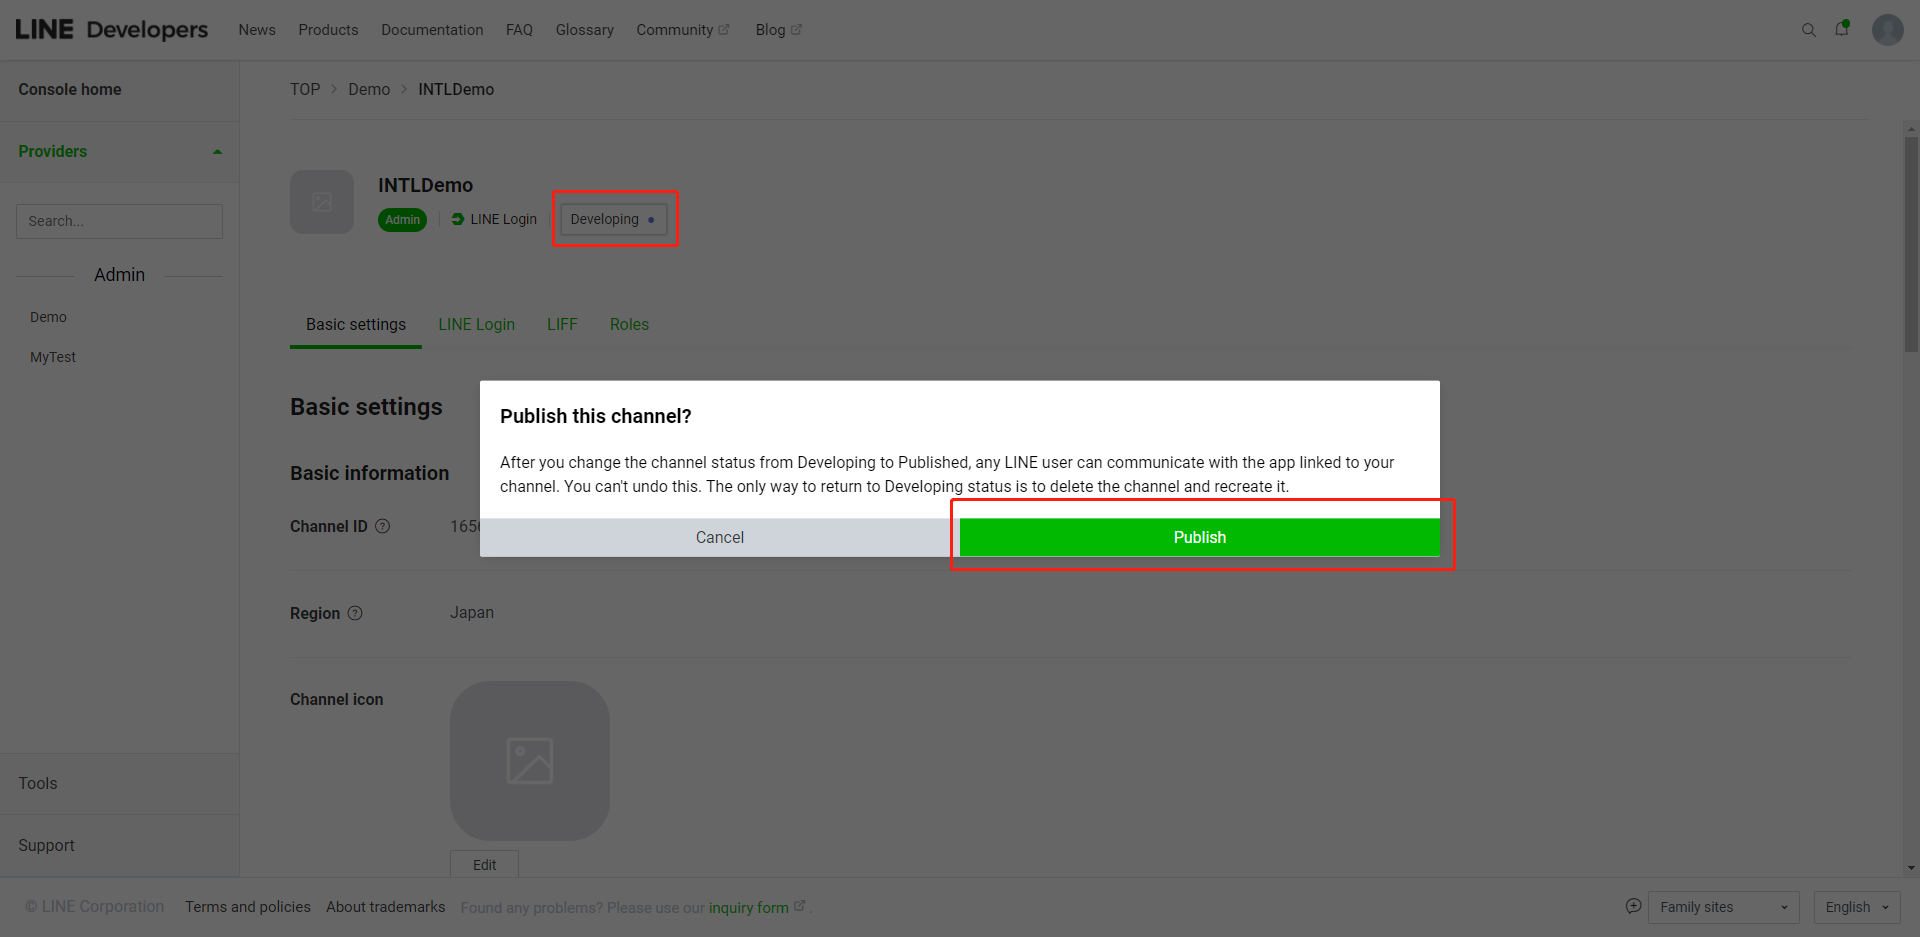
Immediately after creating a channel, the channel is set to Developing mode.Only channel administrators and testers can use the LINE login feature.
Adding Testers
-
Log in to the LINE Developers Console.
-
Select the appropriate channel from the recently visited channels on the home page.

-
On the Channels page, click Roles.
-
In the Roles tab, click Invite by email.

-
Add testers in the Invite new members section.
Email:Tester's LINE account number
Role: Tester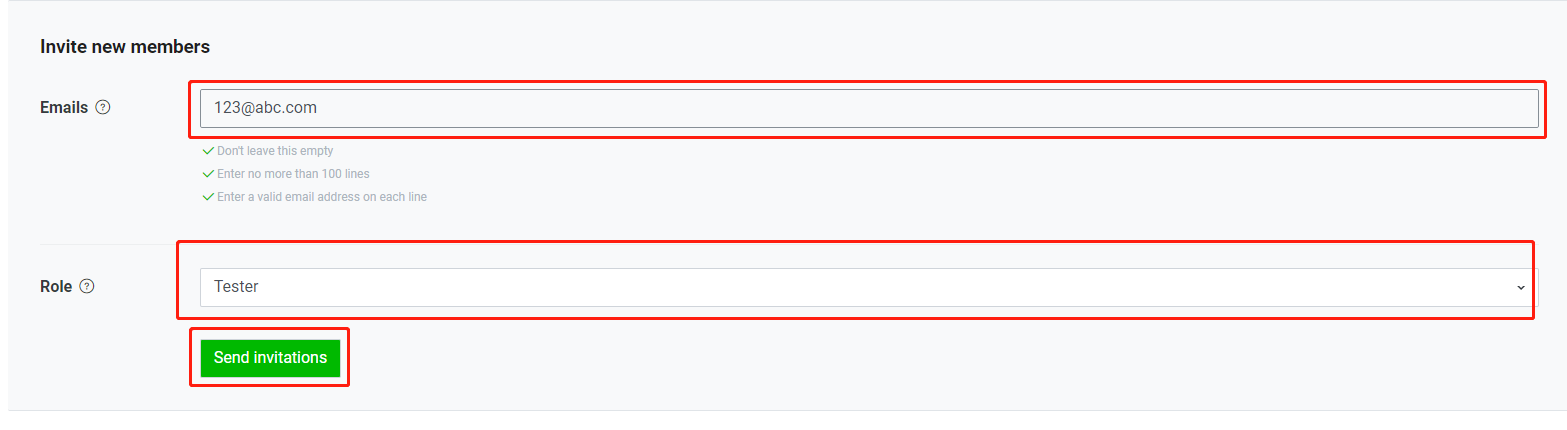
-
Click Send Invitations to send tester invitations.
-
Waiting for testers to accept email invitations.
- Obtain Player Network Console login account.
- Create a new project for your game, or join an existing one.
- Download SDK.
- Integrate SDK.
- Add LINE as the login authentication method for the service in the Player Network Console.
Step 1:Configure SDK for LINE Login
Since the LINE SDK is only compatible with minSdkVersion >= 24, problems may occur when running on devices with Android 7.0 or lower.The game must set minSdkVersion >= 24.
Since the LINE channel introduces new Java8 features, the Gradle settings must use Java8.Compile the dex with the D8 compiler.
For more information, see ANT Packages.
Java8 Compatibility
- Unity
- Unreal Engine
-
Unity 4.x, Unity 5.x Compatibility
If the method count exceeds 65536, see the DexMerge article for a solution.
-
Unity 2017-2019 Compatibility
- Upgrade Android Gradle to version 3.2 and configure it to support Java8
- Upgrade Unity Gradle to 4.6 or higher (Verified by Player Network SDK:The latest version of Unity 2017 is 4.6, other versions are higher than 4.10).
- Upgrade buildToolsVersion to 28.0.1 or higher
Not applicable.
-
Open your project's INTLConfig.ini file:
INTLConfig.ini[INTL environment]
# WARNING: You should change this URL to the production environment when you release your game.
INTL_URL = https://test.intlgame.com
GAME_ID = {INTL_GAME_ID}
SDK_KEY = {INTL_SDK_KEY}
[INTL Log]
LOG_LEVEL = 1
LOG_CONSOLE_OUTPUT_ENABLE = 1
LOG_FILE_OUTPUT_ENABLE = 1
LOG_ENCRYPT_ENABLE = 0
LOG_COMPRESS_ENABLE = 0
[Android LifeCycle]
LIFECYCLE = Line
[LINE]
LINE_CHANNEL_ID = {INTL_LINE_CHANNEL_ID}
LINE_CHECK_SDK_VERSION_ENABLE = 1- Set the SDK backend environment to
INTL_URL = https://test.intlgame.com. - Replace
{INTL_GAME_ID}and{INTL_SDK_KEY}with theGAME_IDandSDK_KEYvalues assigned by the Player Network console. - Set
LOG_LEVEL = 1,LOG_CONSOLE_OUTPUT_ENABLE = 1,LOG_FILE_OUTPUT_ENABLE = 1,LOG_ENCRYPT_ENABLE = 0andLOG_COMPRESS_ENABLE = 0to output console logs and log files without encrypting or compressing the output without encrypting or compressing the output. - Add Line to
LIFECYCLE.For more information, please see SDK Environment. - Replace
{INTL_LINE_CHANNEL_ID}with the ChannelID registered with LINE Developers. LINE_CHECK_SDK_VERSION_ENABLEis used to verify the version of Android on the device.
If the device's Android version is Android 4.2 or lower, calling the LINE API will return unsupported.Set the switch (Default: Enable) to 0 to disable it.However, the game needs to assess the risk of disabling the switch.
- Set the SDK backend environment to
-
Add the following code to the gradle file.
- Unity
- Unreal Engine
android{
    compileOptions {
        sourceCompatibility JavaVersion.VERSION_1_8
        targetCompatibility JavaVersion.VERSION_1_8
    }
}
android{
    compileOptions {
        sourceCompatibility JavaVersion.VERSION_1_8
        targetCompatibility JavaVersion.VERSION_1_8
    }
}
- Enable the D8 compilation option.
- Unity
- Unreal Engine
public static void GenerateGradleProperties(string pathToBuiltProject) {
    // ...
    using(StreamWriter writer = new StreamWriter(gradlePropertiesFile, true)) {
        // ...
        writer.WriteLINE("android.enableD8.desugaring=true");
    }
}
android.enableD8.desugaring=true
Step 2:Add LINE Login
LINE does not require an app to log in.
- Android pulls up the LINE app to sign in if the LINE app is installed, and pulls up the web page to sign in if the LINE app is not installed.
- Authorized login to LINE requires OpenID and profile permissions.The former is to get the player's LINE OpenID and the latter is to get the player's LINE access token, which can be set via the
Permissionsfield.If thePermissionsfield is empty for a business, the Player Network SDK will use the OpenID and profile permissions by default when logging into LINE.
- Register login-related callbacks.
- Unity
- Unreal Engine
// Add callbacks
public void AddAuthObserver()
{
    INTLAPI.AddAuthResultObserver(OnAuthResultEvent);
}

// Remove callbacks
public void RemoveAuthObserver()
{
    INTLAPI.RemoveAuthResultObserver(OnAuthResultEvent);
}

// Process the INTLAuthResult callback
public void OnAuthResultEvent(INTLAuthResult ret)
{
    Debug.Log($"MethodID: {ret.MethodId}");

    string methodTag = "";
    if (authRet.MethodId == (int)INTLMethodID.INTL_AUTH_LOGIN)
    {
        methodTag = "Login";
    }
    else if (authRet.MethodId == (int)INTLMethodID.INTL_AUTH_BIND)
    {
        methodTag = "Bind";
    }
    else if (authRet.MethodId == (int)INTLMethodID.INTL_AUTH_AUTOLOGIN)
    {
        methodTag = "AutoLogin";
    }
    else if (authRet.MethodId == (int)INTLMethodID.INTL_AUTH_QUERY_USER_INFO)
    {
        methodTag = "QueryUserInfo";
    }
    else if (authRet.MethodId == (int)INTLMethodID.INTL_AUTH_GET_AUTH_RESULT)
    {
        methodTag = "GetAuthResult";
    }
}
C++ Event Handling (above v1.15)
//configure callback
FINTLAuthEvent authEvent;
authEvent.AddUObject(this, &OnAuthResult_Implementation);
UINTLSDKAPI::SetAuthResultObserver(authEvent);
// Remove callbacks
UINTLSDKAPI::GetAuthResultObserver().Clear();
void OnAuthResult_Implementation(FINTLAuthResult ret)
{
    UE_LOG(LogTemp, Warning, TEXT("MethodID: %d"), ret.MethodId);
}
Unreal Event Handling
void OnAuthResult_Implementation(FINTLAuthResult ret)
{
    UE_LOG(LogTemp, Warning, TEXT("MethodID: %d"), ret.MethodId);
}
- Call the
AutoLogininterface to log in automatically.
- Unity
- Unreal Engine
INTLAPI.AutoLogin();
UINTLSDKAPI::AutoLogin();
- If automatic login fails, call the
Logininterface to let the player log in manually.
- Unity
- Unreal Engine
INTLAPI.Login(INTLChannel.LINE);
UINTLSDKAPI::Login(EINTLLoginChannel::kChannelLINE);
- Synchronize client authentication status with the game backend and wait for the final verification result.
Step 3: Acceptance testing for login functionality
Search for the keyword "AuthResult" in the Player Network SDK logs to confirm whether the channel name and OpenID are returned correctly.If correct, it means the integration configuration is successful, and login functionality has been successfully added.
If you encounter problems during the integration process, please refer to Frequently Asked Questions.
Step 4:Publish the game
To enable LINE login for players, set the channel to Published.