Android
The purpose of this article is to explain how to set up WhatsApp authentication so that your project can use the Player Network login authentication service to login via the WhatsApp channel.
Prerequisites
1. Configure the app on the Meta Developer platform
1. Register an Account
Please use a developer account registered in a WhatsApp-supported region (non-mainland China) for creation. Developer accounts registered in mainland China currently cannot apply for WhatsApp development permissions.
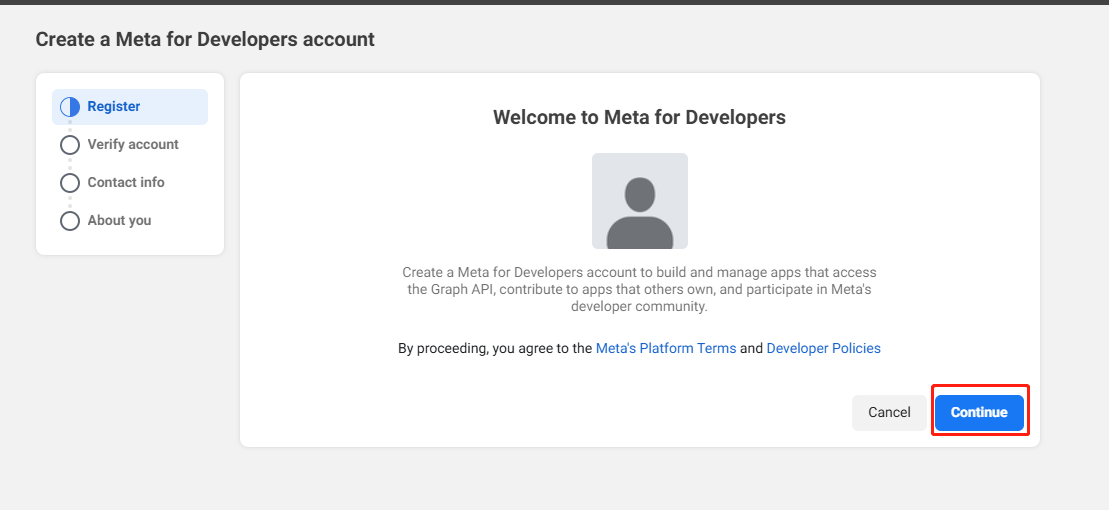
Before configuring the platform for the app, please register a Meta developer account.
-
Register for an account at Facebook and follow the prompts to complete authentication (Email or cell phone verification).
-
Activate a developer account at Meta for Developers.

-
Agree to the agreement and continue.
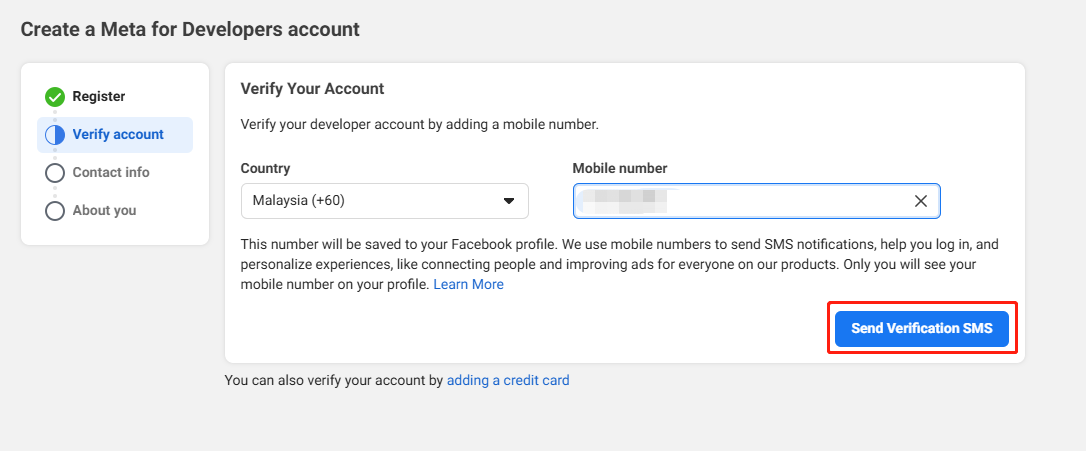
-
Complete the cell phone verification.
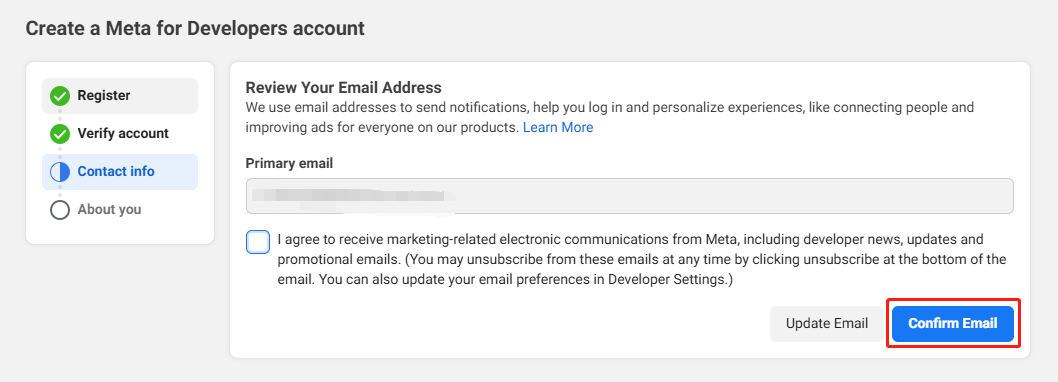
-
Confirm Email.
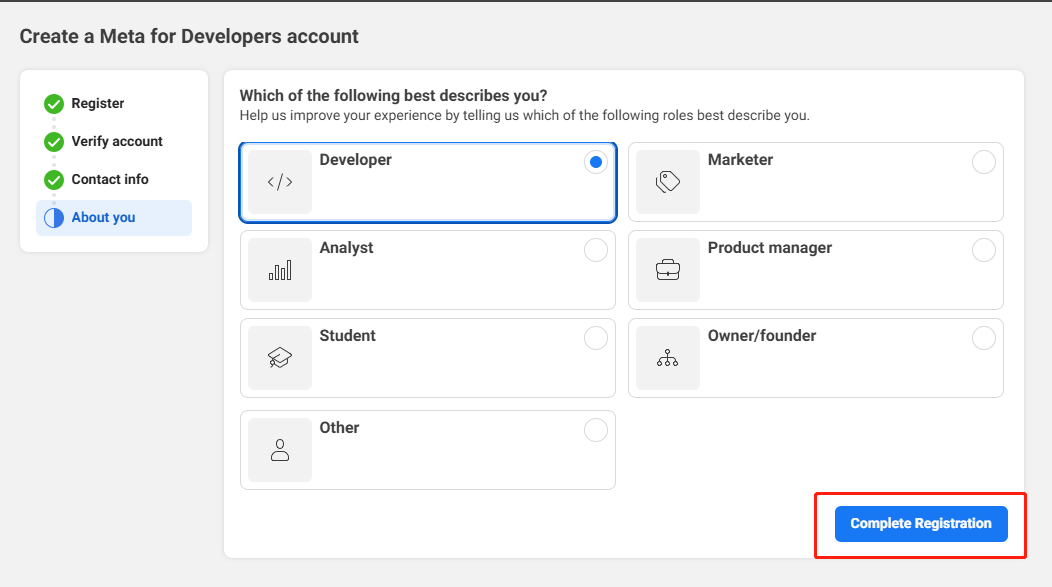
-
Complete the registration.
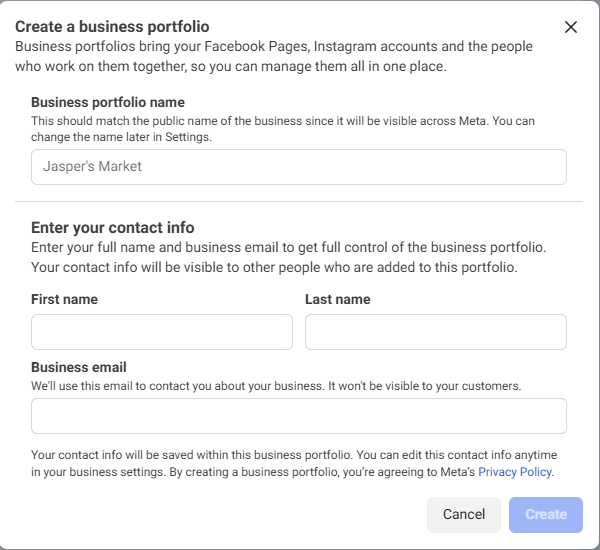
2. Create a Meta business portfolio
Before configuring the platform for the app, please create a Meta business portfolio.
-
Visit business.facebook.com and log in using your Meta developer account.
-
Click the dropdown menu under Home at the top left, then click Create a business portfolio.
-
Please enter the business portfolio name.This name should match the company or organization's public name, as it will be displayed on Meta.The business portfolio name cannot contain special characters.
-
Click Create to complete creation.
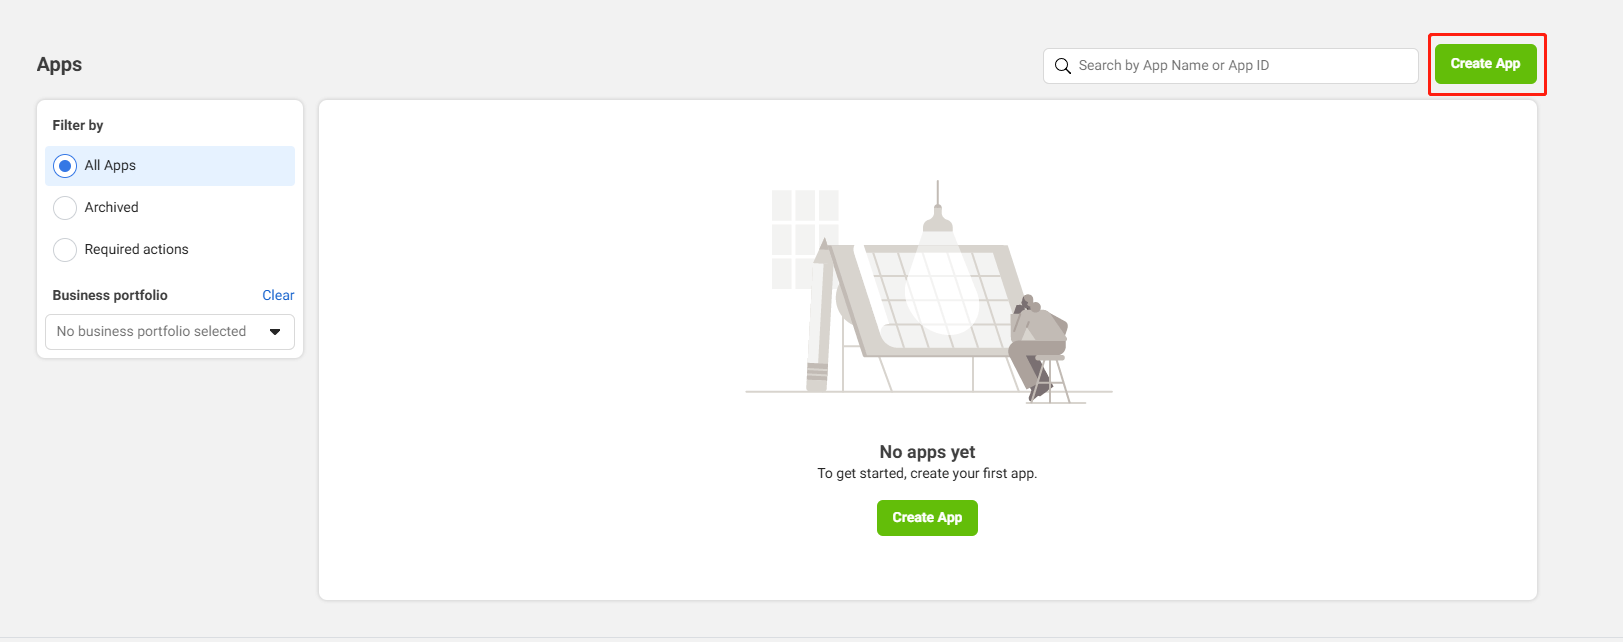
3. Create an Application
-
Login to Meta developer account, go to My Apps, and click Create App in the upper right corner.
-
Fill out basic information:
- App name - Application name.
- App contact email - The primary contact email for receiving notifications about the app from Meta.

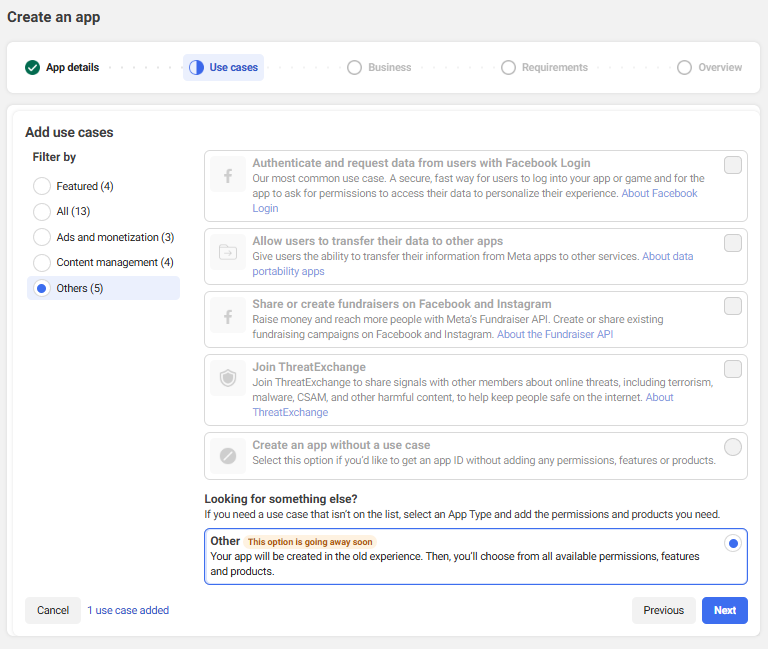
-
On the Add Use Case page, select Other, then click Continue.
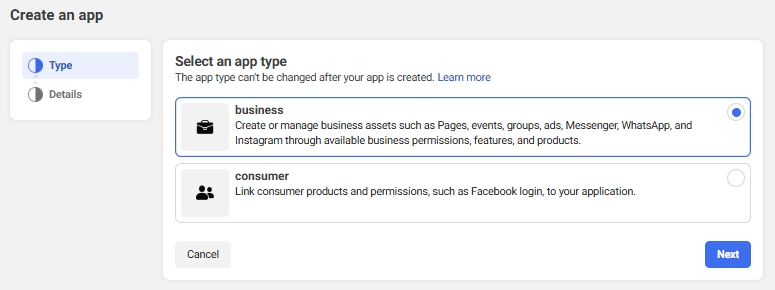
-
Select Business as the app type, then click Continue.
-
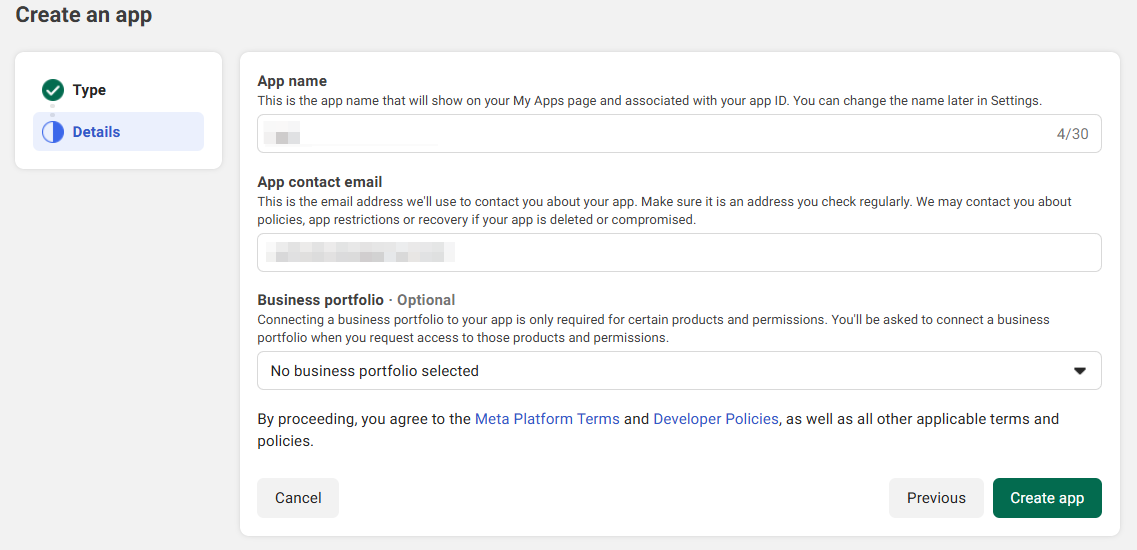
On the Detail page, confirm the application name and email, select the corresponding business portfolio (can be selected later), and click Create app.
Business asset portfolio can choose the same company verification method as the Facebook channel app.
- App created successfully.
4. Configure Application
There may be no WhatsApp configuration entry here; this is usually because the developer account does not have WhatsApp development permissions.Only developer accounts registered in WhatsApp-supported regions (non-mainland China) have WhatsApp development permissions; developer accounts registered in mainland China currently cannot apply for WhatsApp development permissions.
-
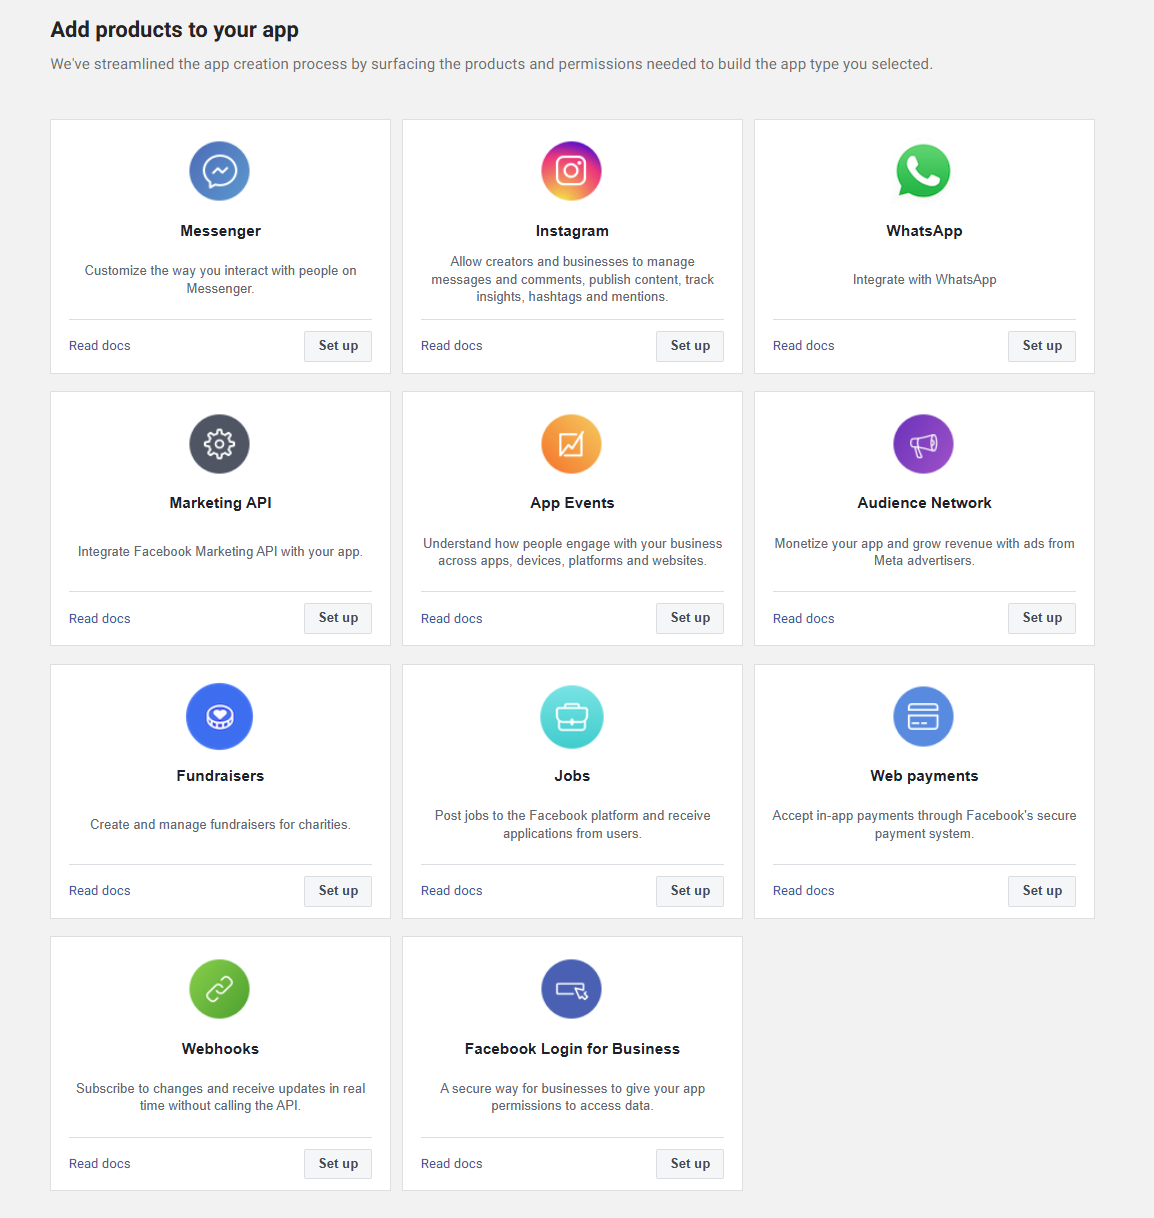
After creating the application, find the Add Product button in the left sidebar of the app panel. Under Add Products to Application on the right, find WhatsApp and click the Settings button on the WhatsApp card to complete the addition.
-
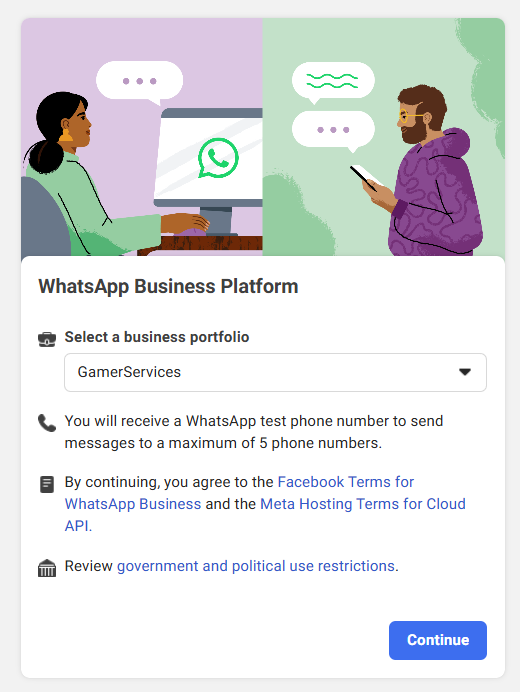
After clicking Settings in the previous step, you will be redirected to the WhatsApp product configuration page. Click Continue directly here.
-
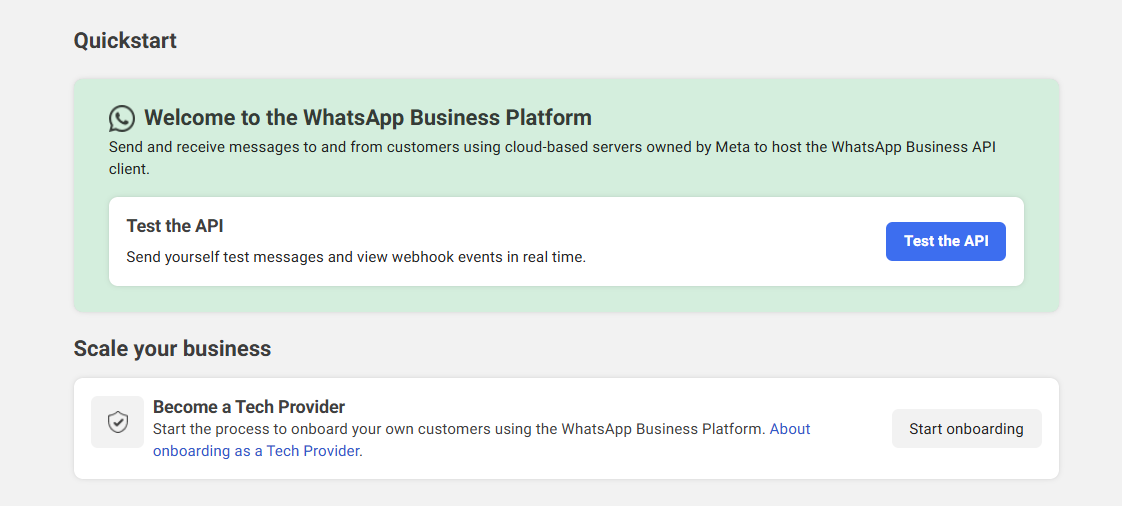
On the Quickstart interface, click Test the API:
5. Create a System User Token
For long-term testing or production environments, you need to use system user tokens. Please refer to System User Tokens Creation Process.
- Refer to the Generate System User Access Tokens section in the link above to create a system user. Select Employee for the user's identity. After creation, please refer to the illustrations in the link to grant the user permissions for the app and the corresponding WhatsApp account.
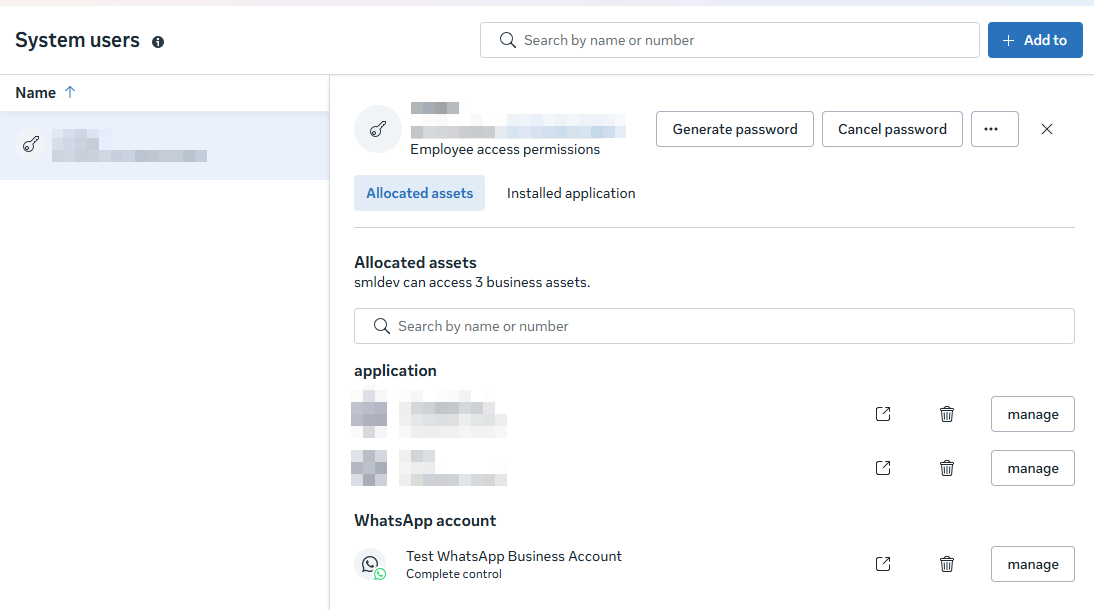
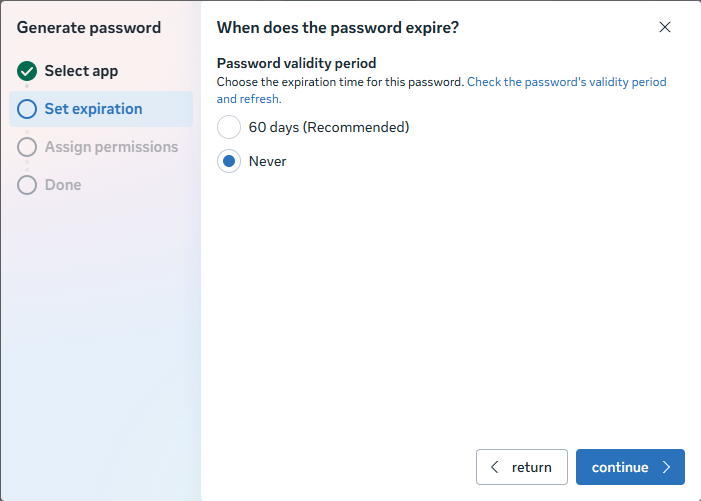
- After authorization, click "Generate Token". In the popup window, select the application, set the token expiry to never expire.
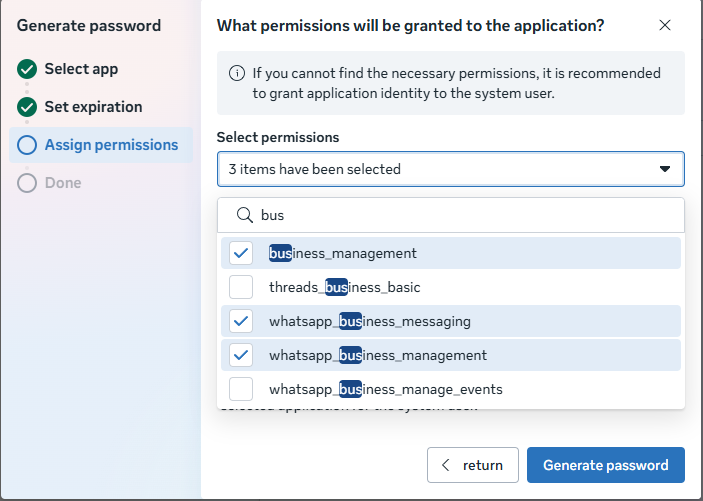
After selecting the following three permissions in the authorization window, click Generate Token to generate
- business_management
- whatsapp_business_management
- whatsapp_business_messaging
The token is displayed only once. Please save it carefully. If lost, you can only regenerate it.

6. Configure WebHook
-
In WhatsApp, configure the callback address for WebHook.
Configure the callback address and verification token provided by Player Network, then click verify and save.

-
Configure the types of messages to be received by the WebHook in WhatsApp.
You need to subscribe to messages
7. Deeplink Redirect Configuration
WhatsApp login feature involves the deeplink redirect capability. Every business integrating WhatsApp channel must configure the deeplink link on the backend. The rule is tentatively set as: xxxxx represents the domain provided by the business, https://xxxxxxxx/whatsapp?info=cccccccccccc. After specifying the domain, you need to configure the redirect file.
Configuration file as follows: https://xxxxxxxxxx/.well-known/assetlinks.json
For instructions on generating assetlinks.json, refer to DeepLink
8. Add official WhatsApp number
需准备海外未注册过WhatsApp的手机号,手机号需长期维护保证可用。
- It is recommended that each business apply for 2 business numbers, one for integration testing and one for production deployment.
- Reason: Account isolation to prevent sending messages to production users during testing; WhatsApp's callback address can only be configured to one address. If the callback address is set to the production environment, the test environment cannot use this WhatsApp business number for login
- Add new official number configuration in the console

-
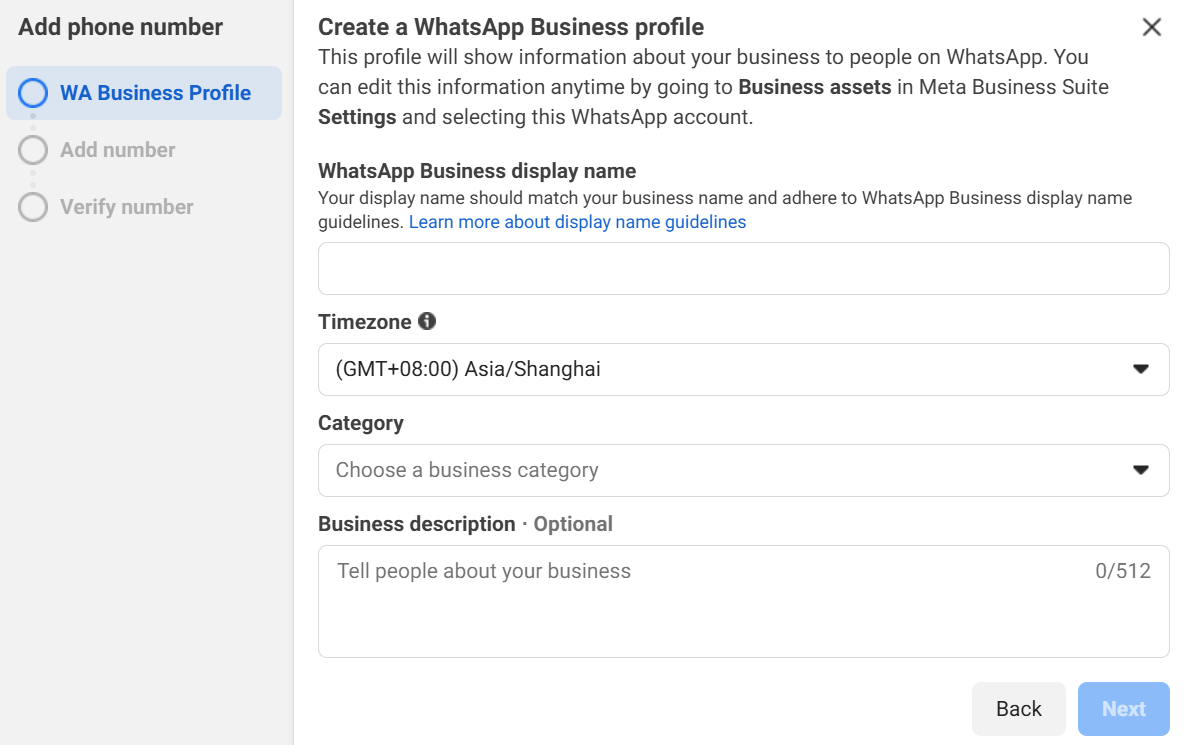
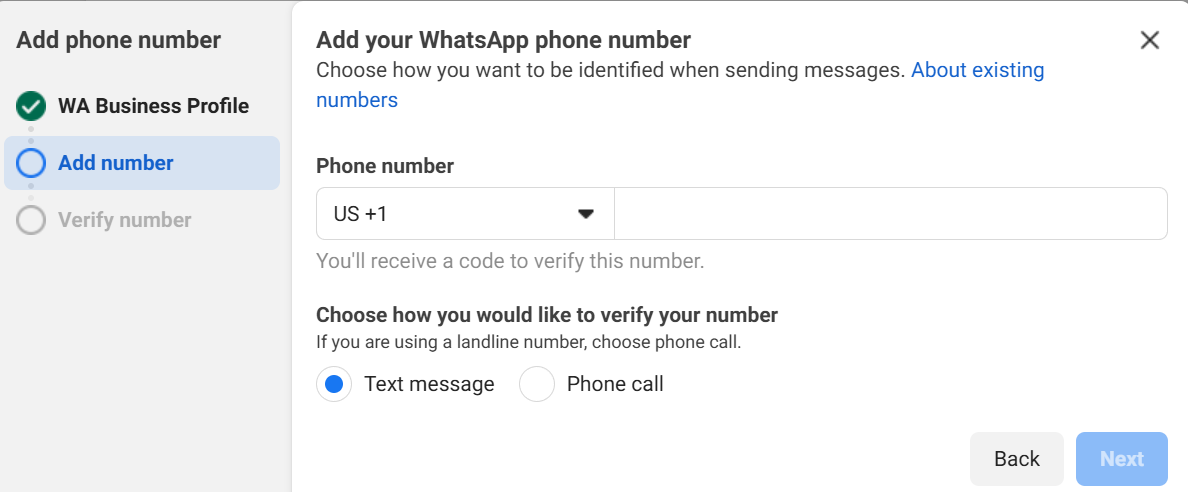
Fill out WA Business Profile
- WhatsApp Business display name: The name displayed to players as the sender identity
- Timezone: Mainly affects billing and data analytics times. It is recommended to select GMT +8:00 or keep it consistent with the project.
- Category: Select Other. Choosing Gaming type will prompt that you cannot continue to register for WhatsApp.
-
Add number and verify
-
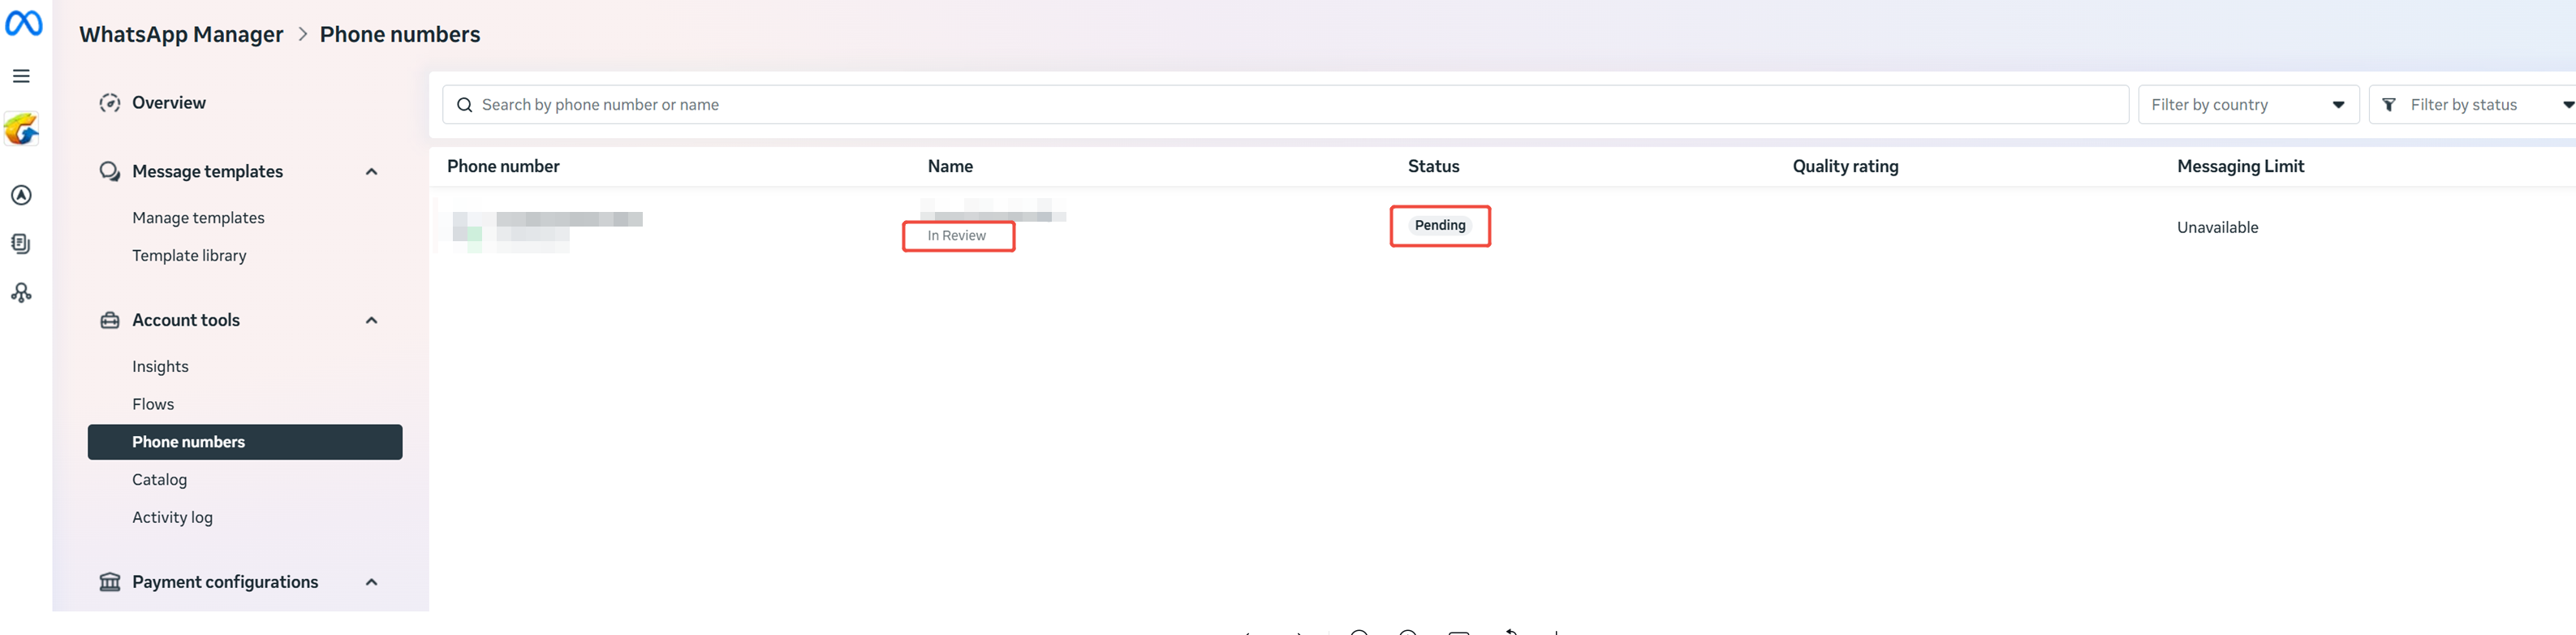
After verification, it will enter the review stage. You can check the review status on the WhatsApp Manager page.
- Complete the Registration operation through API call. The official number becomes available after this is completed.
-
Please refer to the official guide
-
API call solution (you may contact the business interface team for assistance):
-
Complete phone number creation: After successfully applying for a new phone number, you need to call Facebook's API to perform the Register operation.
curl 'https://graph.facebook.com/v24.0/{wa phone number ID}/register' -H 'Content-Type: application/json' -H 'Authorization: Bearer {token}' -d '{"messaging_product": "whatsapp", "pin": "{wa phone number 2fa pin code}"}' -
Link phone number with Facebook App: After Register, you need to call Facebook's API to perform the subscribed_apps operation.
-
9. Others
WhatsApp advertising billing application link
-
Not settled together with Facebook ad spend. WhatsApp independent billing application link
-
Settled together with Facebook ad spend. Application link
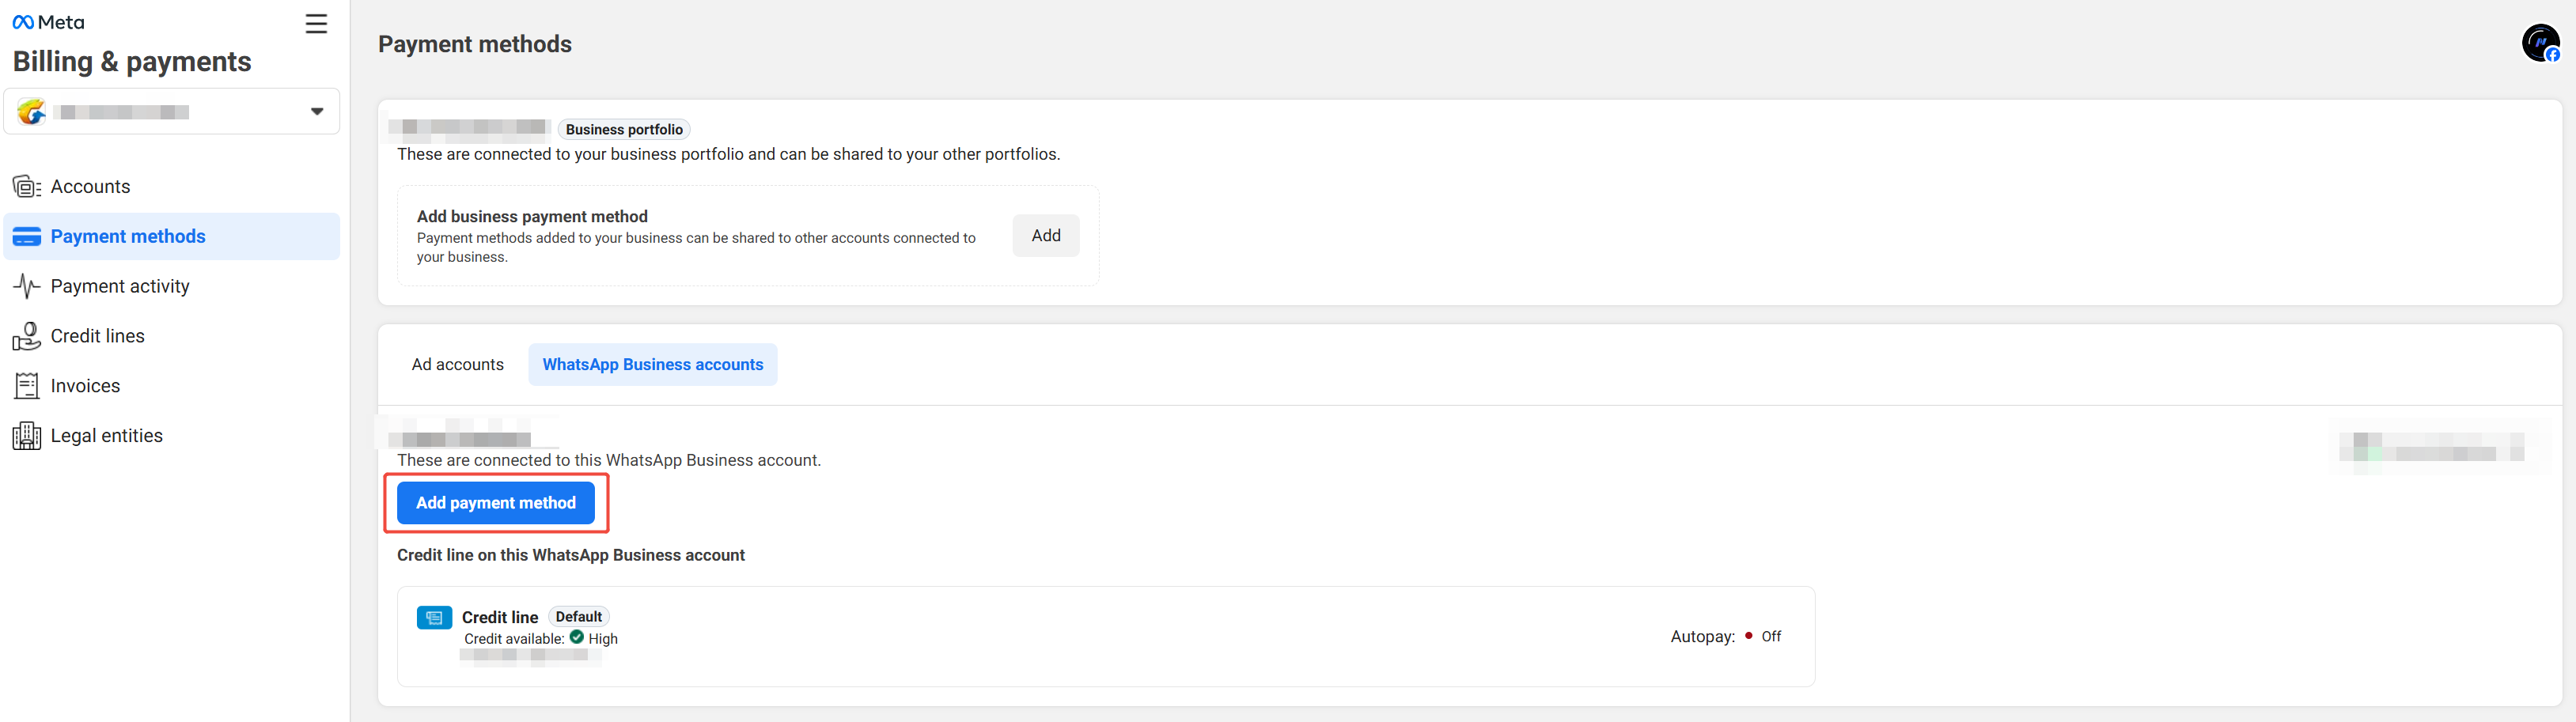
Set credit quota
It is necessary to contact the Meta Account Manager to assign a credit limit to the Business Manager (BM), or the project may add an available credit card on its own.If you need a credit quota assigned, please contact the Facebook Account Manager for assistance.
- Obtain Player Network Console login account.
- Create a new project for your game, or join an existing project.
- Download SDK.
- Integrate the SDK.
- Add WhatsApp as the login authentication method for business in Player Network Console.
Step 1: Configure SDK for WhatsApp Login
-
Open the project's INTLConfig.ini file:
INTLConfig.ini[INTL environment]
# WARNING: You should change this URL to the production environment when you release your game.
INTL_URL = https://test.intlgame.com
GAME_ID = {INTL_GAME_ID}
SDK_KEY = {INTL_SDK_KEY}
[INTL Log]
LOG_LEVEL = 1
LOG_CONSOLE_OUTPUT_ENABLE = 1
LOG_FILE_OUTPUT_ENABLE = 1
LOG_ENCRYPT_ENABLE = 0
LOG_COMPRESS_ENABLE = 0
[WhatsApp]
WHATSAPP_LOGIN_HOST = {INTL_WHATSAPP_LOGIN_HOST}
WHATSAPP_LOGIN_PATH = {INTL_WHATSAPP_LOGIN_PATH}
WHATSAPP_SERVICE_ID = {INTL_WHATSAPP_SERVICE_ID}- Set the SDK backend environment
INTL_URLtohttps://test.intlgame.com. - Replace
{INTL_GAME_ID}and{INTL_SDK_KEY}with theGAME_IDandSDK_KEYvalues assigned by the Player Network Console. - Set
LOG_LEVEL = 1,LOG_CONSOLE_OUTPUT_ENABLE = 1,LOG_FILE_OUTPUT_ENABLE = 1,LOG_ENCRYPT_ENABLE = 0, andLOG_COMPRESS_ENABLE = 0to output console and log files without encryption or compression. - Replace
{INTL_WHATSAPP_LOGIN_HOST}with the deeplink domain for WhatsApp authorization redirect. - Replace
{INTL_WHATSAPP_LOGIN_PATH}with the deeplink path for WhatsApp authorization redirect. - Replace
{INTL_WHATSAPP_SERVICE_ID}with the WhatsApp business phone number.
- Set the SDK backend environment
Step 2: Add WhatsApp Login
Player Network checks the application login status before opening the app for login.
- If the WhatsApp app is installed, Player Network opens the WhatsApp app for login.
- If the WhatsApp app is not installed, the Player Network login page will not display the WhatsApp channel login option.
- Register login-related callbacks.
- Unity
- Unreal Engine
// Add callbacks
public void AddAuthObserver()
{
    INTLAPI.AddAuthResultObserver(OnAuthResultEvent);
}

public void AddAuthBaseObserver()
{
    INTLAPI.AddAuthBaseResultObserver(OnAuthBaseResultEvent);
}

// Remove callbacks
public void RemoveAuthObserver()
{
    INTLAPI.RemoveAuthResultObserver(OnAuthResultEvent);
}

public void RemoveAuthBaseObserver()
{
    INTLAPI.RemoveAuthBaseResultObserver(OnAuthBaseResultEvent);
}

// Process the INTLAuthResult callback
public void OnAuthResultEvent(INTLAuthResult ret)
{
    Debug.Log($"MethodID: {ret.MethodId}");

    string methodTag = "";
    if (authRet.MethodId == (int)INTLMethodID.INTL_AUTH_LOGIN)
    {
        methodTag = "Login";
    }
    else if (authRet.MethodId == (int)INTLMethodID.INTL_AUTH_BIND)
    {
        methodTag = "Bind";
    }
    else if (authRet.MethodId == (int)INTLMethodID.INTL_AUTH_AUTOLOGIN)
    {
        methodTag = "AutoLogin";
    }
    else if (authRet.MethodId == (int)INTLMethodID.INTL_AUTH_QUERY_USER_INFO)
    {
        methodTag = "QueryUserInfo";
    }
    else if (authRet.MethodId == (int)INTLMethodID.INTL_AUTH_GET_AUTH_RESULT)
    {
        methodTag = "GetAuthResult";
    }
}

// Process the AuthBaseResult callback
public void OnAuthBaseResultEvent(INTLBaseResult ret)
{
    Debug.Log($"MethodID: {ret.MethodId}");

    string methodTag = "";
    if (ret.MethodId == (int)INTLMethodID.INTL_GET_WHATSAPP_SIG)
    {
        methodTag = "RequestWhatsAppSignature";
    }
}
C++ Event Handling (above v1.15)
//configure AuthResult callback
FINTLAuthEvent authEvent;
authEvent.AddUObject(this, &OnAuthResult_Implementation);
UINTLSDKAPI::SetAuthResultObserver(authEvent);
// Remove AuthResult callbacks
UINTLSDKAPI::GetAuthResultObserver().Clear();

//configure AuthBaseResult callback
FINTLAuthBaseEvent authBaseEvent;
authBaseEvent.AddUObject(this&OnAuthBaseResult_Implementation);
UINTLSDKAPI::SetAuthBaseResultObserver(authBaseEvent);
// Remove AuthBaseResult callbacks
UINTLSDKAPI::GetAuthBaseResultObserver().Clear();
void OnAuthResult_Implementation(FINTLAuthResult ret)
{
    UE_LOG(LogTemp, Warning, TEXT("MethodID: %d"), ret.MethodId);
}

void OnAuthBaseResult_Implementation(FINTLAuthBaseResult ret)
{
    UE_LOG(LogTemp, Warning, TEXT("MethodID: %d"), ret.MethodId);
}
Unreal Event Handling
void OnAuthResult_Implementation(FINTLAuthResult ret)
{
    UE_LOG(LogTemp, Warning, TEXT("MethodID: %d"), ret.MethodId);
}

void OnAuthBaseResult_Implementation(FINTLAuthBaseResult ret)
{
    UE_LOG(LogTemp, Warning, TEXT("MethodID: %d"), ret.MethodId);
}
- Invoke the
AutoLogininterface to log in automatically.
- Unity
- Unreal Engine
INTLAPI.AutoLogin();
UINTLSDKAPI::AutoLogin();
- When automatic login fails, call the
RequestWhatsAppSignatureinterface to obtain the WhatsApp redirect request and carry the code.
- Unity
- Unreal Engine
INTLAPI.RequestWhatsAppSignature(string ExtraJson);
// taking Facebook as example
UINTLSDKAPI::RequestWhatsAppSignature(const FString extraJson);
- Send authorization request to WhatsApp business number, receive deeplink click and carry authorization information back to the game, call the
LoginForLIinterface to log in.
- Unity
- Unreal Engine
INTLAPI.LoginForLI(INTLChannel.WhatsApp,"",ExtraJson);
UINTLSDKAPI::LoginForLI(EINTLLoginChannel::WhatsApp,"",extraJson);
- Synchronize the client's authentication status with the game backend and await the final validation result.
If you encounter issues during integration, see FAQs.
