Upgrade Guide
For SDK versions that do not require additional operations, download the latest SDK version and replace the old SDK files with the new ones, while keeping all configurations from the previous version.
For SDK versions that require additional operations, refer to the upgrade instructions for each specific version.
For upgrade instructions for Player Network SDK versions prior to V1.17, please contact the Player Network assistant.
After completing the upgrade, verify the configuration against the checklist in this document.
Check Configuration
It is recommended to use a comparison tool (e.g., "Beyond Compare") to compare the old and new versions and update the configurations one by one.
INTLConfig.ini
The path of INTLConfig.ini in the project is:
- Unity
- Unreal Engine
| 1.17.00 | 1.16.05 |
|---|---|
INTLSDK/Scripts/INTLConfig/Editor/Resources/INTLConfig.ini | Android: /Plugins/Android/assets/INTLConfig.iniiOS: /Plugins/iOS/INTLSDK/INTLCore/INTLSDK.bundle/INTLConfig.iniWindows, PS5: /Plugins/x86_64/INTLConfig.ini Nintendo: /Plugins/Switch/INTLConfig.ini |
| 1.17.00 | 1.16.05 |
|---|---|
INTLSDK/Source/INTLConfig/Configs/Resources/INTLConfig.ini | Android: INTLSDKPlugin/Source/INTLSDKPlugin/INTLSDK/Android/assets/INTLConfig.ini iOS: INTLSDKPlugin/Source/INTLSDKPlugin/INTLSDK/iOS/INTLCore/INTLSDK.bundle/INTLConfig.ini Windows, PS5: INTLSDKPlugin/Source/INTLSDKPlugin/INTLSDK/resources/INTLConfig.ini Nintendo: INTLSDKPlugin/Source/INTLSDKPlugin/INTLSDK/Switch/INTLConfig.ini |
It is recommended to compare each field to ensure that every configuration in the INTLConfig.ini file is correct.
Firebase Configuration
The path for the Firebase configuration file is:
Android: Assets/Plugins/Android/google-services.json
iOS: Assets/Plugins/iOS/INTLSDK/INTLFirebase/ThirdSDK/GoogleService-Info.plist
Ensure that the Firebase configuration file for the corresponding platform has not been deleted and that all configuration items are correct.
Gradle Configuration
The path for the Gradle configuration file is:
- Unity
- Unreal Engine
Unity 2018.x and earlier: \Plugins\Android\mainTemplate.gradle
Unity 2018.x and later:
\Plugins\Android\baseProjectTemplate.gradlelauncherTemplate.gradlemainTemplate.gradle
/Plugins/INTLSDKPlugin/Source/INTLSDKPlugin/INTLSDK/Android/INTLCore_UPL.xml
Ensure that the IDs and other values in the configuration files are not overwritten.
Info.plist
- Unity
- Unreal Engine
INTL{Plugin}Kit.projmods is the Info.plist configuration file for the Player Network SDK.The Player Network SDK reads the INTL{Plugin}Kit.projmods files in the INTLSDK/Editor/XUPorter/Mods directory and adds the imported bundles, frameworks, and other dependencies into Xcode.
Since each INTL{Plugin}Kit.projmods file corresponds to an SDK plugin, all placeholders in the .projmods files should be checked and updated before packaging.
For Player Network SDK V1.18 and later, check that all .plist files in the INTLSDK/Source/INTLConfig/Configs/iOS/Plist/ directory are configured correctly.
For earlier versions of Player Network SDK, verify that Unreal Engine > Settings > Project Settings > Platforms > iOS > Extra PList Data is configured correctly.
For the correct configuration for each channel, refer to the tutorial on configuring login authentication services: Tutorial.
Swift Configuration
If the plugin package uses the Swift SDK, mixed Swift and Objective-C issues may occur on iOS.Follow these steps to create a bridging layer to ensure class names are consistent between the two programming languages:
The Facebook and LINE plugins use Swift, so special attention must be paid to this configuration when packaging in Xcode.
- Unity
- Unreal Engine
For Unity 2019.x, skip steps 1 through 4.
-
Create a new file of type Swift File.
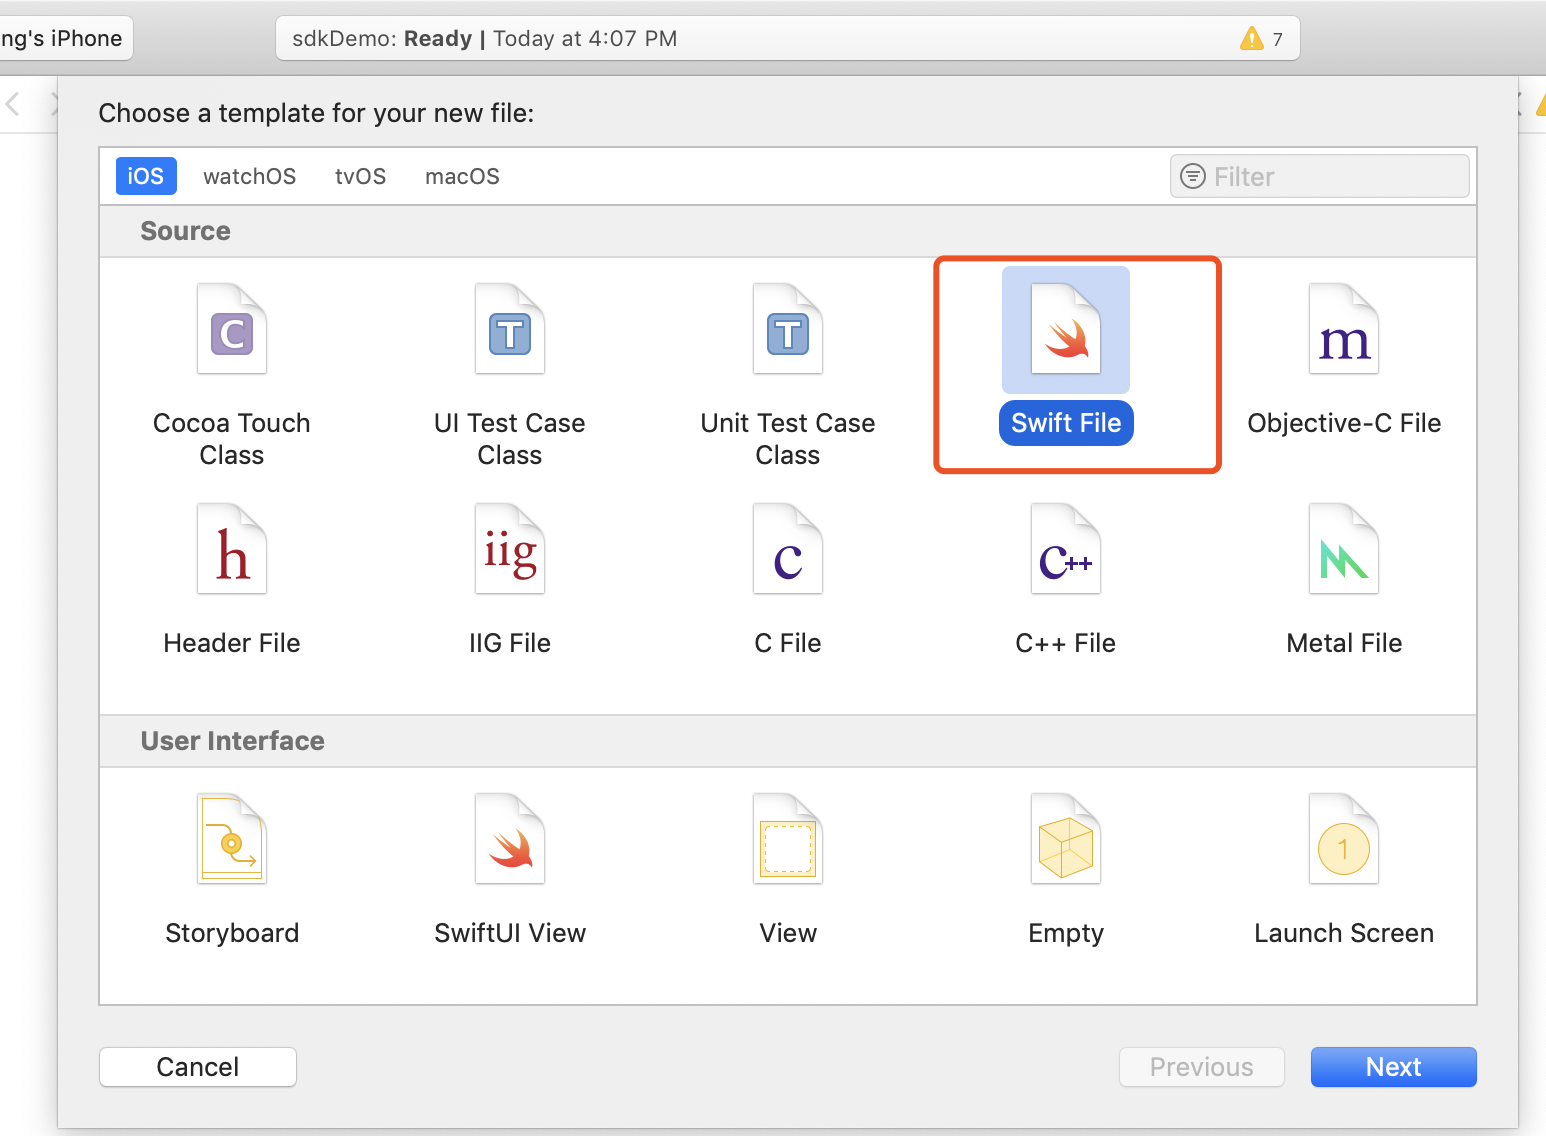
-
Set the file name to have the
.swiftextension, then click Create.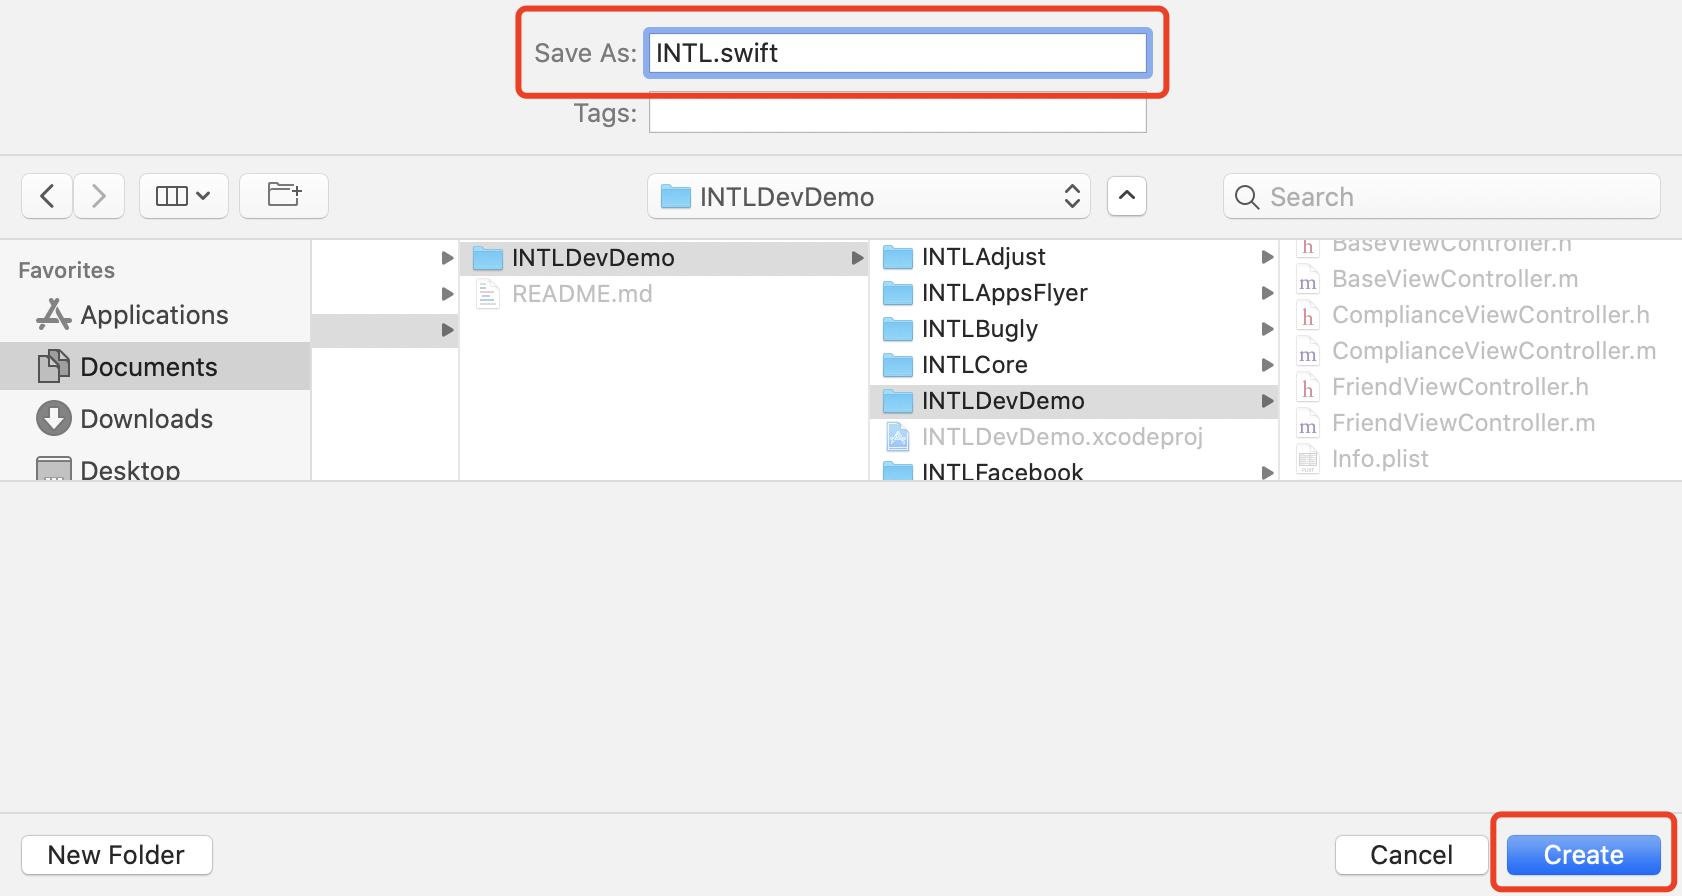
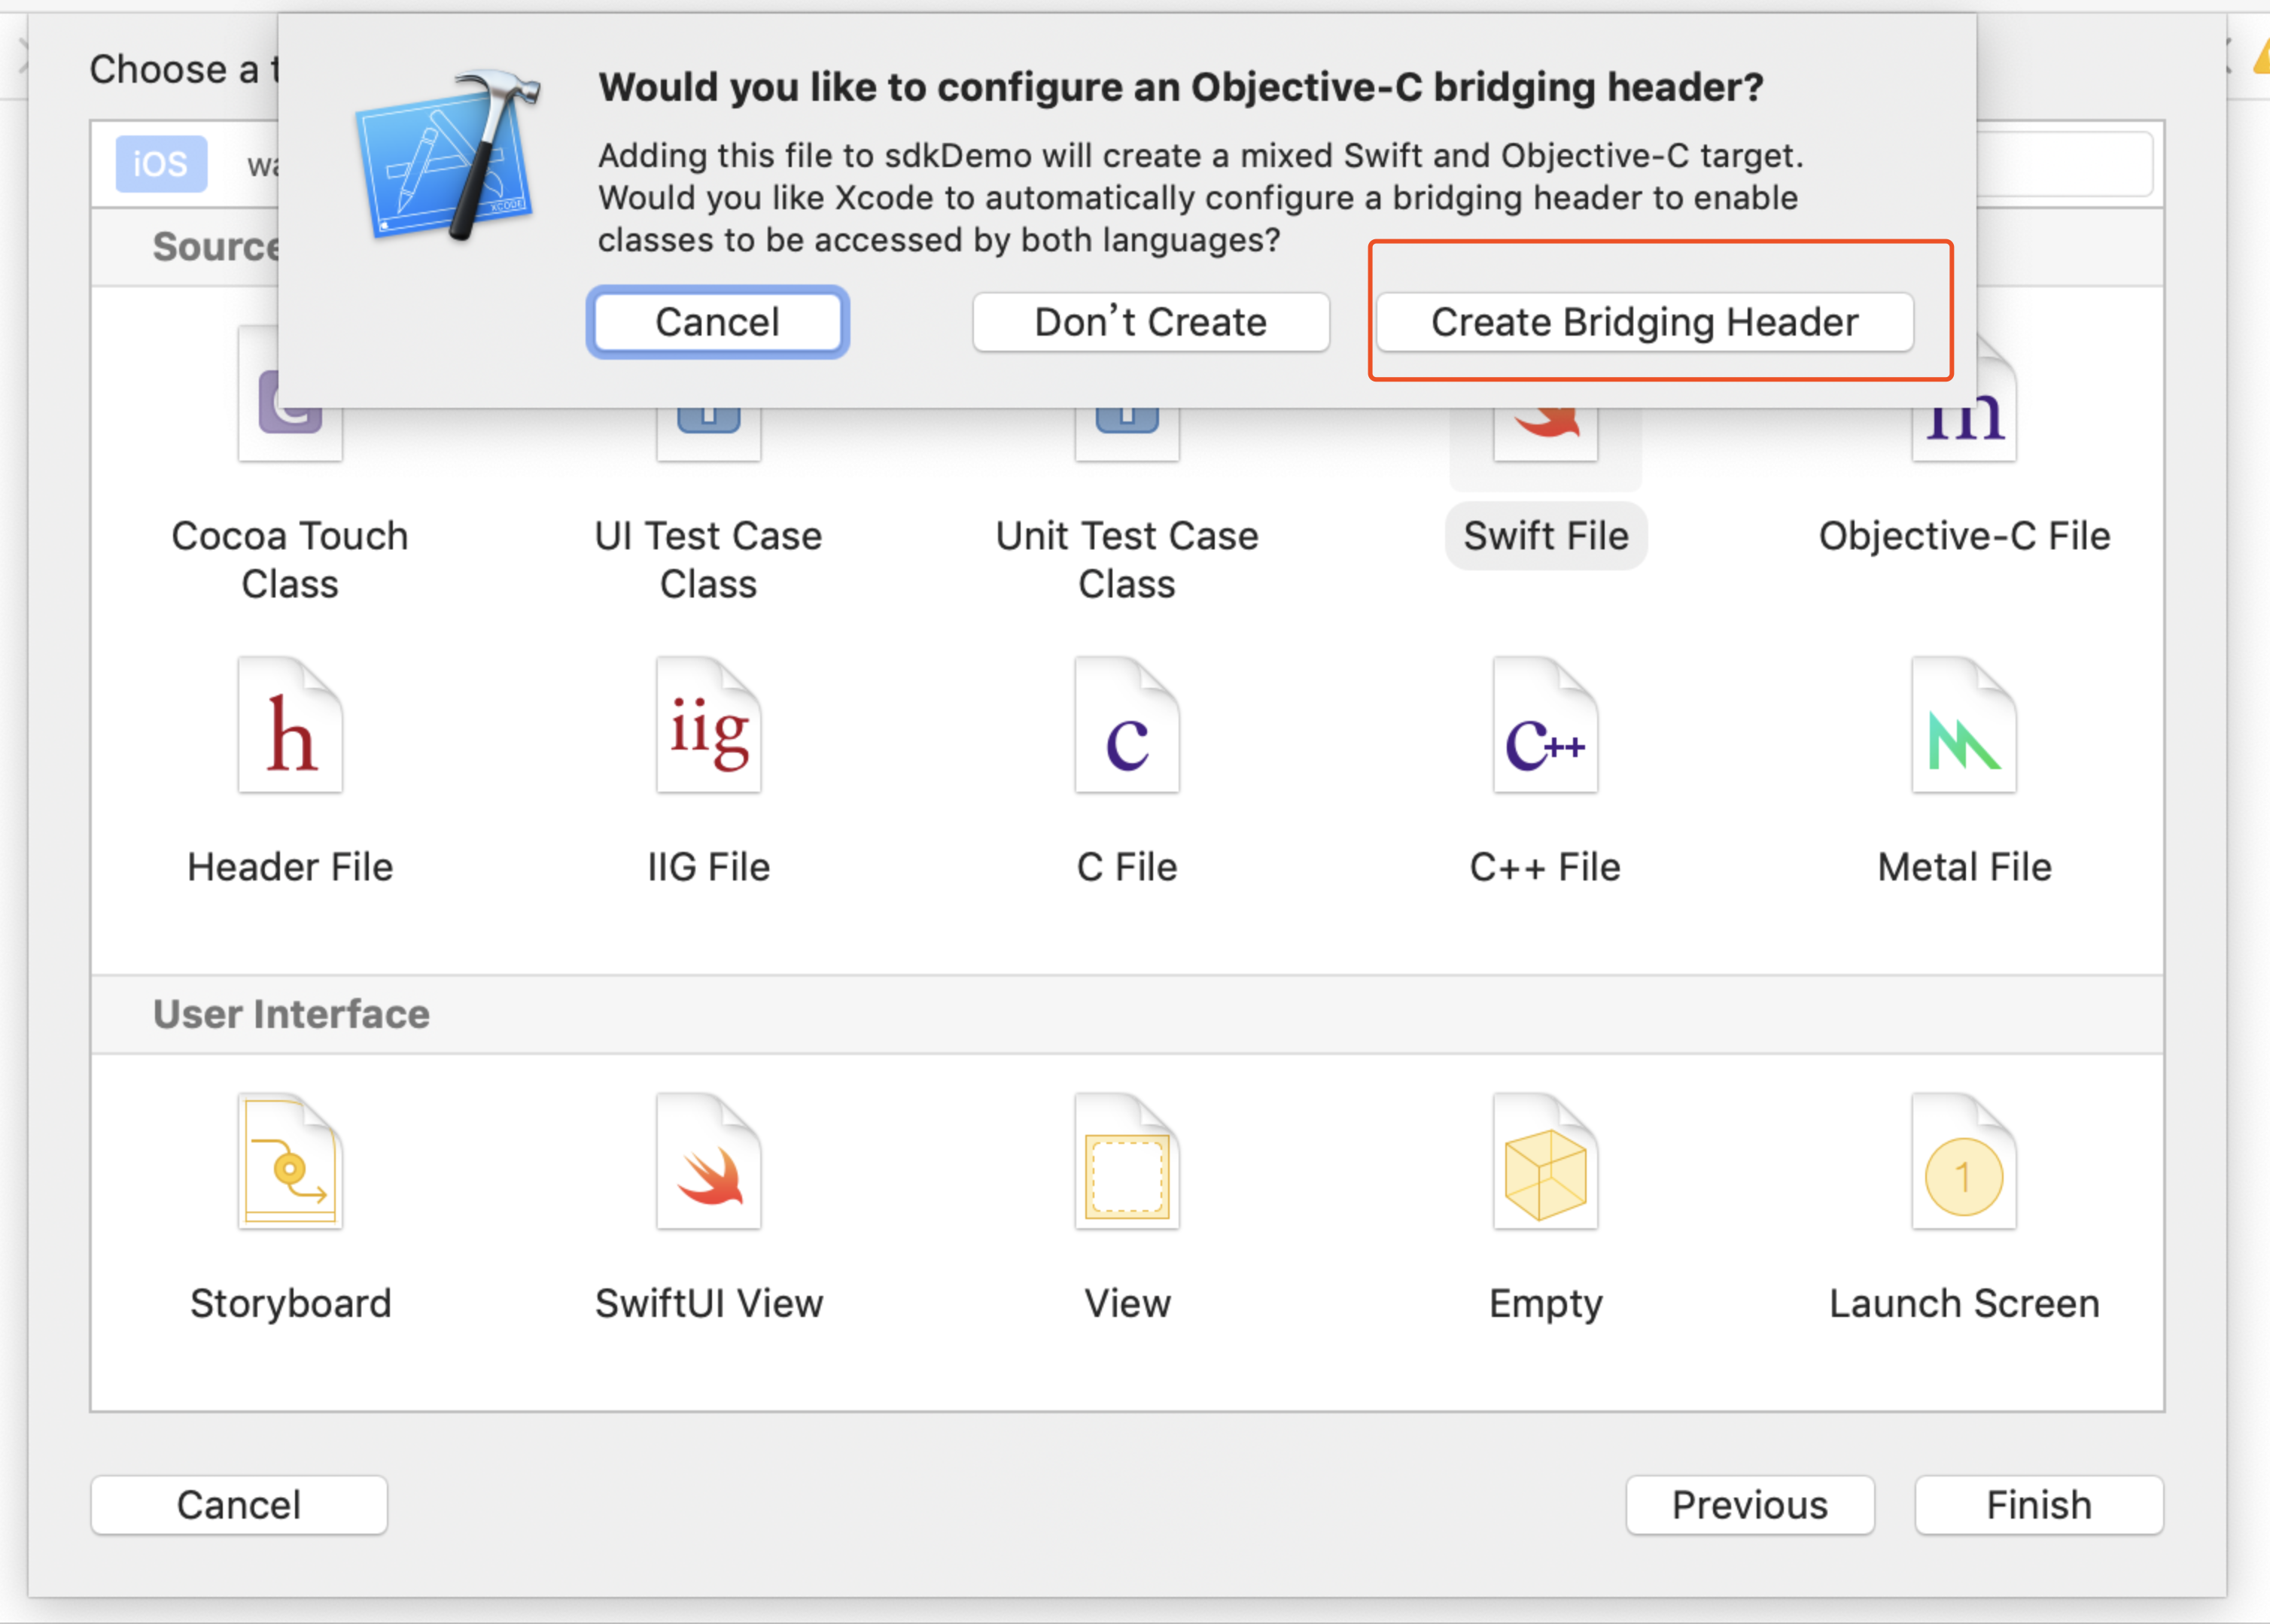
-
Click Create Bridging Header.
Be sure to click Create Bridging Header.Otherwise, Xcode will not create the bridging header.
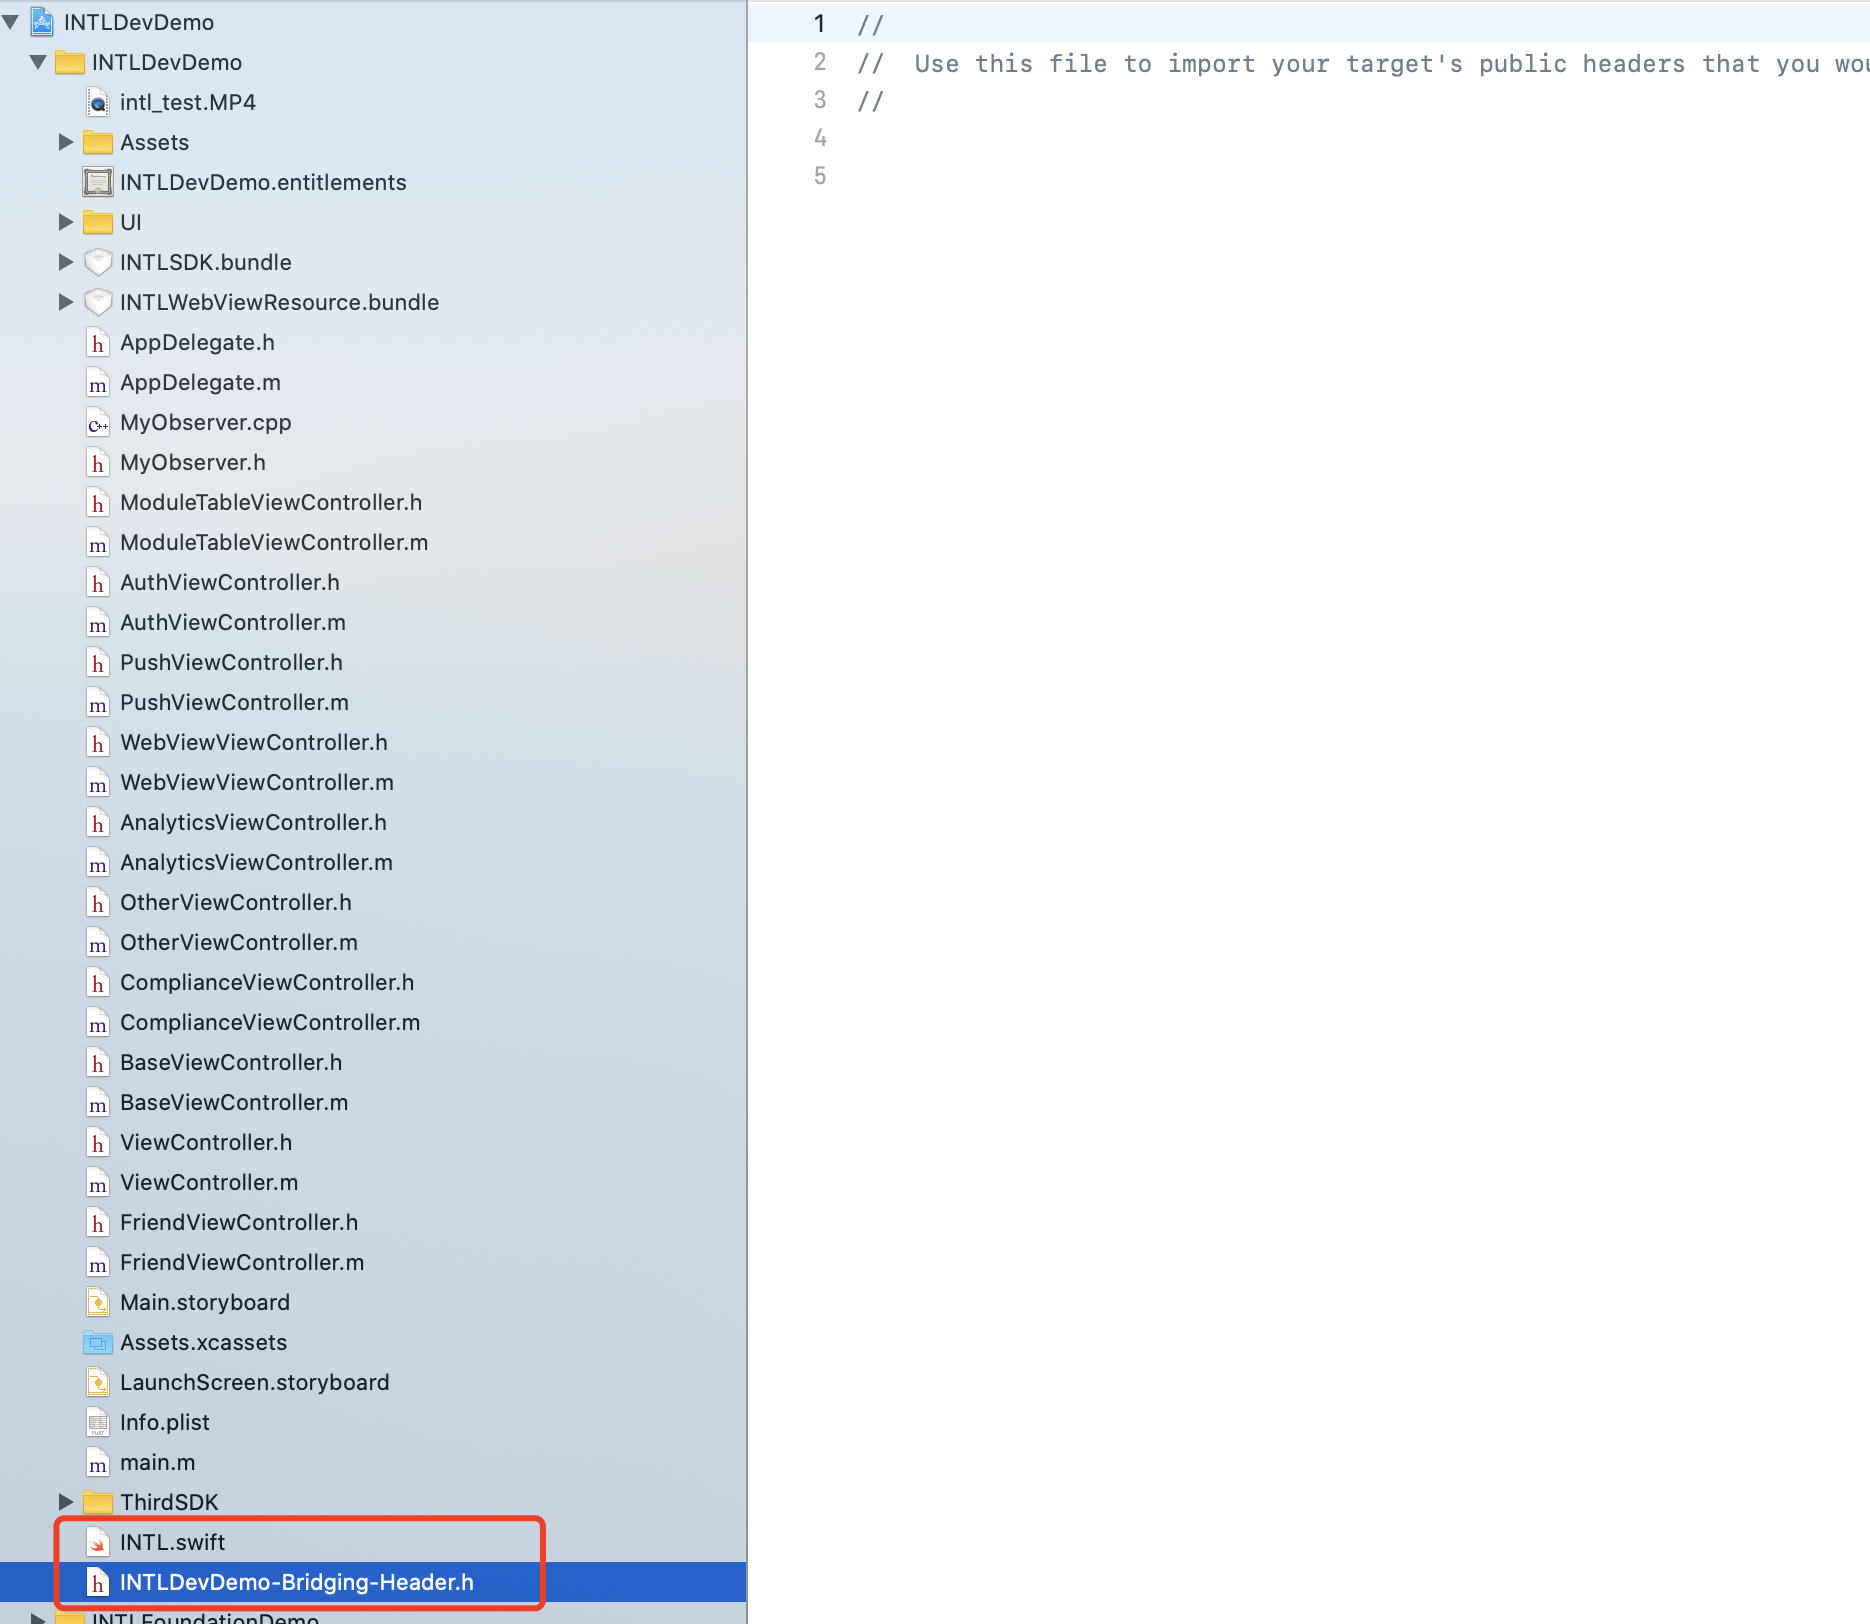
- Check whether two files have been generated in your Xcode project (the
.swiftfile created in step 2, and the automatically generatedproject_name-Bridging-Header.hfile).
Do not modify the file content.
-
In Xcode, go to UnityFramework and enter Library Search Paths in the search box at the top right.
-
On the search results page, add the following configuration to Library Search Paths:
(Keep the order consistent)
$(SDKROOT)/usr/lib/swift
$(TOOLCHAIN_DIR)/usr/lib/swift/$(PLATFORM_NAME)
$(TOOLCHAIN_DIR)/usr/lib/swift-5.0/$(PLATFORM_NAME)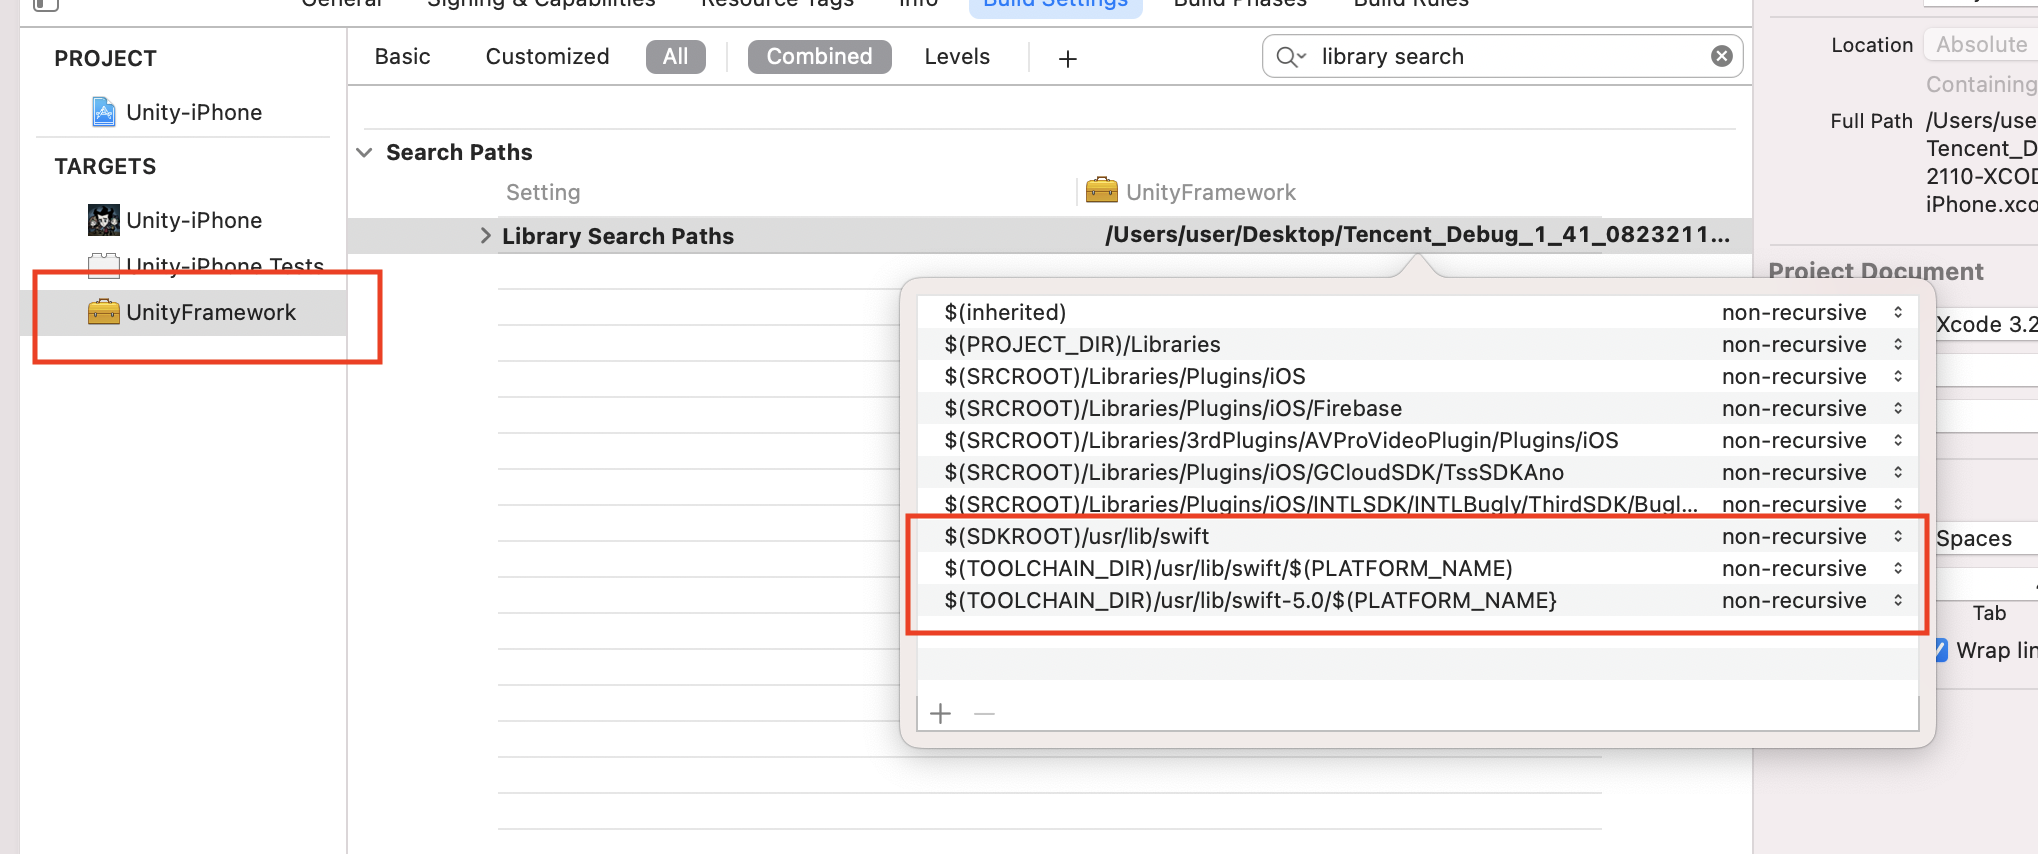
-
Enter Other Linker Flags in the search box at the top right.
-
Add
-lswiftCompatibility51in Other Linker Flags.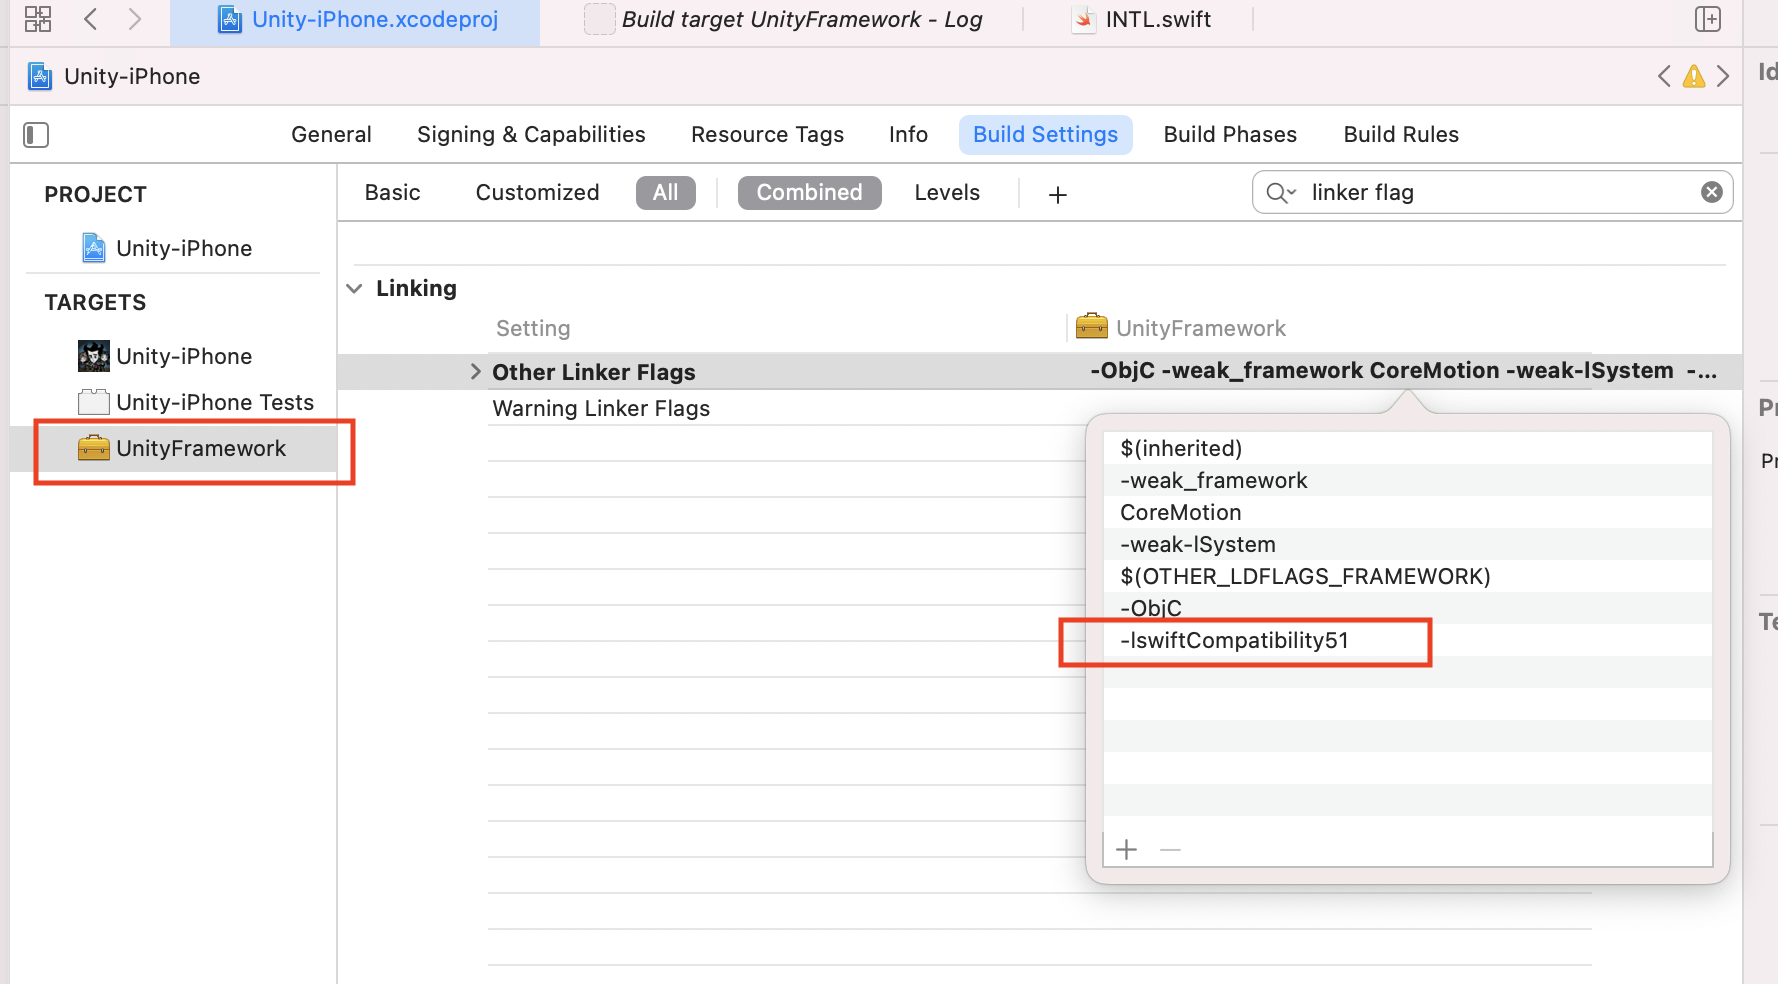
-
Create a new file of type Swift File.
-
Set the file name to
.swiftextension, then click Create. -
Click Create Bridging Header.
Be sure to click Create Bridging Header.Otherwise, Xcode will not create the bridging header.
- Check whether two files have been generated in your Xcode project (the
.swiftfile created in step 2 and the automatically createdproject_name-Bridging-Header.hfile).
Do not modify the file content.
-
When using Xcode 12 or later, add the following code to
/Plugins/INTLSDK/Source/INTLCore/INTLCore.Build.cs:PublicSystemLibraryPaths.Add("/Applications/Xcode.app/Contents/Developer/Toolchains/XcodeDefault.xctoolchain/usr/lib/swift/iphoneos");
PublicSystemLibraryPaths.Add("/Applications/Xcode.app/Contents/Developer/Toolchains/XcodeDefault.xctoolchain/usr/lib/swift-5.0/iphoneos");
Player Network SDK already includes the necessary code.However, when compiling Unreal Engine with Swift libraries using Xcode 12 or later, the following error still occurs.If you use a version of Xcode before 12, you can skip this step.

-
Because iOS Swift modules cannot be directly added to Unreal Engine, you must modify your local copy of the Unreal Engine source code.
-
Add the following code in the
private void AppendProjectBuildConfiguration(StringBuilder Content, string ConfigName, string ConfigGuid)function in/Your_UE_Installation_Path/Engine/Source/Programs/UnrealBuildTool/ProjectFiles/Xcode/XcodeProject.cs:// Enable Swift
Content.Append("\t\t\t\tCLANG_ENABLE_MODULES = YES;" + ProjectFileGenerator.NewLine);
Content.Append("\t\t\t\tSWIFT_VERSION = 5.0;" + ProjectFileGenerator.NewLine);
Content.Append("\t\t\t\tLIBRARY_SEARCH_PATHS = \"$(TOOLCHAIN_DIR)/usr/lib/swift/$(PLATFORM_NAME)\";" + ProjectFileGenerator.NewLine);
if (ConfigName == "Debug")
{
Content.Append("\t\t\t\tSWIFT_OPTIMIZATION_LEVEL = \"-Onone\";" + ProjectFileGenerator.NewLine);
}
Content.Append("\t\t\t\tALWAYS_EMBED_SWIFT_STANDARD_LIBRARIES = YES;" + ProjectFileGenerator.NewLine);
Content.Append("\t\t\t\tEMBEDDED_CONTENT_CONTAINS_SWIFT = YES;" + ProjectFileGenerator.NewLine);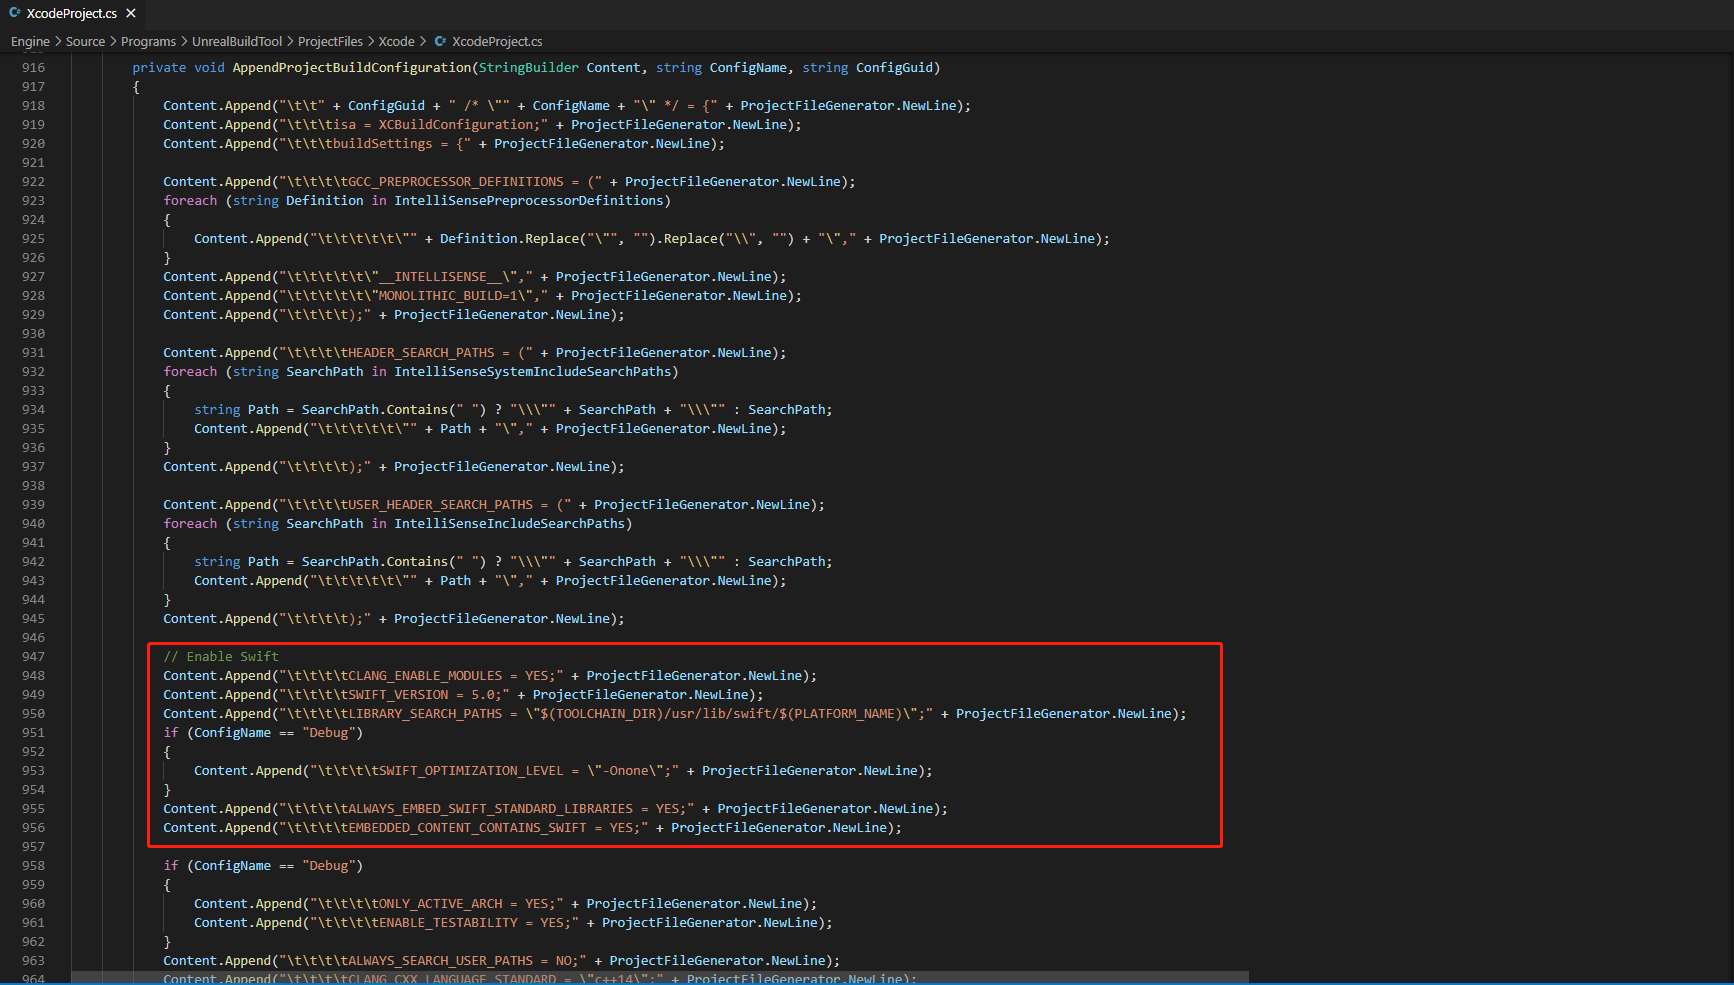
-
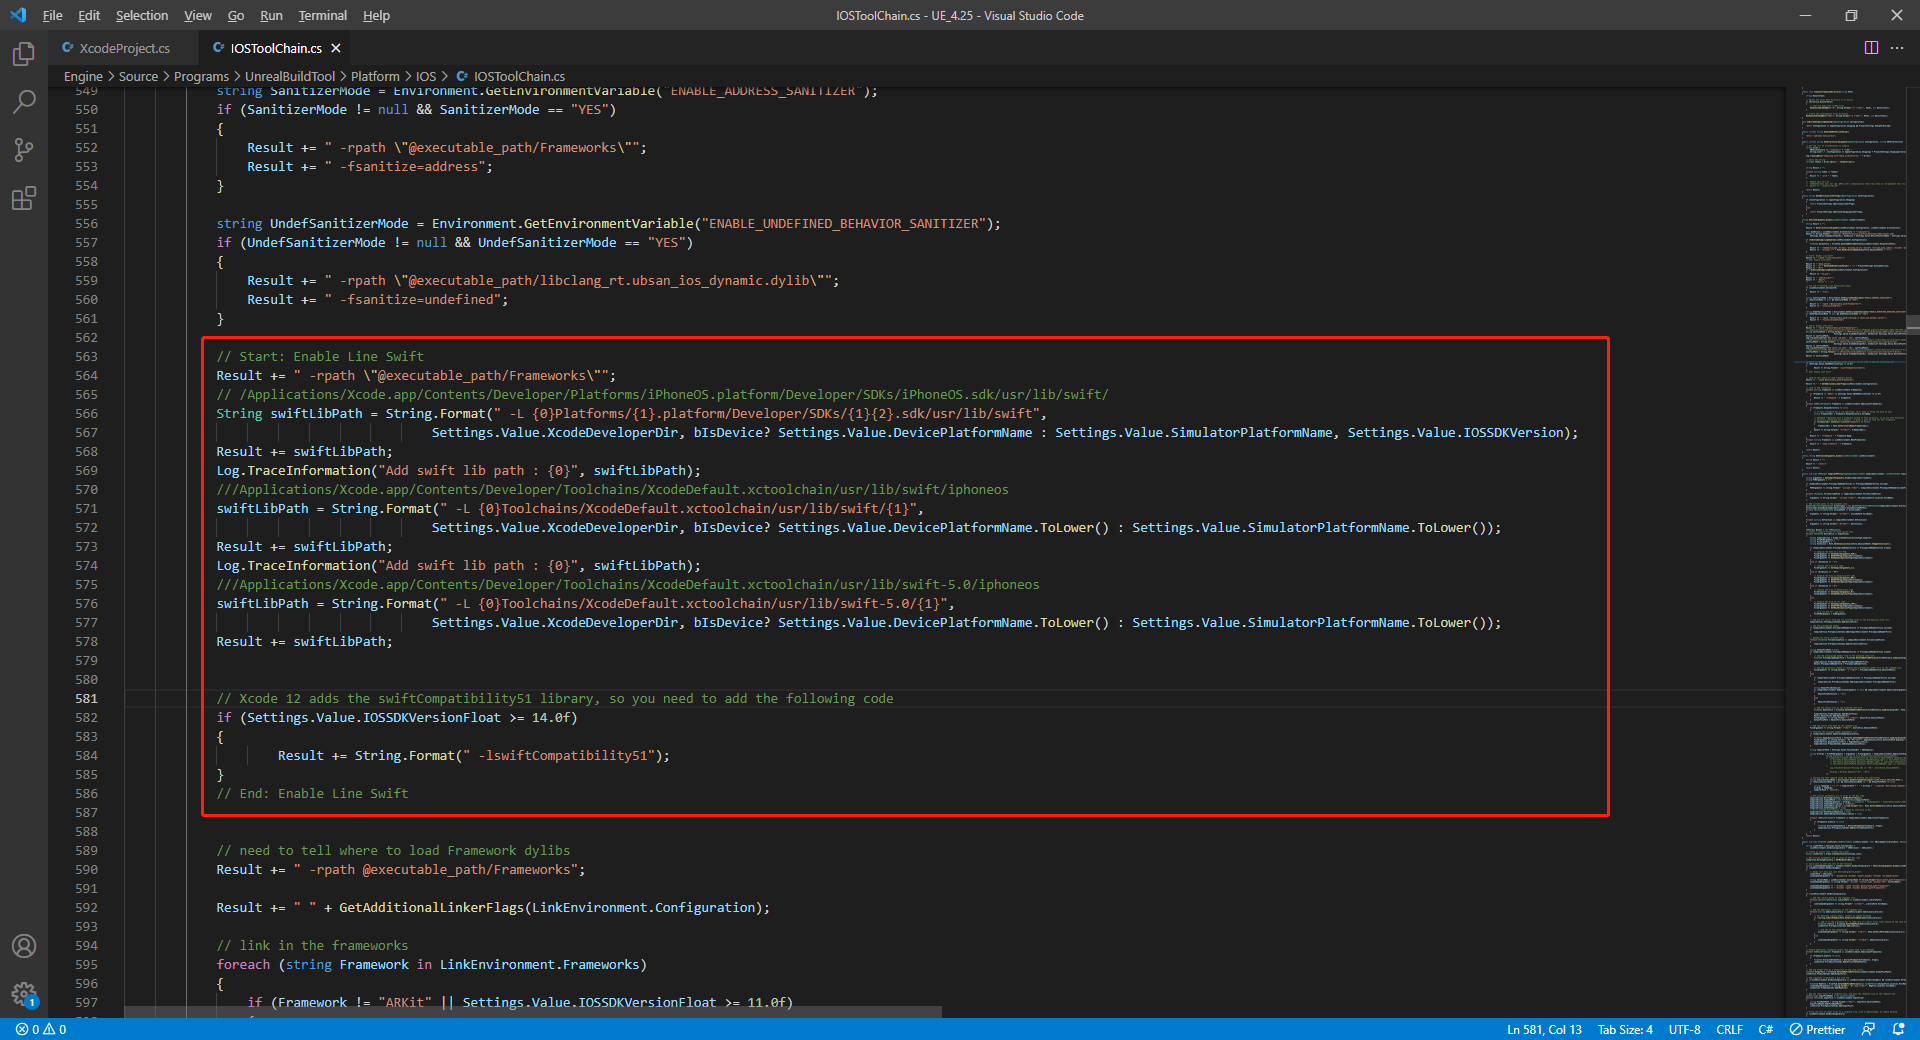
Add the following code in the
string GetLinkArguments_Global(LinkEnvironment LinkEnvironment)function in/Your_UE_Installation_Path/Engine/Source/Programs/UnrealBuildTool/Platform/IOS/IOSToolChain.cs:- Before XCode 12
- XCode 12 and later
// enable swift support
Result += " -rpath \"/usr/lib/swift\"";
Result += " -rpath \"@executable_path/Frameworks\"";
// /Applications/Xcode.app/Contents/Developer/Platforms/iPhoneOS.platform/Developer/SDKs/iPhoneOS.sdk/usr/lib/swift/
String swiftLibPath = String.Format(" -L {0}Platforms/{1}.platform/Developer/SDKs/{1}{2}.sdk/usr/lib/swift",
                            Settings.Value.XcodeDeveloperDir, bIsDevice? Settings.Value.DevicePlatformName : Settings.Value.SimulatorPlatformName, Settings.Value.IOSSDKVersion);
Result += swiftLibPath;
Log.TraceInformation("Add swift lib path : {0}", swiftLibPath);
///Applications/Xcode.app/Contents/Developer/Toolchains/XcodeDefault.xctoolchain/usr/lib/swift/iphoneos
swiftLibPath = String.Format(" -L {0}Toolchains/XcodeDefault.xctoolchain/usr/lib/swift/{1}",
                            Settings.Value.XcodeDeveloperDir, bIsDevice? Settings.Value.DevicePlatformName.ToLower() : Settings.Value.SimulatorPlatformName.ToLower());
Result += swiftLibPath;
Log.TraceInformation("Add swift lib path : {0}", swiftLibPath);
///Applications/Xcode.app/Contents/Developer/Toolchains/XcodeDefault.xctoolchain/usr/lib/swift-5.0/iphoneos
swiftLibPath = String.Format(" -L {0}Toolchains/XcodeDefault.xctoolchain/usr/lib/swift-5.0/{1}",
                            Settings.Value.XcodeDeveloperDir, bIsDevice? Settings.Value.DevicePlatformName.ToLower() : Settings.Value.SimulatorPlatformName.ToLower());
Result += swiftLibPath;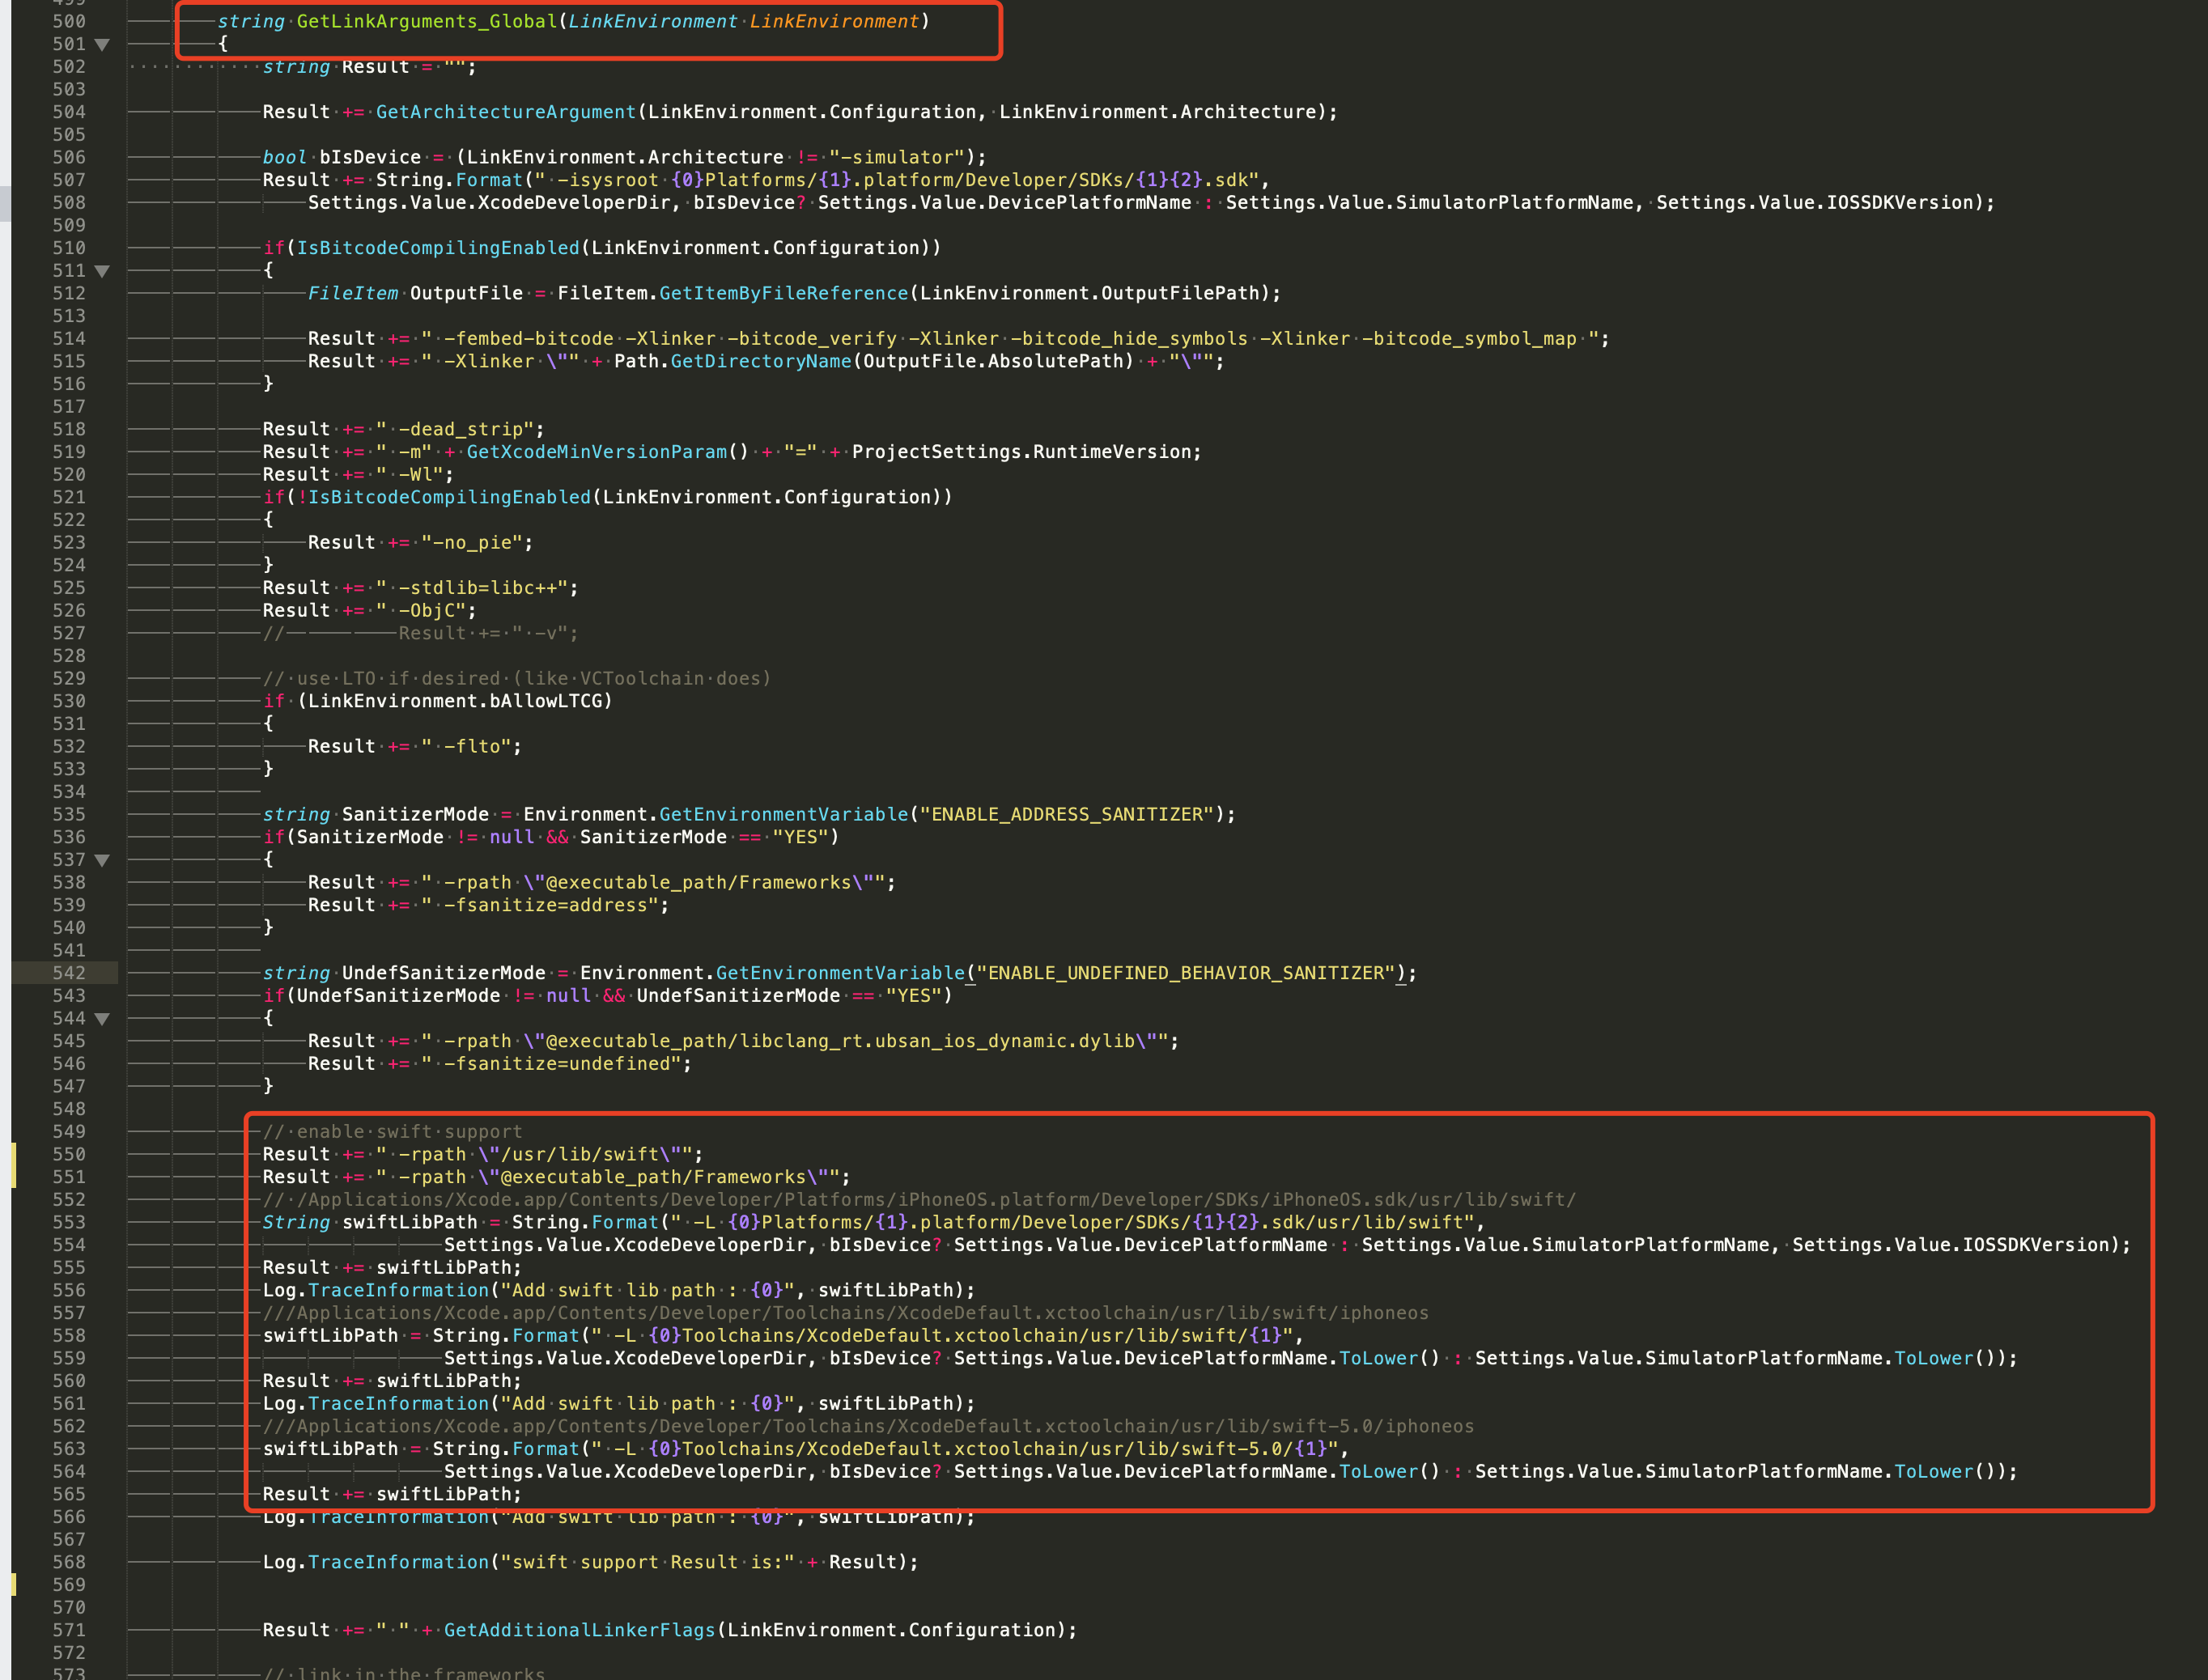
// This line of code must be prepended (see the sample image below for the position of the prepended code)
// enable swift support, make sure '/usr/lib/ swift' goes before '@executable_path/Frameworks'
Result += " -rpath \"/usr/lib/swift\"";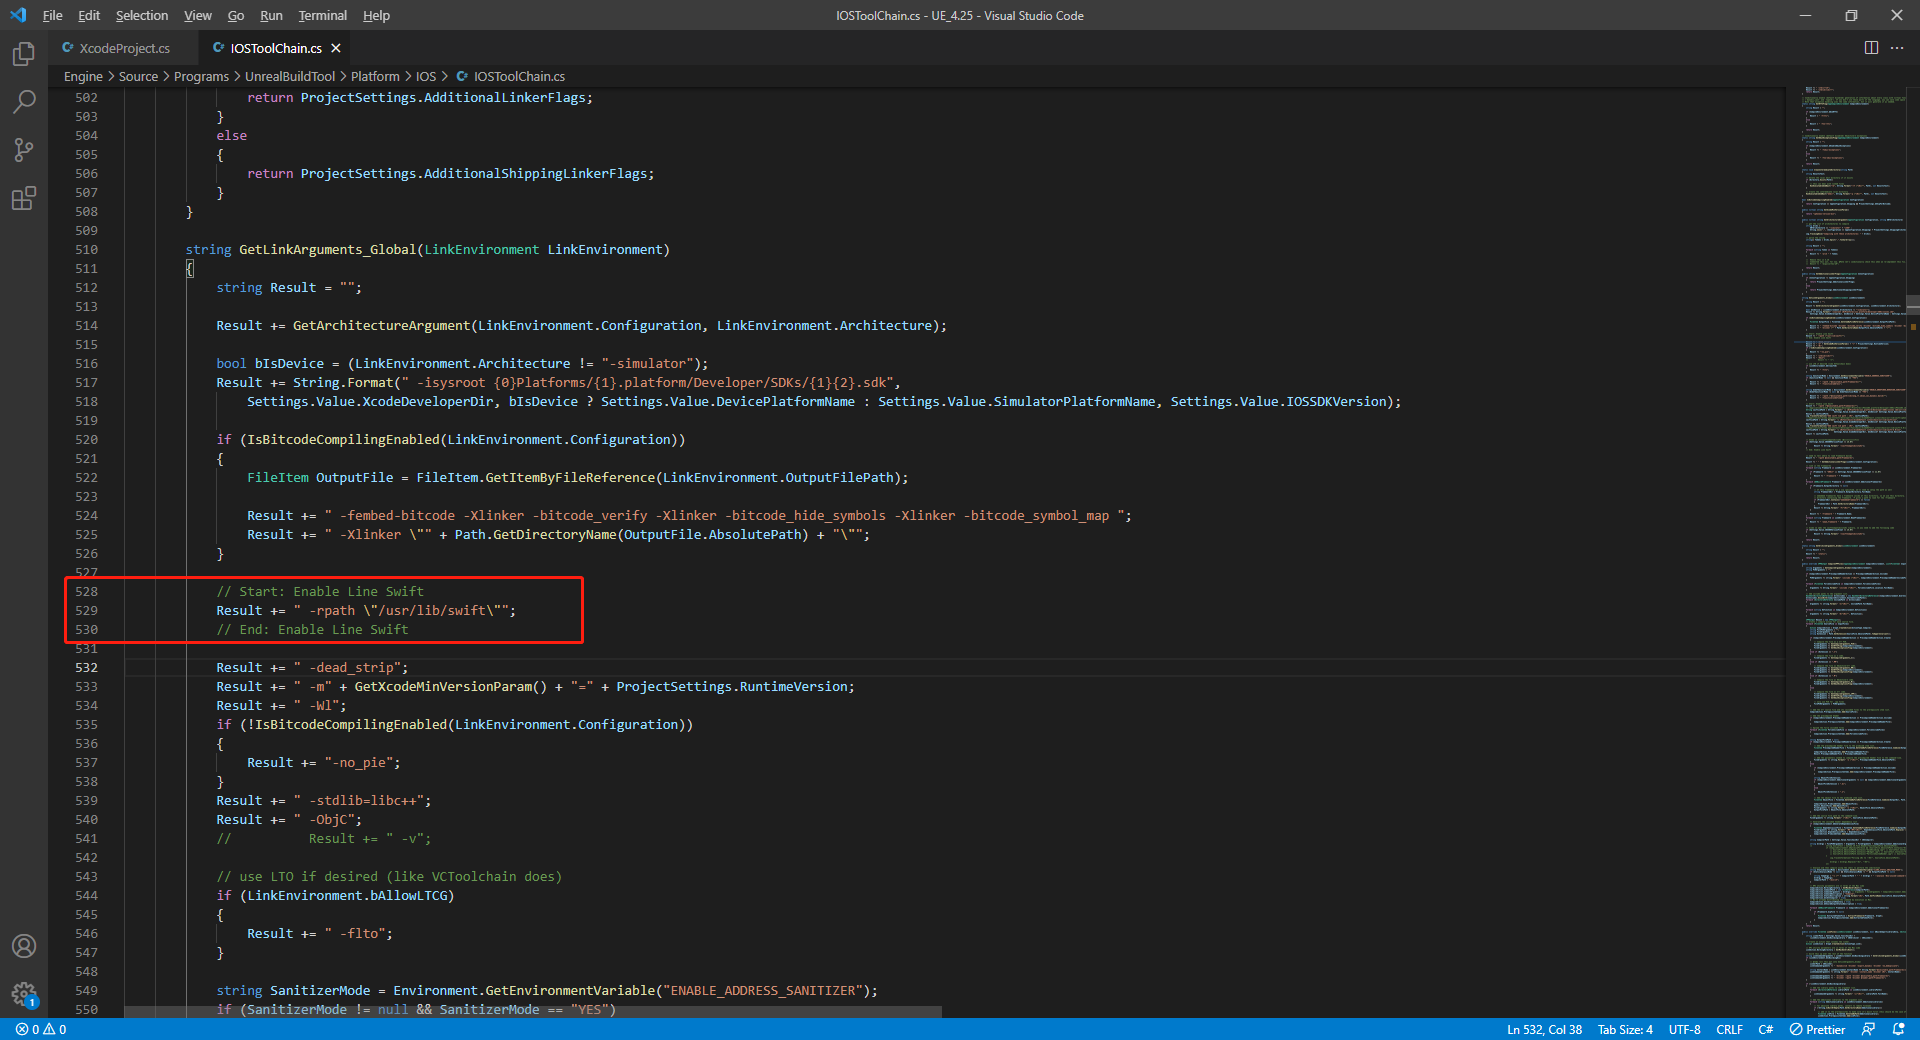
// enable swift support
Result += " -rpath \"@executable_path/Frameworks\"";
// /Applications/Xcode.app/Contents/Developer/Platforms/iPhoneOS.platform/Developer/SDKs/iPhoneOS.sdk/usr/lib/swift/
String swiftLibPath = String.Format(" -L {0}Platforms/{1}.platform/Developer/SDKs/{1}{2}.sdk/usr/lib/swift",
                            Settings.Value.XcodeDeveloperDir, bIsDevice? Settings.Value.DevicePlatformName : Settings.Value.SimulatorPlatformName, Settings.Value.IOSSDKVersion);
Result += swiftLibPath;
Log.TraceInformation("Add swift lib path : {0}", swiftLibPath);
///Applications/Xcode.app/Contents/Developer/Toolchains/XcodeDefault.xctoolchain/usr/lib/swift/iphoneos
swiftLibPath = String.Format(" -L {0}Toolchains/XcodeDefault.xctoolchain/usr/lib/swift/{1}",
                            Settings.Value.XcodeDeveloperDir, bIsDevice? Settings.Value.DevicePlatformName.ToLower() : Settings.Value.SimulatorPlatformName.ToLower());
Result += swiftLibPath;
Log.TraceInformation("Add swift lib path : {0}", swiftLibPath);
///Applications/Xcode.app/Contents/Developer/Toolchains/XcodeDefault.xctoolchain/usr/lib/swift-5.0/iphoneos
swiftLibPath = String.Format(" -L {0}Toolchains/XcodeDefault.xctoolchain/usr/lib/swift-5.0/{1}",
                            Settings.Value.XcodeDeveloperDir, bIsDevice? Settings.Value.DevicePlatformName.ToLower() : Settings.Value.SimulatorPlatformName.ToLower());
Result += swiftLibPath;

// Xcode 12 adds the swiftCompatibility51 library, so you need to add the following code
if (Settings.Value.IOSSDKVersionFloat >= 14.0f)
{
        Result += String.Format(" -lswiftCompatibility51");
}
-
-
Open the solution and recompile
/Users/intl/UE4/UE_4.25/Engine/Source/Programs/UnrealBuildTool/UnrealBuildTool.sln.
Channel Configuration
For the correct configuration for each channel, refer to the tutorial on configuring login authentication services: Tutorial.
