Player Network SDK Integration - Unity
Prerequisites
The version of each SDK plugin used by the game (including the version used by the game launcher) must be consistent.If the game needs to access multiple versions of the Player Network SDK simultaneously, or only one component requires an upgrade, please contact the Player Network assistant.
Enter the PlayerNetwork SDK Download Page and choose the appropriate engine and platform to download the PlayerNetwork SDK.For details, refer to the PlayerNetwork SDK Download Guide.
Step 1: Install the SDK
- Android
- iOS
- Windows
- SDK 1.27 and later versions
- SDK versions 1.24 to 1.26
- SDK versions before 1.24
Unity 2021 ~ Unity 6
androidx
minSdkVersion: 21
targetSdkVersion: 34
compileSdkVersion: 34
If you integrate with LINE, minSdkVersion must be upgraded to 24.
If you integrate with Discord, minSdkVersion must be upgraded to 23.
Note before project submission for review: Starting from SDK V1.24.00, Google has added foreground service permissions declaration.If this declaration is not approved by Google, resubmitting for review may take about a week.For more information, see Specify Foreground Service Types.
Unity 2021 ~ Unity 2022
androidx
minSdkVersion: 21
targetSdkVersion: 34
compileSdkVersion: 34
If you integrate with LINE, minSdkVersion must be upgraded to 24.
If you integrate with Discord, minSdkVersion must be upgraded to 23.
Note before project submission for review: Starting from SDK V1.24.00, Google has added foreground service permissions declaration.If this declaration is not approved by Google, resubmitting for review may take about a week.For more information, see Specify Foreground Service Types.
Unity 2018 ~ Unity 2022
- Unity 2022 and later versions
- Unity 2022 之前版本
androidx
minSdkVersion: 19
targetSdkVersion: 34
compileSdkVersion: 34
If you integrate with VK, minSdkVersion must be upgraded to 21.
If you integrate with Discord, minSdkVersion must be upgraded to 23.
androidx
minSdkVersion: 16
targetSdkVersion: 34
compileSdkVersion: 34
If you integrate with LINE, minSdkVersion must be upgraded to 19.
If you integrate with Firebase, minSdkVersion must be upgraded to 19; Android Gradle must be upgraded to V6.7.1 or above; Android Gradle Plugin must be upgraded to V4.2.0 or above.
If you integrate with VK, minSdkVersion must be upgraded to 21.
If you integrate with Discord, minSdkVersion must be upgraded to 23.
If you integrate with Adjust, minSdkVersion must be upgraded to 18.
1. Add Player Network SDK to your project
- Extract the SDK package.
- Copy
INTLSDKfolder to the project'sAssetsfolder. - Merge the
Pluginsfolder of Player Network SDK into the project'sPluginsfolder.
Player Network SDK package
├─INTLSDK       // Player Network SDK CS scripts that offer APIs and callbacks
│  ├─Editor     // Editor scripts for Player Network SDK including Player Network SDK XUPorter
│  └─Scripts    // Scripts for Player Network SDK that include INTLCore and other plugin scripts
├─LevelInfinite // LI PASS APIs
├─Plugins       // Plugins for Player Network SDK for various platforms
│  ├─Android
│  ├─iOS
│  ├─MacOS
│  └─Windows~
├─Symbols       // Symbol table *.so files for Player Network SDK
└─UnionAdapter  // UnionAdapter APIs that adapt to both MSDK and Player Network SDK
INTLSDK/Scripts/INTLCore
├─INTLSDK
│  ├─Editor
│  └─Scripts
│    ├─INTLConfig
|    └─INTLCore
|      ├─Editor     // INTLCore PostProcess.cs / PreProcess.cs files for different platforms
|      |  ├─INTLCoreAndroidPostProcess.cs
|      |  ├─INTLCoreiOSPostProcess.cs
|      |  ├─INTLCoreMacOSPostProcess.cs
|      |  ├─INTLCoreWindowsPostProcess.cs
|      |  └─INTLCoreWindowsPreProcess.cs
|      └─Scripts    // INTLCore scripts
|        ├─INTLAPI.cs       // Player Network SDK APIs
|        ├─INTLConfig.cs    // Player Network SDK data structures
|        ├─INTLDefine.cs    // Player Network SDK static strings
|        ├─INTLErrorCode.cs // Player Network SDK error codes
|        ├─Modules
|        └─Utils
├─LevelInfinite
├─Plugins
├─Symbols
└─UnionAdapter
INTLSDK/Script/INTLConfig
├─INTLSDK
│  ├─Editor
│  └─Scripts
│    ├─INTLConfig
|    | └─Editor     // Configuration files for Player Network SDK, PostProcess.cs files, and encryption tools
|    |    ├─Encrypt
|    |    | ├─decrypt           // Decryption tool for Player Network SDK for INTLConfig.ini
|    |    | ├─Decrypt.exe       // Decryption tool for Player Network SDK for INTLConfig.ini
|    |    | ├─encrypt           // Encryption tool for Player Network SDK for INTLConfig.ini
|    |    | ├─Encrypt.exe       // Encryption tool for Player Network SDK for INTLConfig.ini
|    |    | ├─EncryptConfig.ini // File to enable or disable encryption for INTLConfig.ini in Player Network SDK
|    |    | ├─INTLConfigINI.cs
|    |    | ├─INTLConfigINIEditor.cs
|    |    | └─INTLEditorTools.cs
|    |    ├─INTLConfigAndroidPostProcess.cs
|    |    ├─INTLConfigiOSPostProcess.cs
|    |    ├─INTLConfigMacOSPostProcess.cs
|    |    ├─INTLConfigSwitchPreProcess.cs
|    |    ├─INTLConfigWindowsPostProcess.cs
|    |    └─Resources   // Configurations for Player Network SDK
|    |      ├─APASConfig.ini    // Configuration file for APAS device level
|    |      └─INTLConfig.ini    // Main configuration file for Player Network SDK
|    └─INTLCore
├─LevelInfinite
└─Plugins
2. Loading required permissions and plug-ins
If your game has not yet created a custom Android activity, see Create a custom activity.
Add Player Network SDK code for loading permissions, libraries, and plugins into the custom launch activity (Android games request permissions and load plugins here).
Add code for loading libraries
static {
    try {
        System.loadLibrary("INTLFoundation");
        System.loadLibrary("INTLCore");
        System.loadLibrary("INTLUnityAdapter");
    }
    catch (Exception e) {
        e.printStackTrace();
    }
}
Register activity lifecycle
import com.intlgame.api.INTLSDK;
import android.content.Intent;
import android.os.Bundle;

@Override
protected void onCreate(Bundle savedInstanceState) {
    super.onCreate(savedInstanceState);
    // add this line
    INTLSDK.initialize(MainActivity.this);
}

@Override
public void onNewIntent(Intent intent) {
    super.onNewIntent(intent);
    // add this line
    INTLSDK.onNewIntent(intent);
}

@Override
public void onActivityResult(int requestCode, int resultCode, Intent data) {
    super.onActivityResult(requestCode, resultCode, data);
    // add this line
    INTLSDK.onActivityResult(requestCode, resultCode, data);
}

@Override
public void onRequestPermissionsResult(int arg0, String[] arg1, int[] arg2) {
    super.onRequestPermissionsResult(arg0, arg1, arg2);
    // add this line
    INTLSDK.onRequestPermissionsResult(arg0, arg1, arg2);
}
Load dynamic permissions
Get dynamic permissions via code
Add the following code to request permissions dynamically:
import android.app.Activity;
import androidx.core.app.ActivityCompat;
import androidx.core.content.ContextCompat;
import java.util.ArrayList;
import java.util.List;

private void RequestPermission(Activity activity, List<String> permissionList, int requestCode) {
    if (null != activity && null != permissionList) {
        List<String> permissionNeeded = new ArrayList();

        for (int i = 0; i < permissionList.size(); ++i) {
            String permission = (String) permissionList.get(i);
            if (null != permission && 0 != ContextCompat.checkSelfPermission(activity.getApplicationContext(), permission)) {
                permissionNeeded.add(permission);
            }
        }

        if (permissionNeeded.size() > 0) {
            ActivityCompat.requestPermissions(activity, (String[]) permissionNeeded.toArray(new String[permissionNeeded.size()]), requestCode);
        }
    }
}

private void RequestDynamicPermissions() {
    List<String> permissions = new ArrayList();
    permissions.add("android.permission.INTERNET");
    permissions.add("android.permission.READ_PHONE_STATE");
    this.RequestPermission(this, permissions, 100);
}
Call RequestDynamicPermissions:
@Override
protected void onCreate(Bundle savedInstanceState) {
    super.onCreate(savedInstanceState);
    // add this line
    RequestDynamicPermissions();
    INTLSDK.initialize(MainActivity.this);
}
Notched screen compatibility settings
After Android P, Android provides a standard API for notched screens.However, for Android O devices, different vendors have different implementation logics.Player Network SDK provides unified C++ API and Java API to support various Android O devices from Xiaomi, Huawei, Samsung, VIVO, and OPPO.
Player Network SDK includes an INTLUnityAdapter module, allowing Unity games to make unmanaged calls from C# to the C++ API.For more information, see Asynchronous Notched Screen Info Read.
Generally, the full-screen aspect ratio of mobile phones is greater than 2.1.To avoid black borders, users must set android.max_aspect to above 2.1.
For Huawei and Xiaomi phones using the Android Oreo operating system, users must configure AndroidManifest.
<!--Supports full-screen aspect ratio of 2.4 to adapt to the future 21:9 ultra-widescreen-->
<meta-data android:name="android.max_aspect" android:value="2.4" />
<!--Xiaomi O version definition: Whether to use ear areas (high-risk area)-->
<!--values:
none: ear areas not rendered in portrait or landscape mode,
portrait: ear areas rendered in portrait mode,
landscape: ear areas rendered in landscape mode,
portrait|landscape: ear areas rendered in both portrait and landscape mode
-->
<meta-data android:name="notch.config" android:value="portrait|landscape"/>
<!--Huawei O version definition: App pages use notch area-->
<meta-data android:name="android.notch_support" android:value="true"/>
For games that use Android API to fetch notched screen safe area information, please add the following configuration:
Add the following code in MainActivity.
import android.os.Build;
import android.view.WindowManager;
import android.view.View;


private void setFullScreen()
{
    getWindow().setFlags(WindowManager.LayoutParams.FLAG_FULLSCREEN,
            WindowManager.LayoutParams.FLAG_FULLSCREEN);// Set full screen
    int systemUiVisibility = 0;
    if (android.os.Build.VERSION.SDK_INT >= android.os.Build.VERSION_CODES.HONEYCOMB) {
        systemUiVisibility = this.getWindow().getDecorView().getSystemUiVisibility();
        int flags = View.SYSTEM_UI_FLAG_LAYOUT_FULLSCREEN
                | View.SYSTEM_UI_FLAG_HIDE_NAVIGATION
                | View.SYSTEM_UI_FLAG_FULLSCREEN;
        systemUiVisibility |= flags;
        getWindow().getDecorView().setSystemUiVisibility(systemUiVisibility);
    }
    // P version is allowed to use the notch area
    if (Build.VERSION.SDK_INT >= Build.VERSION_CODES.P) {
        WindowManager.LayoutParams lp = this.getWindow().getAttributes();
        lp.layoutInDisplayCutoutMode = WindowManager.LayoutParams.LAYOUT_IN_DISPLAY_CUTOUT_MODE_SHORT_EDGES;
        this.getWindow().setAttributes(lp);
    }
}
Call setFullScreen() here.
protected void onCreate(Bundle savedInstanceState) {
    super.onCreate(savedInstanceState);
    // add this line
    setFullScreen();
    this.RequestDynamicPermissions();
    INTLSDK.initialize(this);
}
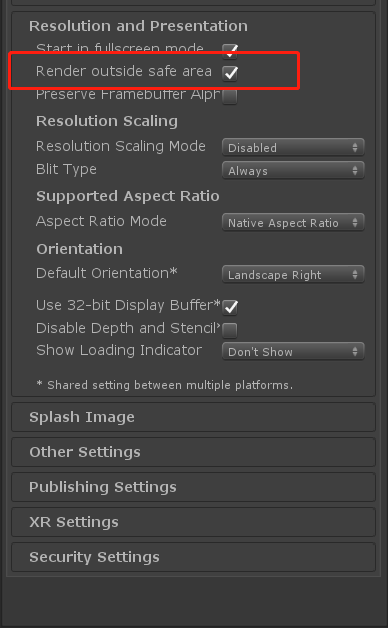
In PlayerSetting, select Render outside safe area.
3. Generate JAR package
Before generating the JAR package, replace all com.intlgame.unity.MainActivity in Plugins/Android/AndroidManifest.xml with the actual package name of the game, such as com.example.myapp.MainActivity.
Player Network SDK uses Gradle to generate the JAR package.Gradle configuration files include third-party SDK version numbers as well as dependencies required by Player Network SDK and third-party channels.The game needs to add necessary dependencies based on the required plugins.
mainTemplate.gradle and INTLCore.mainTemplate.gradle are Player Network SDK Gradle configuration files.Please update the Gradle configuration according to the game requirements.
Unity 2018
| File | File Path |
|---|---|
| mainTemplate.gradle | Plugins/Android |
| INTLCore.mainTemplate.gradle | Plugins/Android/Gradle |
There are at least two updates:
- Merge the
mainTemplate.gradlefrom your game into Player Network SDK'smainTemplate.gradle, and keep content marked by Player Network SDK.
buildscript {
    repositories {**ARTIFACTORYREPOSITORY**
        // ↓↓↓↓↓↓↓↓↓↓↓↓↓↓↓↓↓↓↓↓↓↓↓↓↓ Player Network SDK ↓↓↓↓↓↓↓↓↓↓↓↓↓↓↓↓↓↓↓↓↓↓↓↓↓
        maven {
            url "https://mirrors.tencent.com/nexus/repository/maven-public/"
        }
        maven {
            url "https://mirrors.tencent.com/repository/maven/thirdparty"
        }
        // ↑↑↑↑↑↑↑↑↑↑↑↑↑↑↑↑↑↑↑↑↑↑↑↑↑ Player Network SDK ↑↑↑↑↑↑↑↑↑↑↑↑↑↑↑↑↑↑↑↑↑↑↑↑↑
        mavenCentral()
        google()
        jcenter()
    }

    dependencies {
        // ↓↓↓↓↓↓↓↓↓↓↓↓↓↓↓↓↓↓↓↓↓↓↓↓↓ Player Network SDK ↓↓↓↓↓↓↓↓↓↓↓↓↓↓↓↓↓↓↓↓↓↓↓↓↓
        classpath 'com.android.tools.build:gradle:4.0.1'
        // ↑↑↑↑↑↑↑↑↑↑↑↑↑↑↑↑↑↑↑↑↑↑↑↑↑ Player Network SDK ↑↑↑↑↑↑↑↑↑↑↑↑↑↑↑↑↑↑↑↑↑↑↑↑↑
**BUILD_SCRIPT_DEPS**
    }
}

allprojects {
    repositories {**ARTIFACTORYREPOSITORY**
        // ↓↓↓↓↓↓↓↓↓↓↓↓↓↓↓↓↓↓↓↓↓↓↓↓↓ Player Network SDK ↓↓↓↓↓↓↓↓↓↓↓↓↓↓↓↓↓↓↓↓↓↓↓↓↓
        maven {
            url "https://mirrors.tencent.com/nexus/repository/maven-public/"
        }
        maven {
            url "https://mirrors.tencent.com/repository/maven/thirdparty"
        }
        // ↑↑↑↑↑↑↑↑↑↑↑↑↑↑↑↑↑↑↑↑↑↑↑↑↑ Player Network SDK ↑↑↑↑↑↑↑↑↑↑↑↑↑↑↑↑↑↑↑↑↑↑↑↑↑
        mavenCentral()
        google()
        jcenter()
        flatDir {
            dirs 'libs'
        }
    }
}
- Follow the integration instructions for third-party channels.
- Replace the
{placeholder}text inINTLCore.mainTemplate.gradlewith the value from the INTLConfig.ini configuration file.
android {
    compileSdkVersion rootProject.ext.common.compileSdkVersion
    buildToolsVersion rootProject.ext.common.buildToolsVersion

    defaultConfig {
        minSdkVersion rootProject.ext.common.minSdkVersion
        targetSdkVersion rootProject.ext.common.targetSdkVersion
        multiDexEnabled rootProject.ext.common.minSdkVersion < 21

        manifestPlaceholders = [
                "FACEBOOK_APPID"                : "{INTL_FACEBOOK_APP_ID}",
                "GOOGLE_APPID"                  : '{INTL_GOOGLE_APP_ID}',
                "FACEBOOK_CLIENT_TOKEN"         : "{INTL_FACEBOOK_CLIENT_TOKEN}",
                'GOOGLEPGS_APPID'               : '{INTL_GOOGLEPGS_APPID}',
                'VK_APPID'                      : '{INTL_VK_APP_ID}',
                'GARENA_APP_ID'                 : '{INTL_GARENA_APP_SDK_ASSIGN_ID}',
                'QQ_APPID'                      : '{INTL_QQ_APP_ID}',
                'GOOGLE_CLIENT_ID'              : '{INTL_GOOGLE_CLIENT_KEY_ANDROID}',
                'DISCORD_APP_ID'                : '{INTL_DISCORD_APP_ID}',
                'DISCORD_REDIRECT_SCHEME'       : '{INTL_DISCORD_REDIRECT_SCHEME}',
                'DISCORD_REDIRECT_HOST'         : '{INTL_DISCORD_REDIRECT_HOST}',
                'DISCORD_REDIRECT_PATH'         : '{INTL_DISCORD_REDIRECT_PATH}',
                'DMM_LOGIN_ACTIVITY_DATA_SCHEME': '{INTL_DMM_LOGIN_ACTIVITY_DATA_SCHEME}',
                'WEBVIEW_TASK_AFFINITY'         : '',
                'VNG_GG_APP_ID'                 : '{INTL_VNG_GG_APP_ID}',
                'VNG_GG_CLIENT_TOKEN'           : '{INTL_VNG_GG_CLIENT_TOKEN}',
        ]
    }
}
Unity 2019 and above
| File | File Path |
|---|---|
| mainTemplate.gradle | Plugins/Android |
| baseProjectTemplate.gradle | Plugins/Android |
| launcherTemplate.gradle | Plugins/Android |
| INTLCore.mainTemplate.gradle | Plugins/Android/Gradle |
| INTLCore.baseProjectTemplate.gradle | Plugins/Android/Gradle |
| INTLCore.launcherTemplate.gradle | Plugins/Android/Gradle |
There are at least two updates:
- Merge the
mainTemplate.gradle,baseProjectTemplate.gradle, andlauncherTemplate.gradlefrom your game into the corresponding Gradle files in Player Network SDK, and keep content marked by Player Network SDK.
// ↓↓↓↓↓↓↓↓↓↓↓↓↓↓↓↓↓↓↓↓↓↓↓↓↓ Player Network SDK - INTLCore ↓↓↓↓↓↓↓↓↓↓↓↓↓↓↓↓↓↓↓↓↓↓↓↓↓
dependencies {
    implementation "androidx.appcompat:appcompat:1.4.0-alpha03"
    implementation "androidx.annotation:annotation:1.0.0"
    implementation "com.google.android.gms:play-services-ads-identifier:17.0.0"
    // Migrated to :app
    // implementation "com.google.android.play:core:1.10.0"
}
// ↑↑↑↑↑↑↑↑↑↑↑↑↑↑↑↑↑↑↑↑↑↑↑↑↑ Player Network SDK - INTLCore ↑↑↑↑↑↑↑↑↑↑↑↑↑↑↑↑↑↑↑↑↑↑↑↑↑

// ↓↓↓↓↓↓↓↓↓↓↓↓↓↓↓↓↓↓↓↓↓↓↓↓↓ Player Network SDK - INTLFacebook ↓↓↓↓↓↓↓↓↓↓↓↓↓↓↓↓↓↓↓↓↓↓↓↓↓
dependencies {
    implementation "androidx.annotation:annotation:1.0.0"
    implementation "com.facebook.android:facebook-login:16.1.3"
    implementation "com.facebook.android:facebook-share:16.1.3"
    implementation "com.facebook.android:facebook-core:16.1.3"
    implementation "com.facebook.android:facebook-gamingservices:16.1.3"
    implementation "com.facebook.android:facebook-common:16.1.3"
    implementation "com.facebook.android:facebook-applinks:16.1.3"
}
// ↑↑↑↑↑↑↑↑↑↑↑↑↑↑↑↑↑↑↑↑↑↑↑↑↑ Player Network SDK - INTLFacebook ↑↑↑↑↑↑↑↑↑↑↑↑↑↑↑↑↑↑↑↑↑↑↑↑↑

// ↓↓↓↓↓↓↓↓↓↓↓↓↓↓↓↓↓↓↓↓↓↓↓↓↓ Player Network SDK ↓↓↓↓↓↓↓↓↓↓↓↓↓↓↓↓↓↓↓↓↓↓↓↓↓
apply from: "$rootDir/INTL.Gradle/INTLCore.mainTemplate.gradle"
// ↑↑↑↑↑↑↑↑↑↑↑↑↑↑↑↑↑↑↑↑↑↑↑↑↑ Player Network SDK ↑↑↑↑↑↑↑↑↑↑↑↑↑↑↑↑↑↑↑↑↑↑↑↑↑
- Follow the integration instructions for third-party channels.
- Replace
{placeholder}inINTLCore.launcherTemplate.gradlewith values from theINTLConfig.iniconfiguration file.
android {
    compileSdkVersion rootProject.ext.common.compileSdkVersion
    buildToolsVersion rootProject.ext.common.buildToolsVersion

    defaultConfig {
        minSdkVersion rootProject.ext.common.minSdkVersion
        targetSdkVersion rootProject.ext.common.targetSdkVersion
        multiDexEnabled rootProject.ext.common.minSdkVersion < 21

        manifestPlaceholders = [
                "FACEBOOK_APPID"                : "{INTL_FACEBOOK_APP_ID}",
                "FACEBOOK_CLIENT_TOKEN"         : "{INTL_FACEBOOK_CLIENT_TOKEN}",
                "GOOGLE_APPID"                  : '{INTL_GOOGLE_APP_ID}',
                'GOOGLEPGS_APPID'               : '{INTL_GOOGLEPGS_APPID}',
                'VK_APPID'                      : '{INTL_VK_APP_ID}',
                'GARENA_APP_ID'                 : '{INTL_GARENA_APP_SDK_ASSIGN_ID}',
                'QQ_APPID'                      : '{INTL_QQ_APP_ID}',
                'GOOGLE_CLIENT_ID'              : '{INTL_GOOGLE_CLIENT_KEY_ANDROID}',
                'DISCORD_APP_ID'                : '{INTL_DISCORD_APP_ID}',
                'DISCORD_REDIRECT_SCHEME'       : '{INTL_DISCORD_REDIRECT_SCHEME}',
                'DISCORD_REDIRECT_HOST'         : '{INTL_DISCORD_REDIRECT_HOST}',
                'DISCORD_REDIRECT_PATH'         : '{INTL_DISCORD_REDIRECT_PATH}',
                'DMM_LOGIN_ACTIVITY_DATA_SCHEME': '{INTL_DMM_LOGIN_ACTIVITY_DATA_SCHEME}',
                'WEBVIEW_TASK_AFFINITY'         : '',
                'VNG_GG_APP_ID'                 : '{INTL_VNG_GG_APP_ID}',
                'VNG_GG_CLIENT_TOKEN'           : '{INTL_VNG_GG_CLIENT_TOKEN}',
        ]
    }
}
4. Player Network SDK Configuration
When manually modifying the INTLConfig.ini file, please contact the Player Network support to confirm that the changes are as expected. For details, see SDK Config Instructions.
Please configure according to the instructions in INTLConfig.ini.
5. Initialize Player Network SDK
Player Network SDK must be initialized before integrating third-party channels.For more details, see Initialize SDK.For more details, see Initialize SDK.
using INTL;// import INTL namespace

void InitializeINTLSDK()
{
    INTLAPI.IsDebug = true; // Set SDK to Debug mode to print logs; default is false
    INTLAPI.InitSDK();
}
- SDK versions 1.27 and later
- SDK versions 1.24 to 1.26
- SDK versions before 1.24
Unity 2021 - Unity 6
Unity 2021 ~ Unity 2022
Unity 2018 ~ Unity 2022
Due to the submission requirements of App Store Connect stating that Xcode 15 must be used, the minimum supported iOS version is iOS 12.
To integrate Facebook from SDK V1.27 and later versions, Xcode 16 or above is needed.
If you integrate LINE, the iOS SDK needs to be updated to version 13 or above.
1. Add Player Network SDK to your project
- Extract the SDK package.
- Copy
INTLSDKfolder to the project'sAssetsfolder. - Merge the
Pluginsfolder of Player Network SDK into the project'sPluginsfolder.
Player Network SDK package
├─INTLSDK       // Player Network SDK CS scripts that offer APIs and callbacks
│  ├─Editor     // Editor scripts for Player Network SDK including Player Network SDK XUPorter
│  └─Scripts    // Scripts for Player Network SDK that include INTLCore and other plugin scripts
├─LevelInfinite // LI PASS APIs
├─Plugins       // Plugins for Player Network SDK for various platforms
│  ├─Android
│  ├─iOS
│  ├─MacOS
│  └─Windows~
├─Symbols       // Symbol table *.so files for Player Network SDK
└─UnionAdapter  // UnionAdapter APIs that adapt to both MSDK and Player Network SDK
INTLSDK/Scripts/INTLCore
├─INTLSDK
│  ├─Editor
│  └─Scripts
│    ├─INTLConfig
|    └─INTLCore
|      ├─Editor     // INTLCore PostProcess.cs / PreProcess.cs files for different platforms
|      |  ├─INTLCoreAndroidPostProcess.cs
|      |  ├─INTLCoreiOSPostProcess.cs
|      |  ├─INTLCoreMacOSPostProcess.cs
|      |  ├─INTLCoreWindowsPostProcess.cs
|      |  └─INTLCoreWindowsPreProcess.cs
|      └─Scripts    // INTLCore scripts
|        ├─INTLAPI.cs       // Player Network SDK APIs
|        ├─INTLConfig.cs    // Player Network SDK data structures
|        ├─INTLDefine.cs    // Player Network SDK static strings
|        ├─INTLErrorCode.cs // Player Network SDK error codes
|        ├─Modules
|        └─Utils
├─LevelInfinite
├─Plugins
├─Symbols
└─UnionAdapter
INTLSDK/Script/INTLConfig
├─INTLSDK
│  ├─Editor
│  └─Scripts
│    ├─INTLConfig
|    | └─Editor     // Configuration files for Player Network SDK, PostProcess.cs files, and encryption tools
|    |    ├─Encrypt
|    |    | ├─decrypt           // Decryption tool for Player Network SDK for INTLConfig.ini
|    |    | ├─Decrypt.exe       // Decryption tool for Player Network SDK for INTLConfig.ini
|    |    | ├─encrypt           // Encryption tool for Player Network SDK for INTLConfig.ini
|    |    | ├─Encrypt.exe       // Encryption tool for Player Network SDK for INTLConfig.ini
|    |    | ├─EncryptConfig.ini // File to enable or disable encryption for INTLConfig.ini in Player Network SDK
|    |    | ├─INTLConfigINI.cs
|    |    | ├─INTLConfigINIEditor.cs
|    |    | └─INTLEditorTools.cs
|    |    ├─INTLConfigAndroidPostProcess.cs
|    |    ├─INTLConfigiOSPostProcess.cs
|    |    ├─INTLConfigMacOSPostProcess.cs
|    |    ├─INTLConfigSwitchPreProcess.cs
|    |    ├─INTLConfigWindowsPostProcess.cs
|    |    └─Resources   // Configurations for Player Network SDK
|    |      ├─APASConfig.ini    // Configuration file for APAS device level
|    |      └─INTLConfig.ini    // Main configuration file for Player Network SDK
|    └─INTLCore
├─LevelInfinite
└─Plugins
2. Load required permissions and plugins
XUPorter automatically adds dependent libraries and source code files when exporting Xcode projects, which helps with packaging.
Player Network SDK has optimized XUPorter's original version to prevent conflicts between the XUPorter solution and the Player Network SDK solution.
- Added
INTLSDKEditornamespace to avoid naming conflicts when other components also use XUPorter. - Changed search path for MODS files.This way, Player Network SDK XUPorter only searches for MODS files in the
INTLSDK/directory, rather than duplicating configurations from other components. - Lifecycle has been added into
UnityAppController.mm.
Player Network SDK XUPorter solution
INTL{Plugin}Kit.projmods is the Player Network SDK configuration file for Info.plist.Player Network SDK reads the INTL{Plugin}Kit.projmods file from the INTLSDK/Editor/XUPorter/Mods directory and adds imported bundles, frameworks, and other dependencies in Xcode.
Since each INTL{Plugin}Kit.projmods file corresponds to a plugin, the game must update each file according to its requirements for the plugin, and replace the {placeholder} text with the value from the INTLConfig.ini configuration file.
For example, update INTLFacebookKit.projmods to obtain the required configuration.
"Info.plist":{
        "LSApplicationQueriesSchemes":
        [
            "fb",
            "fb-messenger-api",
            "fbshareextension",
            "fbauth2",
            "fb-messenger-share-api",
            "fbapi"
        ],
        "NSAppTransportSecurity":
        {
            "NSAllowsArbitraryLoads":true
        },
        "FacebookClientToken":"{INTL_FACEBOOK_CLIENT_TOKEN}",
        "CFBundleURLTypes" :
        [
            {
                "CFBundleTypeRole":"Editor",
                "CFBundleURLName":"Facebook",
                "CFBundleURLSchemes":["fb{INTL_FACEBOOK_APP_ID}"]
            }
        ]
    }
iOS Usage Instructions
Upon integration, users can modify content as needed and confirm content compliance with the legal team.If not modified, replace INTLSample with your game name.
According to iOS permission requirements, when applying for sensitive permissions, when the system pops up to prompt users to fill in information, fill in Usage Description.
-
In
Assets/INTLSDK/Editor/XUPorter/Mods~/INTLCoreKit.projmods, the following permissions have been escalated:"NSPhotoLibraryUsageDescription"
"NSCameraUsageDescription"
"NSLocationWhenInUseUsageDescription"
"NSPhotoLibraryAddUsageDescription"
"NSMicrophoneUsageDescription"Upon integration, users can modify the content as needed.
-
In
Assets/INTLSDK/Editor/XUPorter/Mods~/INTLADTrackingKit.projmods, the following permissions have been escalated:"NSUserTrackingUsageDescription"
3) Merge Privacy Manifest
Version requirement: Player Network SDK V1.22 and above
Starting from Spring 2024, applications that need to be updated or uploaded to Apple App Store Connect must clearly specify the reason for use in order to demonstrate how the app uses required reason APIs (APIs for which a reason for use must be submitted).For more information, see Upcoming Third-Party SDK Requirements.
For affected Player Network SDK plugins, the ones requiring manual merge are INTLFoundation, INTLCore, and INTLGarena, with INTLGarena only needed if the project confirms Garena integration.
Additionally, INTLLine has been automatically integrated within Player Network SDK without extra action required.
Since the privacy manifests for other third-party SDKs have not yet been published, currently the Player Network SDK privacy manifest does not include the corresponding content.To view the list of plugins not yet released, refer to iOS 17 Privacy Manifest.
Steps
- Locate the privacy manifest
PrivacyInfo.xcprivacyfor the required plugin within the Player Network SDK product directory.
- Unity
- Unreal Engine
| Plugin | Path |
|---|---|
| INTLFoundation | /Plugins/iOS/INTLSDK/INTLFoundation/INTLFoundation.framework/PrivacyInfo.xcprivacy |
| INTLCore | /Plugins/iOS/INTLSDK/INTLCore/INTLCore.framework/PrivacyInfo.xcprivacy |
| INTLGarena | /Plugins/iOS/INTLSDK/INTLGarena/INTLGarena.framework/PrivacyInfo.xcprivacy |
| Plugin | Path |
|---|---|
| INTLFoundation | /INTLSDK/Source/INTLFoundation/Libs/iOS/INTLFoundation/INTLFoundation.embeddedframework/INTLFoundation.framework/PrivacyInfo.xcprivacy |
| INTLCore | /INTLSDK/Source/INTLCore/Libs/iOS/INTLCore/INTLCore.embeddedframework/INTLCore.framework/PrivacyInfo.xcprivacy |
| INTLGarena | /INTLSDK/Source/INTLGarena/Libs/iOS/INTLGarena/INTLGarena.embeddedframework/INTLGarena.framework/PrivacyInfo.xcprivacy |
-
Use the 4 nodes in
PrivacyInfo.xcprivacywithin the Player Network SDK to compare with corresponding content in the game project'sPrivacyInfo.xcprivacy, and merge based on the following conditions.

-
Privacy Nutrition Label Types (NSPrivacyCollectedDataTypes)is the node describing types of data usage:
Compare eachitem'sCollected Data Type (NSPrivacyCollectedDataType), if different values exist, add them to the game project file.
If identical values exist, compareCollection Purposes (NSPrivacyCollectedDataTypePurposes), if different values exist, add them to the game project file.
-
Privacy Tracking Domains (NSPrivacyTrackingDomains)is the node for domain tracking list:
Compare each related node, if different values exist, add them to the game project file. -
Privacy Tracking Enabled (NSPrivacyTracking)describes whether the App Tracking Transparency feature is enabled:
Compare each node, if the Player Network SDK's privacy manifest's value isYES, modify the game project file. -
Privacy Accessed API Types (NSPrivacyAccessedAPITypes)is the node describing types of interface usage:
Compare eachitem'sPrivacy Accessed API Type (NSPrivacyAccessedAPIType), if different values exist, add them to the game project file.
If identical values exist, comparePrivacy Accessed API Reasons (NSPrivacyAccessedAPITypeReasons), if different values exist, add them to the game project file.
-
-
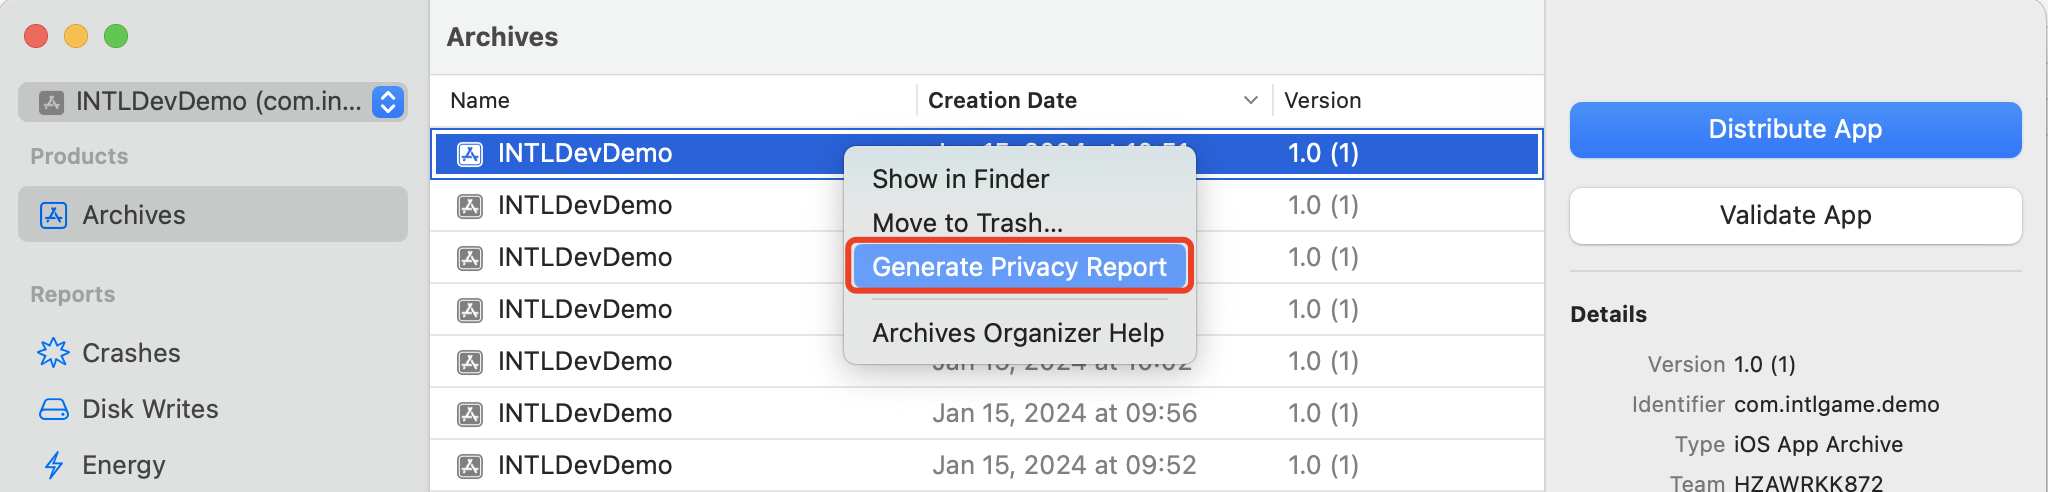
You can generate a privacy report with Xcode 15 to verify if it meets expectations.
4) Player Network SDK Configuration
When manually modifying the INTLConfig.ini file, please contact the Player Network support to confirm that the changes are as expected. For details, see SDK Config Instructions.
Please configure according to the instructions in INTLConfig.ini.
5. Initialize Player Network SDK
Player Network SDK must be initialized before integrating third-party channels.For more details, see Initialize SDK.For more details, see Initialize SDK.
using INTL;// import INTL namespace

void InitializeINTLSDK()
{
    INTLAPI.IsDebug = true; // Set SDK to Debug mode to print logs; default is false
    INTLAPI.InitSDK();
}
- SDK versions 1.27 and later
- SDK versions 1.24 to 1.26
- SDK versions before 1.24
Unity 2021 - Unity 6
Unity 2021 ~ Unity 2022
Unity 2018 ~ Unity 2022
Supports 64-bit Windows 7, Windows 10, Windows 11 operating systems.
Due to the characteristics of the Windows platform, the game's installation directory cannot contain an English character semicolon (;), otherwise the game will not be able to find the necessary DLL, resulting in game failure.
If the Windows platform integrates Google, Facebook, LINE, Apple, and other channels, WebView needs to be introduced.
Recommended to run based on the Microsoft Visual C++ Redistributable 2015-2022 compiler.
-
Windows 7:
- Install Microsoft Visual C++ Redistributable packages and add the command
VC_redist.x64.exe /install /quiet /norestartto the installation script. - Install Windows 7 Security Update (KB3063858).
- Install Microsoft Visual C++ Redistributable packages and add the command
-
Windows 8 and Windows 8.1:
Install Microsoft Visual C++ Redistributable packages and add the command
VC_redist.x64.exe /install /quiet /norestartto the installation script.
1. Add Player Network SDK to your project
- Extract the SDK package.
- Copy
INTLSDKfolder to the project'sAssetsfolder. - Merge the
Pluginsfolder of Player Network SDK into the project'sPluginsfolder.
Player Network SDK package
├─INTLSDK       // Player Network SDK CS scripts that offer APIs and callbacks
│  ├─Editor     // Editor scripts for Player Network SDK including Player Network SDK XUPorter
│  └─Scripts    // Scripts for Player Network SDK that include INTLCore and other plugin scripts
├─LevelInfinite // LI PASS APIs
├─Plugins       // Plugins for Player Network SDK for various platforms
│  ├─Android
│  ├─iOS
│  ├─MacOS
│  └─Windows~
├─Symbols       // Symbol table *.so files for Player Network SDK
└─UnionAdapter  // UnionAdapter APIs that adapt to both MSDK and Player Network SDK
INTLSDK/Scripts/INTLCore
├─INTLSDK
│  ├─Editor
│  └─Scripts
│    ├─INTLConfig
|    └─INTLCore
|      ├─Editor     // INTLCore PostProcess.cs / PreProcess.cs files for different platforms
|      |  ├─INTLCoreAndroidPostProcess.cs
|      |  ├─INTLCoreiOSPostProcess.cs
|      |  ├─INTLCoreMacOSPostProcess.cs
|      |  ├─INTLCoreWindowsPostProcess.cs
|      |  └─INTLCoreWindowsPreProcess.cs
|      └─Scripts    // INTLCore scripts
|        ├─INTLAPI.cs       // Player Network SDK APIs
|        ├─INTLConfig.cs    // Player Network SDK data structures
|        ├─INTLDefine.cs    // Player Network SDK static strings
|        ├─INTLErrorCode.cs // Player Network SDK error codes
|        ├─Modules
|        └─Utils
├─LevelInfinite
├─Plugins
├─Symbols
└─UnionAdapter
INTLSDK/Script/INTLConfig
├─INTLSDK
│  ├─Editor
│  └─Scripts
│    ├─INTLConfig
|    | └─Editor     // Configuration files for Player Network SDK, PostProcess.cs files, and encryption tools
|    |    ├─Encrypt
|    |    | ├─decrypt           // Decryption tool for Player Network SDK for INTLConfig.ini
|    |    | ├─Decrypt.exe       // Decryption tool for Player Network SDK for INTLConfig.ini
|    |    | ├─encrypt           // Encryption tool for Player Network SDK for INTLConfig.ini
|    |    | ├─Encrypt.exe       // Encryption tool for Player Network SDK for INTLConfig.ini
|    |    | ├─EncryptConfig.ini // File to enable or disable encryption for INTLConfig.ini in Player Network SDK
|    |    | ├─INTLConfigINI.cs
|    |    | ├─INTLConfigINIEditor.cs
|    |    | └─INTLEditorTools.cs
|    |    ├─INTLConfigAndroidPostProcess.cs
|    |    ├─INTLConfigiOSPostProcess.cs
|    |    ├─INTLConfigMacOSPostProcess.cs
|    |    ├─INTLConfigSwitchPreProcess.cs
|    |    ├─INTLConfigWindowsPostProcess.cs
|    |    └─Resources   // Configurations for Player Network SDK
|    |      ├─APASConfig.ini    // Configuration file for APAS device level
|    |      └─INTLConfig.ini    // Main configuration file for Player Network SDK
|    └─INTLCore
├─LevelInfinite
└─Plugins
2. Change cache directory
By default, the cache directory generated by Player Network SDK PC users and applications is:
C:/ProgramData/INTLC:/Users/{name}/AppData/Local/INTL/local/INTL.
Before calling InitSDK, game developers must set the cache directory.For more information, see Change User Data Folder Directory API.
// For example, game id is 11, and the game application name is INTLSDKDemo.
// Then the game invokes the interface like this:
INTLAPI.SetSDKDefaultUserStorage("D:\\game_data\\");
// The data cache path for Player Network SDK will be D:\game_data\11\INTLSDKDemo\.
3. Player Network SDK Configuration
When manually modifying the INTLConfig.ini file, please contact the Player Network support to confirm that the changes are as expected. For details, see SDK Config Instructions.
Please configure according to the instructions in INTLConfig.ini.
4. Initialize Player Network SDK
Player Network SDK must be initialized before integrating third-party channels.For more details, see Initialize SDK.For more details, see Initialize SDK.
using INTL;// import INTL namespace

void InitializeINTLSDK()
{
    INTLAPI.IsDebug = true; // Set SDK to Debug mode to print logs; default is false
    INTLAPI.InitSDK();
}
To release the global state of Player Network SDK, it is recommended to shut down the SDK at the end of the application lifecycle.
For more details on the dedicated Windows APIs mentioned above, see ShutDown.
Step 2: Verify Successful Integration of Player Network SDK
- Modify the configuration under the
INTL Lognode in the INTLConfig.ini file.
[INTL Log]
LOG_LEVEL = 1
LOG_ENCRYPT_ENABLE = 0
LOG_COMPRESS_ENABLE = 0
LOG_CONSOLE_OUTPUT_ENABLE = 1
LOG_FILE_OUTPUT_ENABLE = 1
- Run the program, when the log displays
Init INTL SDK success., it indicates successful integration.
