Login Integration
Client Login Access
Proceed with the following steps immediately after Step Five
Step Six: Host Game Project Configuration
- Unity
- Unreal Engine
- Install and activate the Input System package:
Input System requires Unity 2019.1 or newer and .NET Framework 4 to run; it is not suitable for projects running on .NET Framework 3.5.
The XSX real machine requires version 1.6.1 of the Input System, and comes with the `com.unity.inputsystem.gxdk-1.0.1` extension, please contact the Player Network Assistant if you encounter any problems with the introduction.

For more information, see the Input System Installation Guide (https://docs.unity3d.com/Packages/com.unity.inputsystem@1.0/manual/Installation.html).
1. From Unity's main menu, go to **Window > Package Manager** to open the Unity Package Manager.
2. Click **Advanced** to make sure **Show Preview Packages** is enabled. 3.
3. From the list on the left, select the latest **Input System** package and click **Install**.
Click **Install**. [Image:Introducing InputSystem](/Images2/account/playernetwork/thirdparties/LevelInfinite/GetStarted/22.png)
4. From Unity's main menu, go to **Edit > Project Settings** and then click **Player**. 5.
5. Set the value of **Active Input Handling** to `Input System Package (New)`.

- Add Macro Definitions:
-
From Unity's main menu, go to Edit > Project Settings and click Player.
-
Open the Other Settings panel and navigate to Scripting Define Symbols.
-
Add
INTL_CONSOLE_GAME_INPUTto the text box, separated by a semicolon.
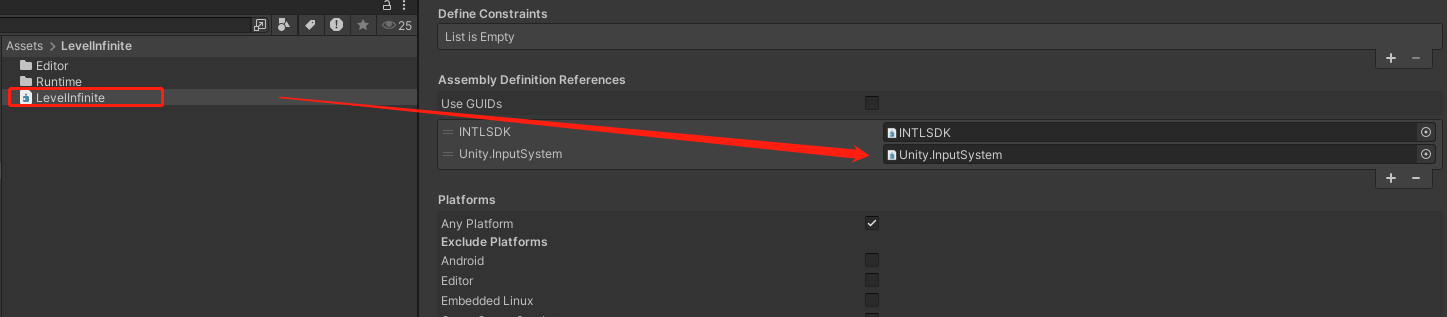
4. Open the assembly definition file `LevelInfinite.asmdef` in `Assets/LevelInfinite` and add `Unity. Definition References** and add `Unity.InputSystem`.
-
No content
Step Seven: Add Callback Handling
- Unity
- Unreal Engine
You need to add the AuthResultObserver and LIEventObserver callbacks to handle login component events.
The callback data structure is INTLAuthResult, which includes login and account information, such as OpenID, account binding details, and account logout status.
// Add callbacks
INTLAPI.AddAuthResultObserver(OnAuthResultEvent);
LevelInfinite.AddLIEventObserver(OnLIBaseEventResult);

// Handle AuthResultObserver callback result
private void OnAuthResultEvent(INTLAuthResult AuthResult)
{
    switch (AuthResult.MethodId)
    {
        case (int)INTLMethodID.LI_LOGIN_ENTER_GAME:
            if(AuthResult.RetCode == (int)ERROR_CODE.SUCCESS) {
                Debug.Log("LI PASS Login success");
            } else {
                Debug.Log("LI PASS Login failed, ret_code = " + AuthResult.RetCode + ", ret_msg = " + AuthResult.RetMsg);
            }
            break;
        default:
            break;
    }
}

// Handle LIEventObserver callback result
private void OnLIBaseEventResult(LIBaseEventResult liRet)
    {
        switch (liRet.lIEventType)
        {
            case LIEventType.GN_READY:
                break;
            default:
                break;
        }
    }
You need to add the AuthResultObserver and LIEventObserver callbacks to handle login events.
The callback data structure is FINTLAuthResult, which includes login and account information, such as OpenID, account binding details, and account logout status.
// Add callbacks
AuthResultObserver = UINTLSDKAPI::GetAuthResultObserver().AddUObject(this, &ULevelInfiniteWindow::OnAuthResult_Callback);
// Handle AuthResultObserver callback result
void ULevelInfiniteWindow::OnAuthResult_Callback(FINTLAuthResult AuthResult)
{
    if(AuthResult.MethodId == (int32)LIEnterGameMethodId::kLILoginEnterGame)
    {
        // LI Login succeeded, enter the game here.
    }
    else if (AuthResult.MethodId == (int32)LIEnterGameMethodId::kLIBindEnterGame)
    {
        // Social account binding succeeded inside the game
    }
}

// Add callbacks
FDelegateHandle LIEventObserver;
LIEventObserver = ULevelInfiniteAPI::GetEventDelegate().AddUObject(this, &ULevelInfiniteWindow::OnLIEvent_Callback);

// Handle LIEventObserver callback result
void ULevelInfiniteWindow::OnLIEvent_Callback(FLIBaseEvent Event)
{
    FString logStr;
    switch(Event.EventType){
        case ELIEventType::GN_READY:
        {
            break;
        }
    }
}
Step Eight: Complete the Login Process
- Unity
- Unreal Engine
Call the LoginChannelWithLIPass interface to open the LI PASS login component and specify the login channel for the player.
If the current account is not yet linked with LI PASS and the player is entering the game for the first time, the login component will display the interface for linking LI PASS.
LevelInfinite.LoginChannelWithLIPass(INTLChannel.PlayStation);
Call the LoginChannelWithLIPass interface to open the LI PASS login component and specify the login channel for the player.
If the current account is not yet linked with LI PASS and the player is entering the game for the first time, the login component will display the interface for linking LI PASS.
ULevelInfiniteAPI::LoginChannelWithLIPass(EINTLLoginChannel::kChannelPlayStation);
Step Nine: Configure Third-Party Channel Information
LI Pass supports multiple console-end third-party channels:
Backend Login Access
Please refer to Backend Integration in the Integration Overview.
