Getting Started with LI PASS Integration
Starting from this article, follow the guide to integrate the PlayerNetwork SDK step by step!
If you need human service, you can consult the Player Network Assistant on WeChat Work.
Game Registration & Configuration
To register and configure your game, log in to the Player Network Console. For details, see the Player Network Console Usage Documentation.
Get PlayerNetwork SDK
Enter the PlayerNetwork SDK Download Page and choose the appropriate engine and platform to download the PlayerNetwork SDK.For details, see the PlayerNetwork SDK Download Guide.
Client Integration
Step 1: Import PlayerNetwork SDK into the game project
- Unity
- Unreal Engine
- Player Network SDK Integration
Engine Version Support
| SDK Version | Supported Unity Versions |
|---|---|
| SDK 1.27 and later versions | Unity 2021 ~ Unity 6 |
| SDK 1.24 ~ 1.26 | Unity 2021 ~ Unity 2022 |
Player Network SDK supports integration on Android, iOS, Windows, and Console platforms. For details, please refer to the integration documentation: Player Network SDK Integration.
- Copy files into the project
After copying the LevelInfinite, INTLSDK, Plugins, and StreamingAssets/LevelInfinite folders into your project's Assets directory, then open the Unity project.

| Folder | Description |
|---|
| LevelInfinite | LI PASS engine layer code | | INTLSDK | Player Network sdk engine layer code | | Plugins | LI PASS platform layer library file | | StreamingAssets/LevelInfinite | LI PASS business logic resources, can be hot updated | | Symbols | Symbol table files for PlayerNetwork SDK, used to restore stack |
Files in the Symbols directory must be properly saved; after game launch, these may be needed for online issue troubleshooting with the symbol table.
If you encounter issues during the import process, refer to Possible Issues at the end of the document or consult the Player Network Assistant .
- Generate Unity Lua Interface Files
When opening the Unity project, a window to generate C# exported Lua interface files will automatically pop up as shown below. Click Generate to proceed.

If no popup appears, in the Unity menu bar, select INTLLua > All > Clear to delete, which will remove the directory Assets/LevelInfinite/Runtime/INTLGameNative/Scripts/LuaObject (or manually delete the directory).
A pop-up will automatically prompt for generating Unity's Lua interface afterwards.If the pop-up does not appear, manually trigger it by selecting INTL > INTLLua > All > Make from Unity's menu bar.

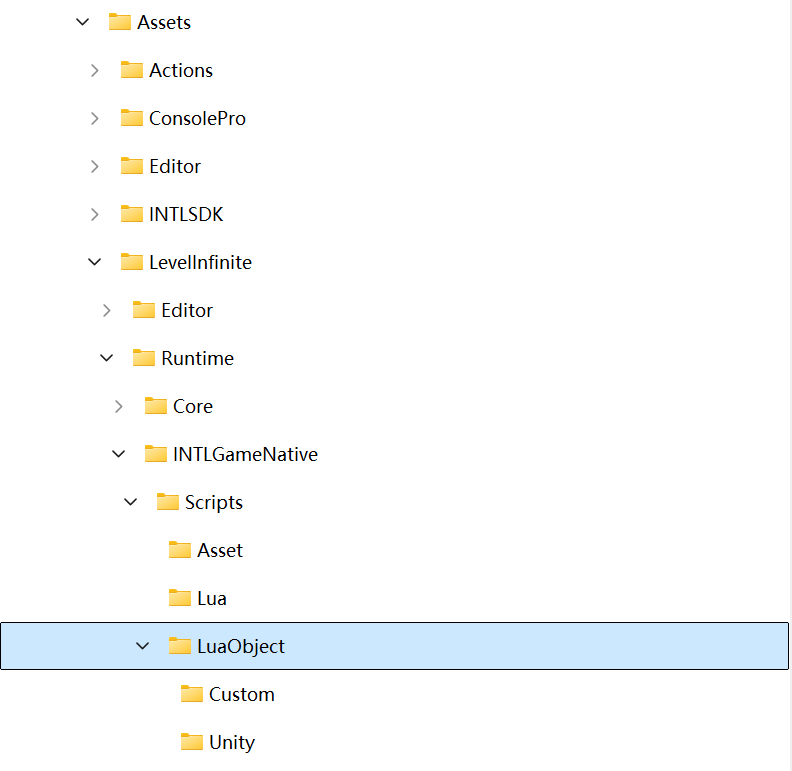
You can check in the Assets/LevelInfinite/Runtime/INTLGameNative/Scripts/LuaObject directory whether the interface export file was successfully generated.
- Player Network SDK Integration
Engine Version Support
| SDK Version | Supported UE Versions |
|---|---|
| SDK 1.26 and later versions | UE4.21 ~ UE4.27 & UE5 ~ UE5.5 |
| Versions before SDK 1.26 | Versions before SDK 1.26: support UE4.21 ~ UE4.27 & UE5 ~ UE5.4 |
Player Network SDK supports integration on Android, iOS, Windows, and Console platforms. For details, please refer to the integration documentation: Player Network SDK Integration.
- Copy files into the project
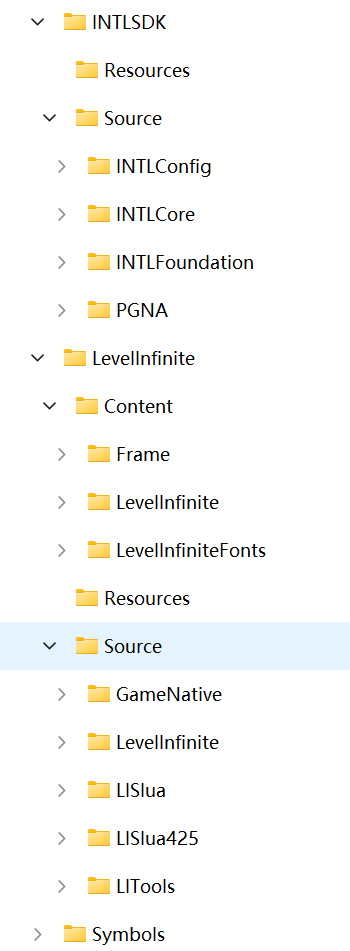
Copy the LevelInfinite and INTLSDK directories to the Plugins directory of the game project.Create a Plugins folder if there isn't one in the project.
| Folder | Description |
|---|
| LevelInfinite | LI PASS engine layer code & associated libraries | | INTLSDK | Player Network sdk engine layer code & associated libraries | | Symbols | PlayerNetwork SDK symbol table file, used to restore stack |
The file extension for LevelInfiniteAssetVersion.lua is LUA, not LUAC, because it contains the LI PASS version number, facilitating business colleagues to know our LI PASS version and for issue diagnosis.
Files in the Symbols directory need to be properly preserved. After the game is launched, troubleshooting online issues may require the symbol table.
- Add PlayerNetwork SDK dependency in game project
Open the build file for the game project, i.e., the {ProjectName}.Build.cs file, and as per the example, add the LevelInfinite plugin as a private dependency to the module:
public INTLSample(ReadOnlyTargetRules Target) : base(Target)
{
    PCHUsage = PCHUsageMode.UseExplicitOrSharedPCHs;

    PublicDependencyModuleNames.AddRange(new string[] { "Core", "CoreUObject", "Engine", "InputCore", "HeadMountedDisplay" });

    // Add the following code
    PrivateDependencyModuleNames.AddRange(new string[] {
            "INTLCore",
            "INTLFoundation",
            "INTLConfig",
            "LevelInfinite"
    });
}
- Package LI PASS Lua Resources into the Initial Package
Package LI PASS Lua resources into the initial package, adding them in the Packaging/Additional Non-Asset option:
../Plugins/LevelInfinite/Content

Business needs to fill in based on the actual storage path of the LevelInfinite folder, e.g., if the actual storage path is ../Plugins/Template/LevelInfinite, you need to add ../Plugins/Template/LevelInfinite/Content here.
- Package LI PASS uasset Resources into the Initial Package
Package LI PASS uasset resources into the initial package, adding them in the Packaging/Additional Asset option:
/LevelInfinite

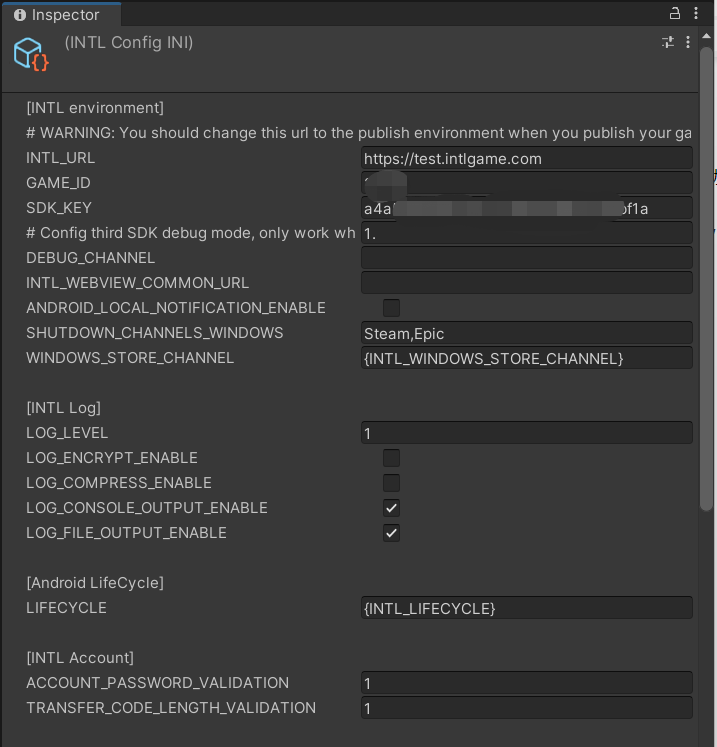
Step Two: Configure INTLConfig.ini File
- The INTLConfig.ini file contains configuration items for the LI PASS service and is essential for using the LI PASS service in the game.
- When downloading the SDK, the INTLConfig.ini is generated by default along with the necessary configurations, allowing businesses to directly use these configurations to experience SDK functions.
- If there is a need to modify the INTLConfig.ini configuration items, you can use the game engine's visual configuration editing tool or directly modify the INTLConfig.ini file.
- Unity
- Unreal Engine
Open the visual configuration editor through the editor toolbar INTL > LI INIConfig Window.
Open the visual configuration editor through the editor toolbar LITools > Config Editor.

For details on each configuration item, you can select an option in the editor to automatically display a brief description of the option or refer to the SDK INTLConfig.ini Configuration to view a complete list of configuration items.
[Optional] Retrieve player email during third-party channel login
This setting belongs to the Third-Party Channel Configuration in the Player Network Console. Web-side operations do not have access; please contact your business team to complete configuration.
To use the quick binding feature of the Web binding module, you must first set permission to obtain player email during third-party channel login.
- For compliance reasons, emails returned from specific sources can be masked as needed; please contact Player Network Assistant to enable this if required.
- You can report the hash of the email as
base64(sha256(email))in the backend transaction logs; please contact Player Network Assistant to enable this if required. - This is used to verify whether the player information or binding list contains
emailinformation; please contact Player Network Assistant to enable this if required. - Can be used for iOS Firebase's Private Set Membership (PSM) feature. See Firebase iOS Project Configuration.
Below are third-party channels that support returning player email:
Apple
Apple requires player authorization to obtain email. If authorization is denied, the email cannot be obtained. See Login API passing email and fullName.
-
Use the editing tool to add the
emailpermission to [Dynamic] underAPPLE_LOGIN_PERMISSION. -
Enable the email return feature in the Player Network Console by setting return_email to YES. For details, see Third-Party Channel Configuration.
Firebase
Enable the email return feature in the Player Network Console by setting return_email to YES. For details, see Third-Party Channel Configuration.
-
Use the editing tool to add
emailpermission to [Dynamic] underFACEBOOK_LOGIN_PERMISSION.IfINTLConfig.inidoes not configureFACEBOOK_LOGIN_PERMISSION, theemailpermission will be automatically included. -
Configure email permission on Meta for Developers.email permission requires Advanced Access Level to allow all apps to obtain the player's email.

-
Enable email return function in the Player Network Console by setting return_email to YES. For detailed steps, see Third-party Channel Configuration.
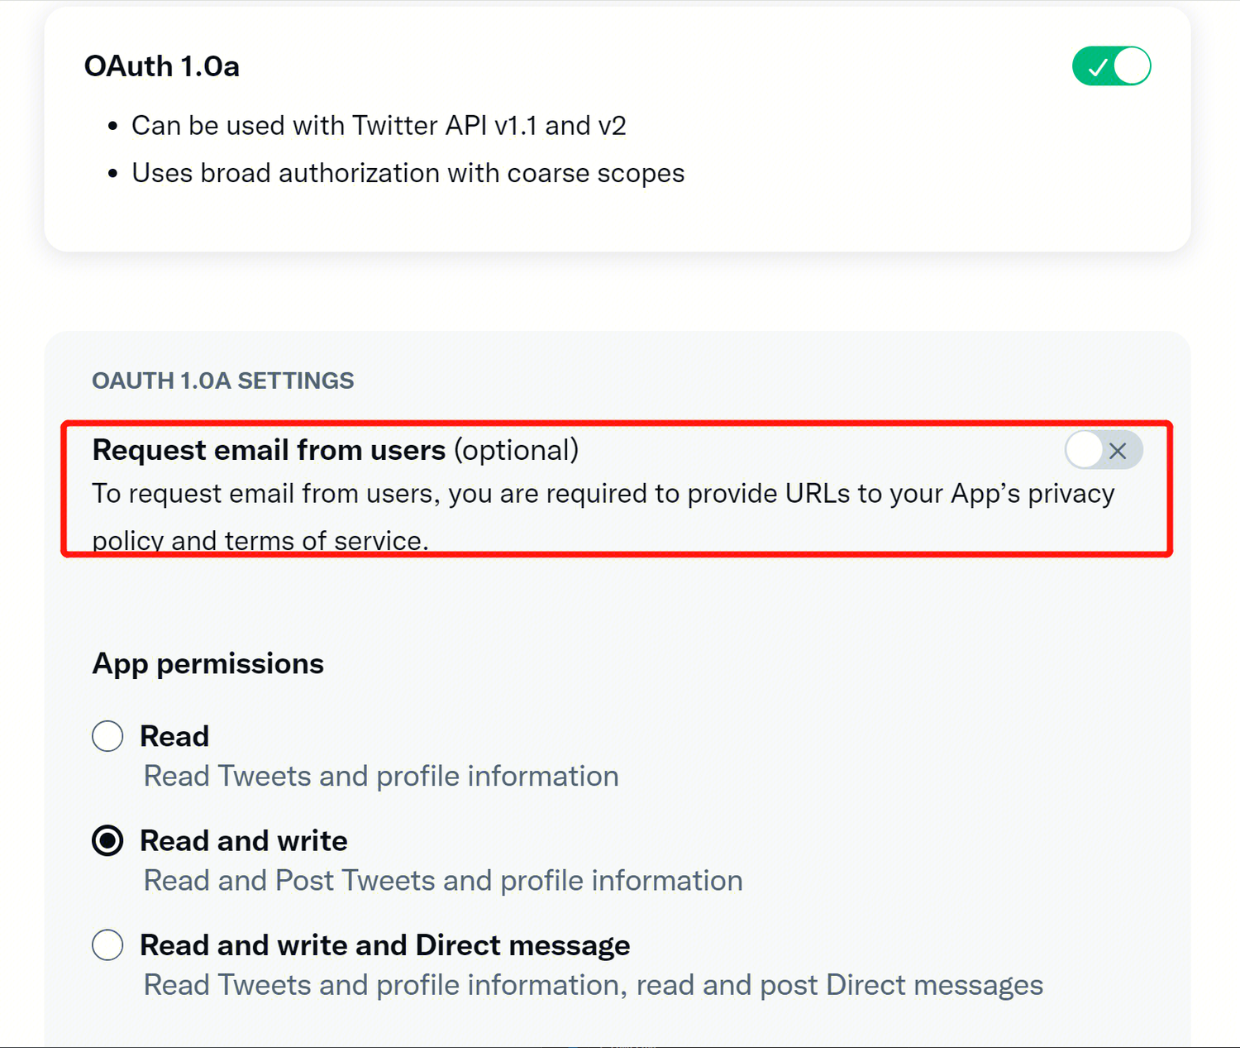
Adjust
-
Under User authentication settings on Twitter Developer Platform, check Request email from users.
-
Enable the email return feature in the Player Network Console by setting return_email to YES. For details, see Third-Party Channel Configuration.
Step Three: Initialize LI PASS
- Unity
- Unreal Engine
When the game starts, you should call the initialization interfaces provided by PNTSDK INTLAPI.InitSDK and LevelInfinite.InitLIP.
- The initialization process will first check if there are available hot update resources;
- If there are resource updates, it will automatically download and then load the new version;
- After the resource loading is complete, it will trigger the
GN_READYevent in the LI PASS event callback (LIEventObserver), marking the completion of the LI PASS initialization.
INTLAPI.InitSDK(); // Initialize sdk
Font font = null;  // Set font for LI PASS interface
LevelInfinite.InitLIP(font, Application.version, "en");
When the game starts, you should call the initialization interfaces provided by PNTSDK INTLAPI.InitSDK and LevelInfinite.InitLIP.
- The initialization process will first check if there are available hot update resources.
- If there are resource updates, the new resources will be downloaded and loaded automatically.
- After the resource loading is complete, it will trigger the
GN_READYevent in the LI PASS event callback (LIEventObserver), marking the completion of the LI PASS initialization.
#include "INTLSDKAPI.h" // Include the INTL header file

UINTLSDKAPI::Init();
FString Version = FApp::GetBuildVersion();
ULevelInfiniteAPI::InitLIP(GetGameInstance<UGameInstance>(), Version, TEXT("en"));
Step Four: Set LI PASS Interface and Email Language
- Set the language for the LI PASS interface using the
SetLanguageinterface. - It is recommended to keep the language set here consistent with the game language to ensure uniformity.
- The set language type will also apply to emails, such as
verification code emails.
Note that when switching the game language, the SetLanguage interface needs to be set again.
- Unity
- Unreal Engine
Interface details: SetLanguage.
LevelInfinite.SetLanguage("en");
Interface details: SetLanguage.
ULevelInfiniteAPI::SetLanguage(TEXT("en"));
Step Five: Set UI Root Nodes
Before using other LI PASS features, the SetUIRoot must be called to set the root node for all LI PASS interfaces to ensure proper UI display.
设置 UI 根节点后,请不要销毁该节点,否则 LI PASS UI 界面无法挂载,会产生预期外的行为。
Release the LI PASS interface through interface button operations; do not force destroy.If Unity controls GC (garbage collection) during scene switching, an empty pointer error may occur.
- Unity
- Unreal Engine
- For subsequent host-side integration steps, refer to Host Account Solution Step Six.
- For subsequent PC Standalone login solution steps, refer to PC Standalone Account Solution Step Six.
- For subsequent PC Store login solution steps, refer to PC Store Account Solution Step Six.
- For subsequent integration steps on mobile, please refer to Step 6 of Mobile Account Solution.
Step Six: Open LI PASS Login Panel
Here, the Mobile Account Solution is used as an example to open the LI PASS interface.The game business needs to integrate according to its own needs, following the Login module's corresponding account solution guidance.
- Unity
- Unreal Engine
LevelInfinite.OpenLoginPanel();
ULevelInfiniteAPI::OpenLoginPanel();
After completing the above steps, running the project should normally open the LI PASS interface.
Possible Issues
- Unity
- Unreal Engine
1. Unity Assembly Issues When Importing
LI PASS supports assemblies starting from version V1.08.If the project does not support assemblies, follow the steps below to remove them:
- Delete the following assembly definition files.
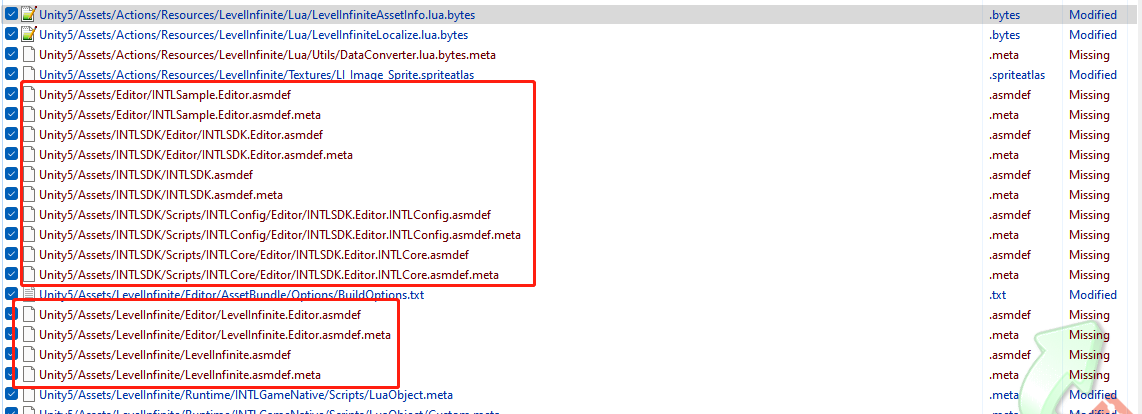
- Edit
luaSvr.csto change the assembly name fromLevelInfinitetoAssembly-CSharp.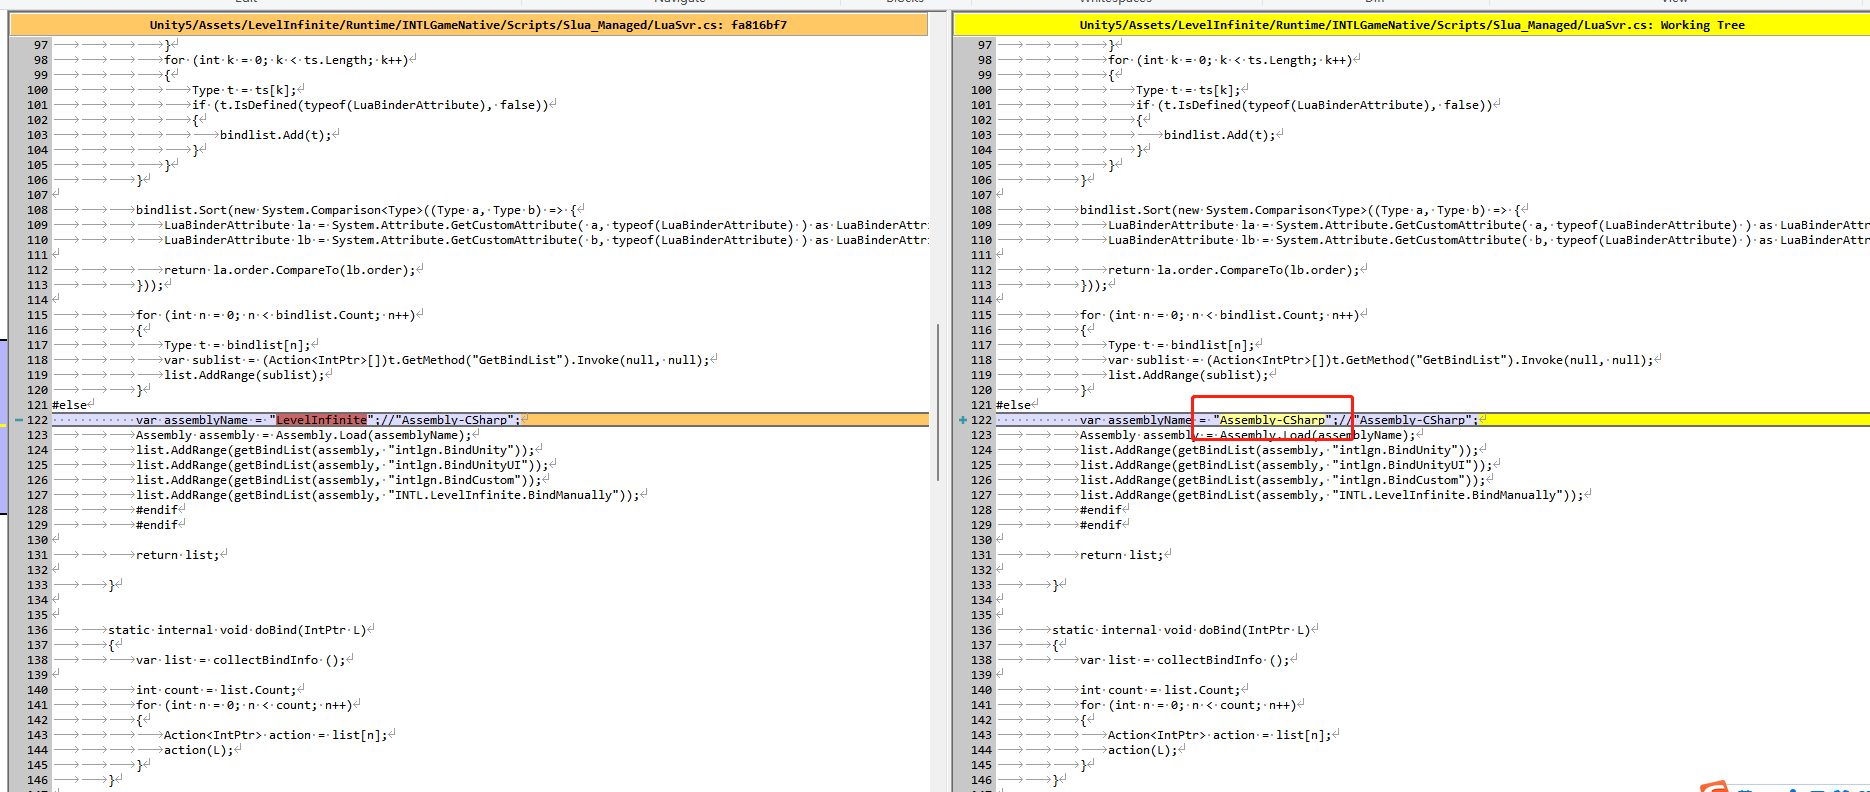
- Contact Player Network Assistant to obtain an
AssetBundlepackage without assemblies.
2. [Optional] Switch Loading Method
LI PASS's default loading method is Editor mode, intended to smoothly run LI PASS processes in the editor.In development, the business can change the loading method to StreamingAssets mode through the menu LevelInfinite > AssetLoadMode.
The choice of loading mode does not affect the loading mode of the build package (default CDN).

| Option | Explanation |
|---|---|
| Editor | Corresponds to INTL_DEBUG_LUA macro, reads local Lua files |
| StreamingAssets | Corresponds to INTL_USE_LOCAL_ASSETS macro, loads AssetBundle in StreamingAssets |
| CDN | Corresponds to Player Network console AssetBundle, if console resource loading fails, it loads AssetBundle from StreamingAssets |
1. Path Error During Cook: LongPackageNameToFilename failed to convert ...
If errors occur during Cook stating LongPackageNameToFilename failed to convert '/LevelInfinite'. Path does not map to any roots, modify Cook path /LevelInfinite -> /LevelInfinite/, commonly seen in versions below UE4.27.
If you encounter problems during the integration process, please refer to Frequently Asked Questions.
