iOS
The purpose of this article is to describe how to set up Discord authentication so that your game can be logged in through the Discord channel using the Player Network login authentication service.
From Spring 2024, developers will have to clearly describe data use in the privacy manifest, showing how required reason APIs will be utilized in apps that are updated or uploaded to Apple App Store Connect.For more information, see Upcoming third-party SDK requirements.
Since Discord's privacy manifest has not yet been released, the corresponding content is not included in the Player Network SDK privacy manifest. For details, see iOS 17 Privacy Manifest.
Prerequisites
1. Configuring the application on the Discord Developer Platform
1.1. Create an Application
- Register and authenticate your account on the Discord official website
- Go to the Developer Platform and click New Application
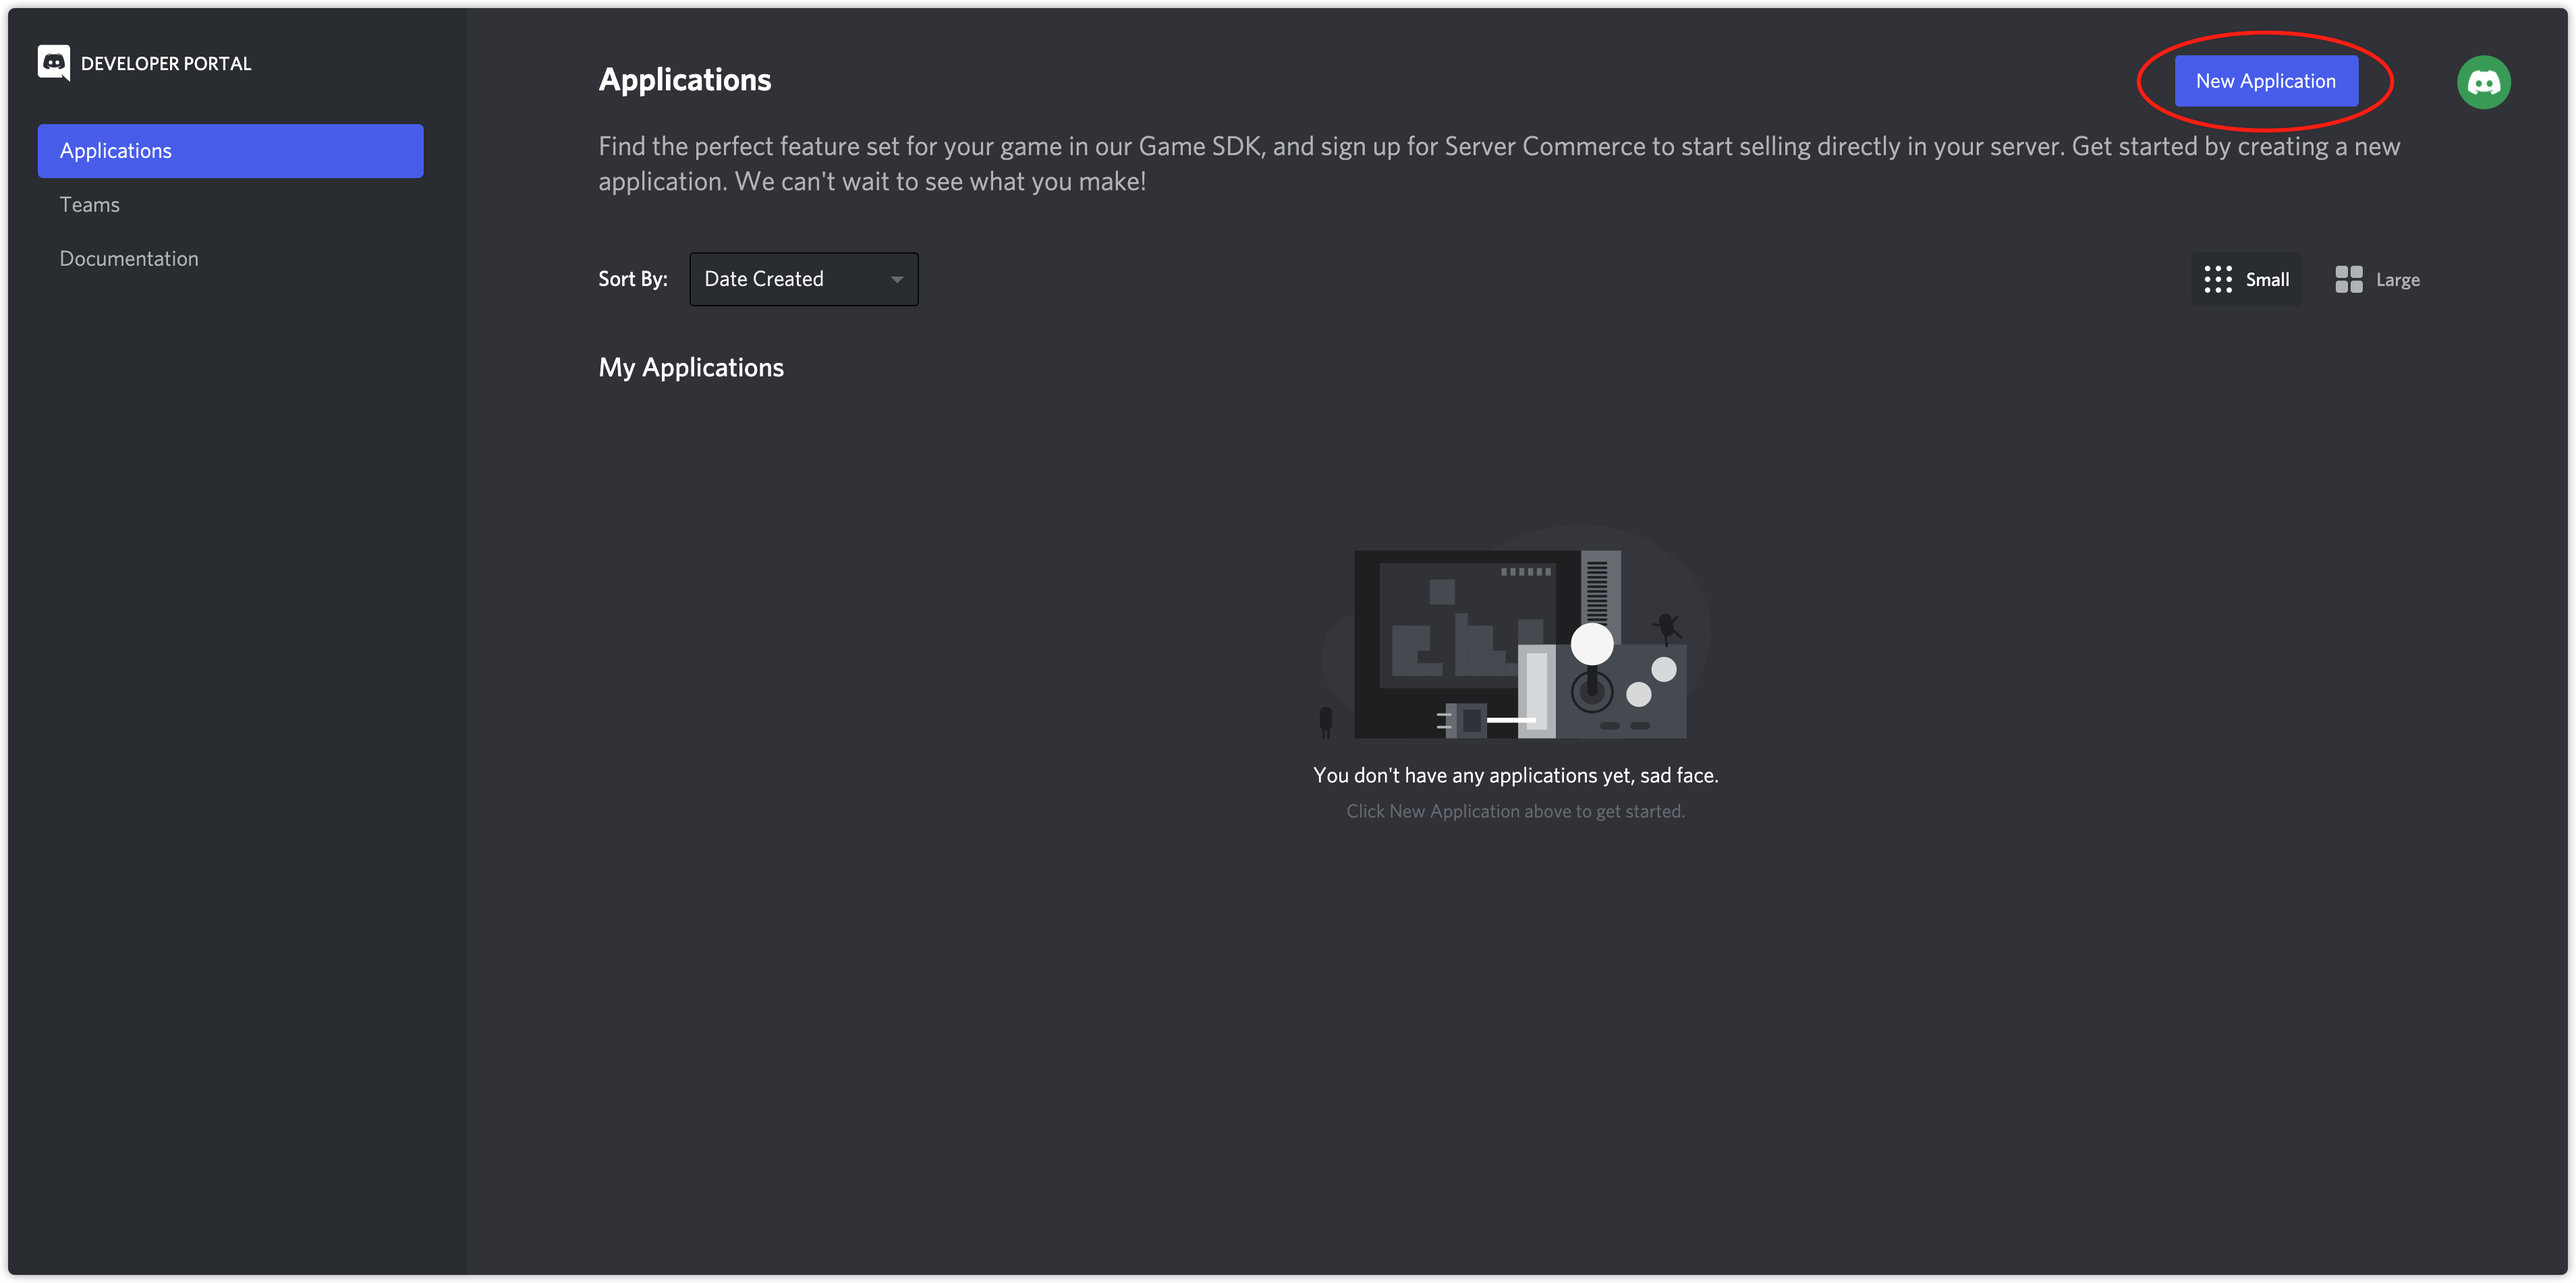
- Enter your application name and click Create
- On the General Information page, obtain the APPLICATION ID
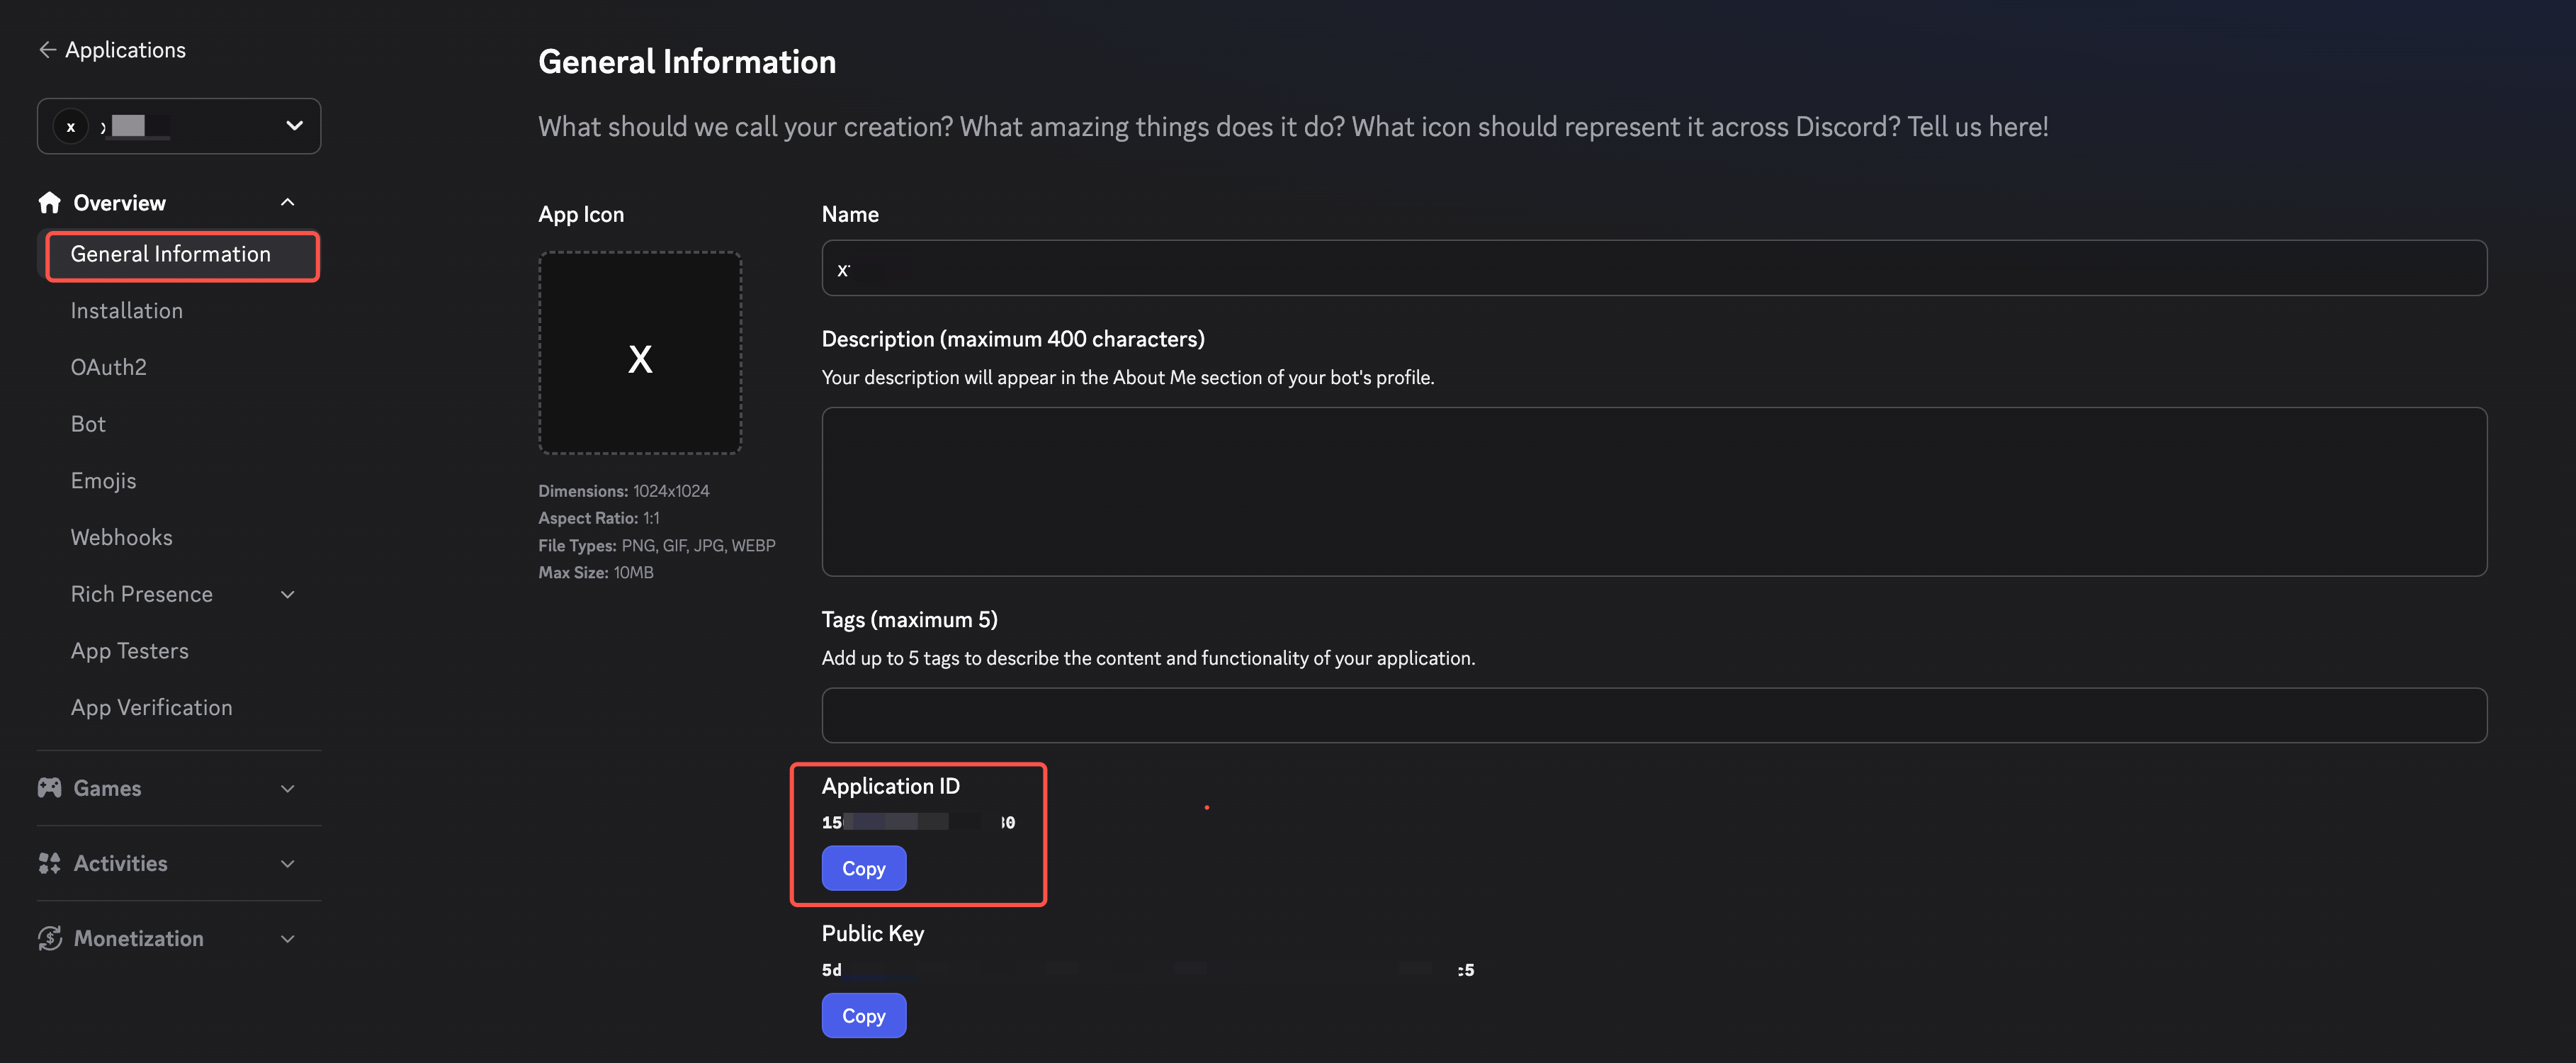
- Configure the Discord App ID in INTLConfig.ini
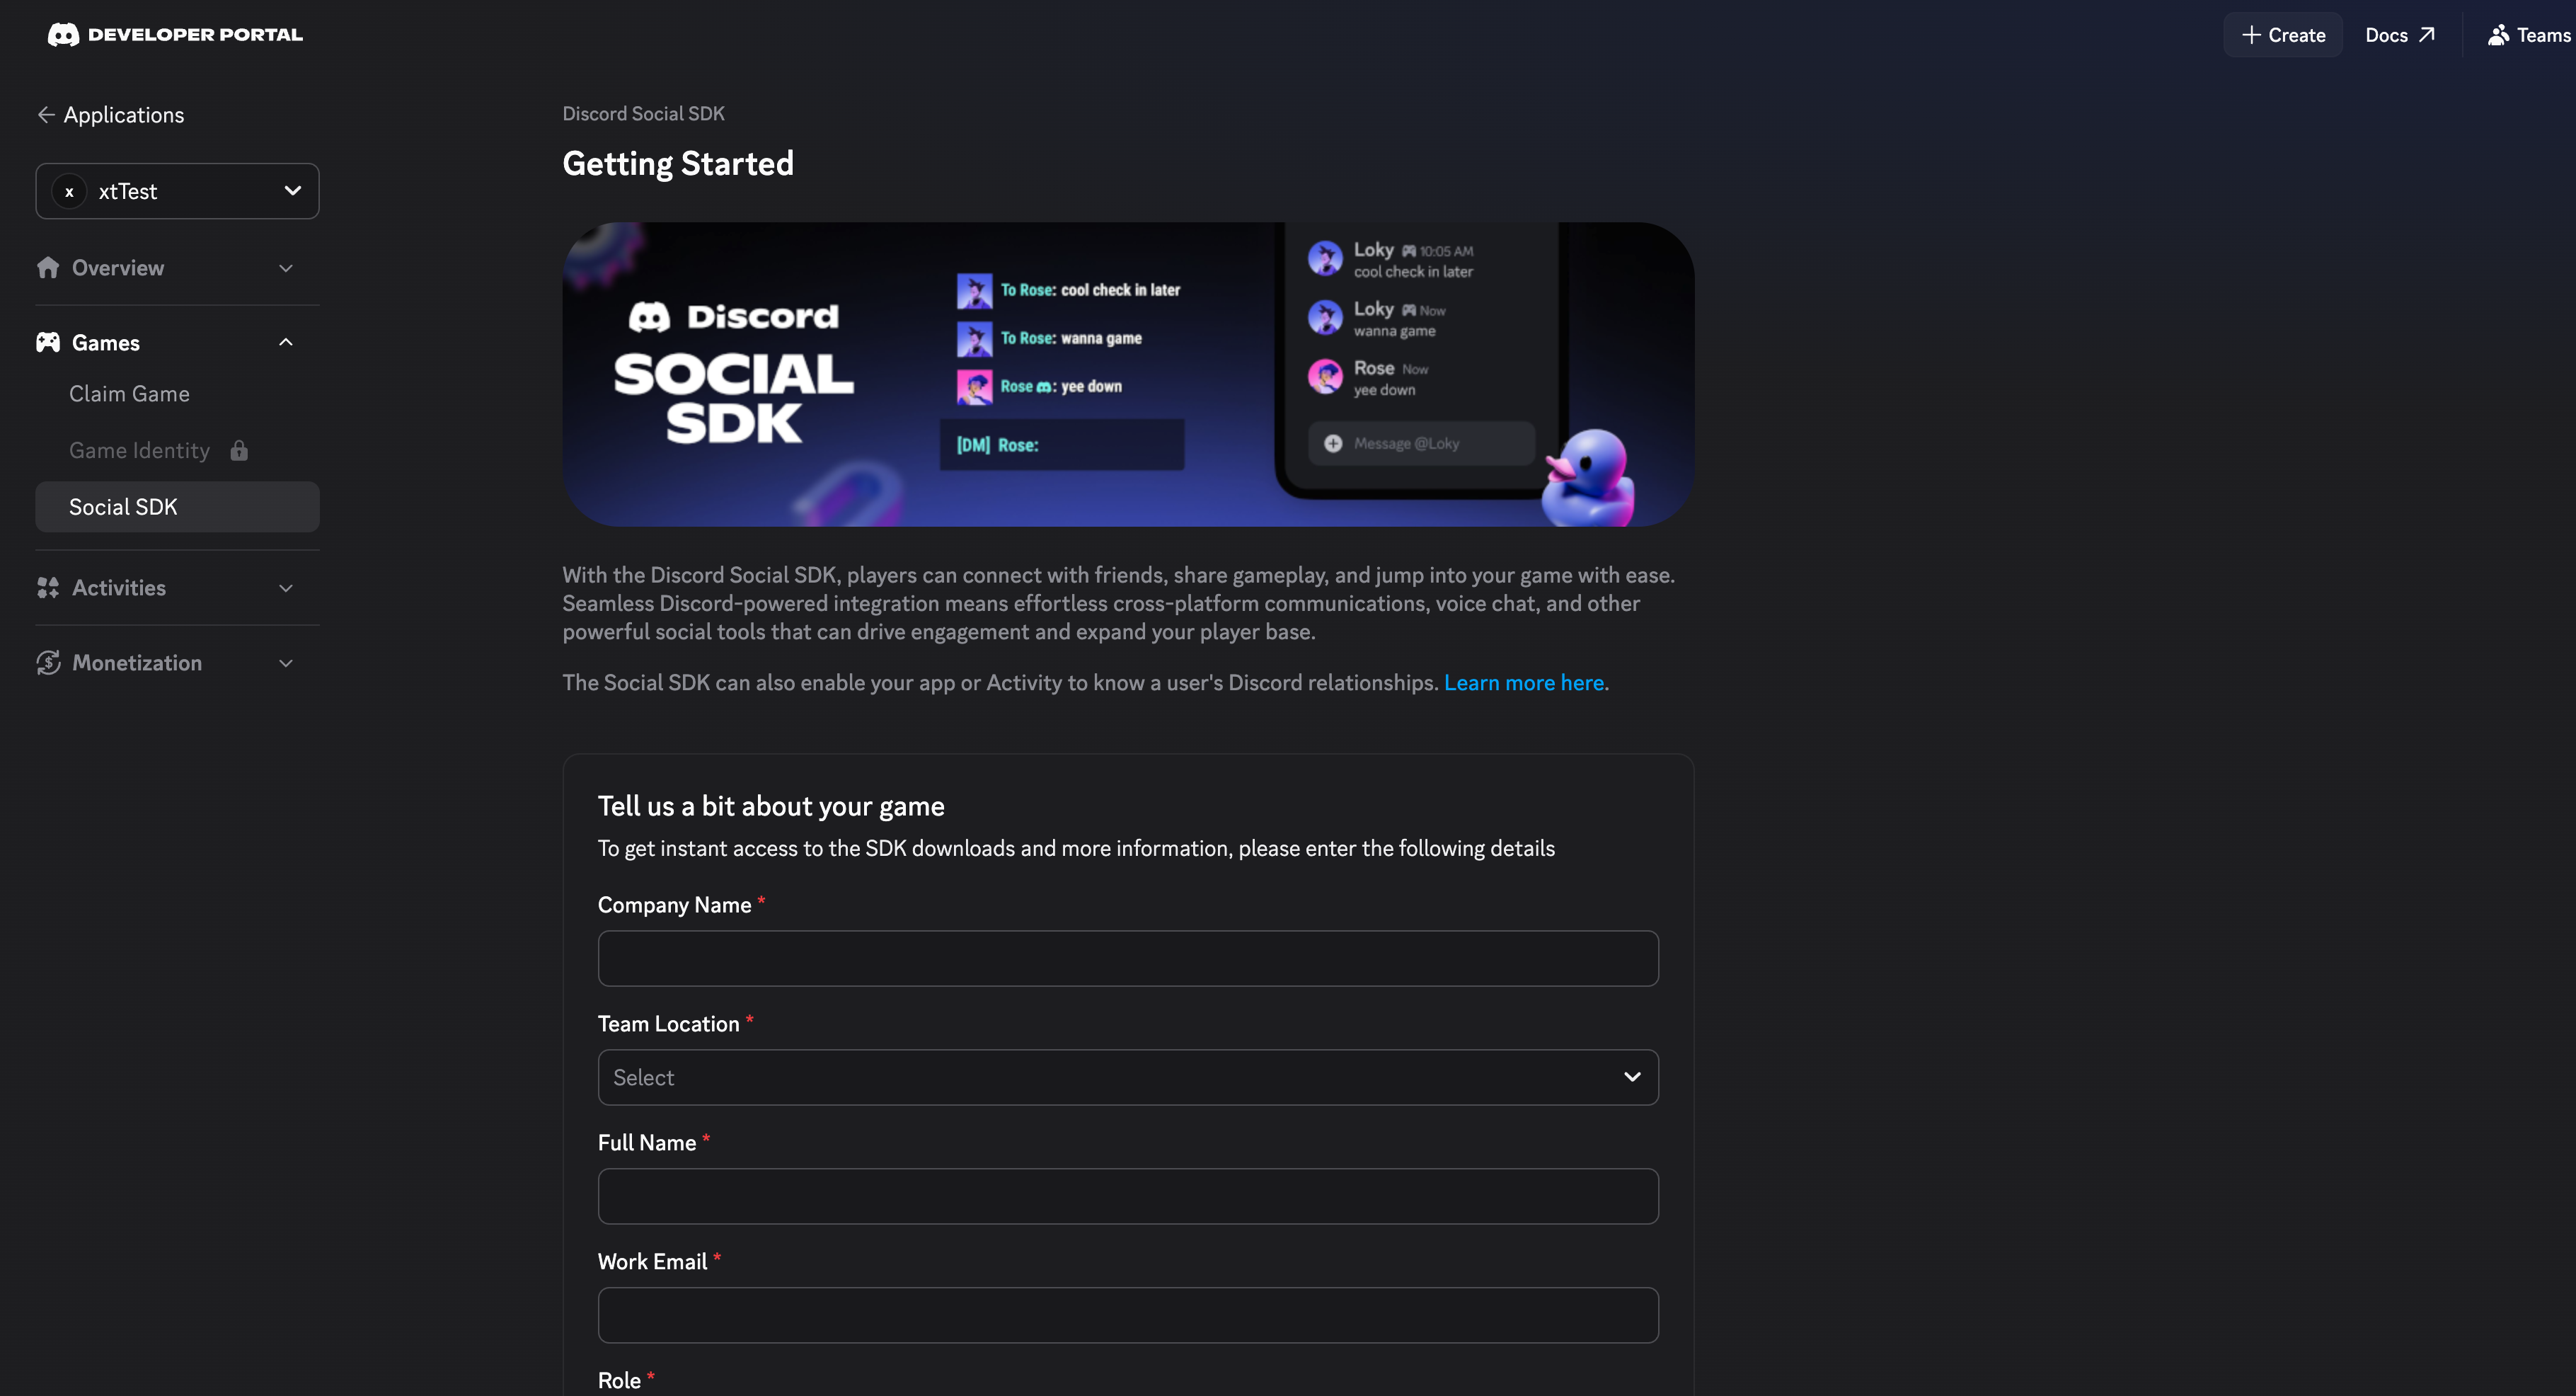
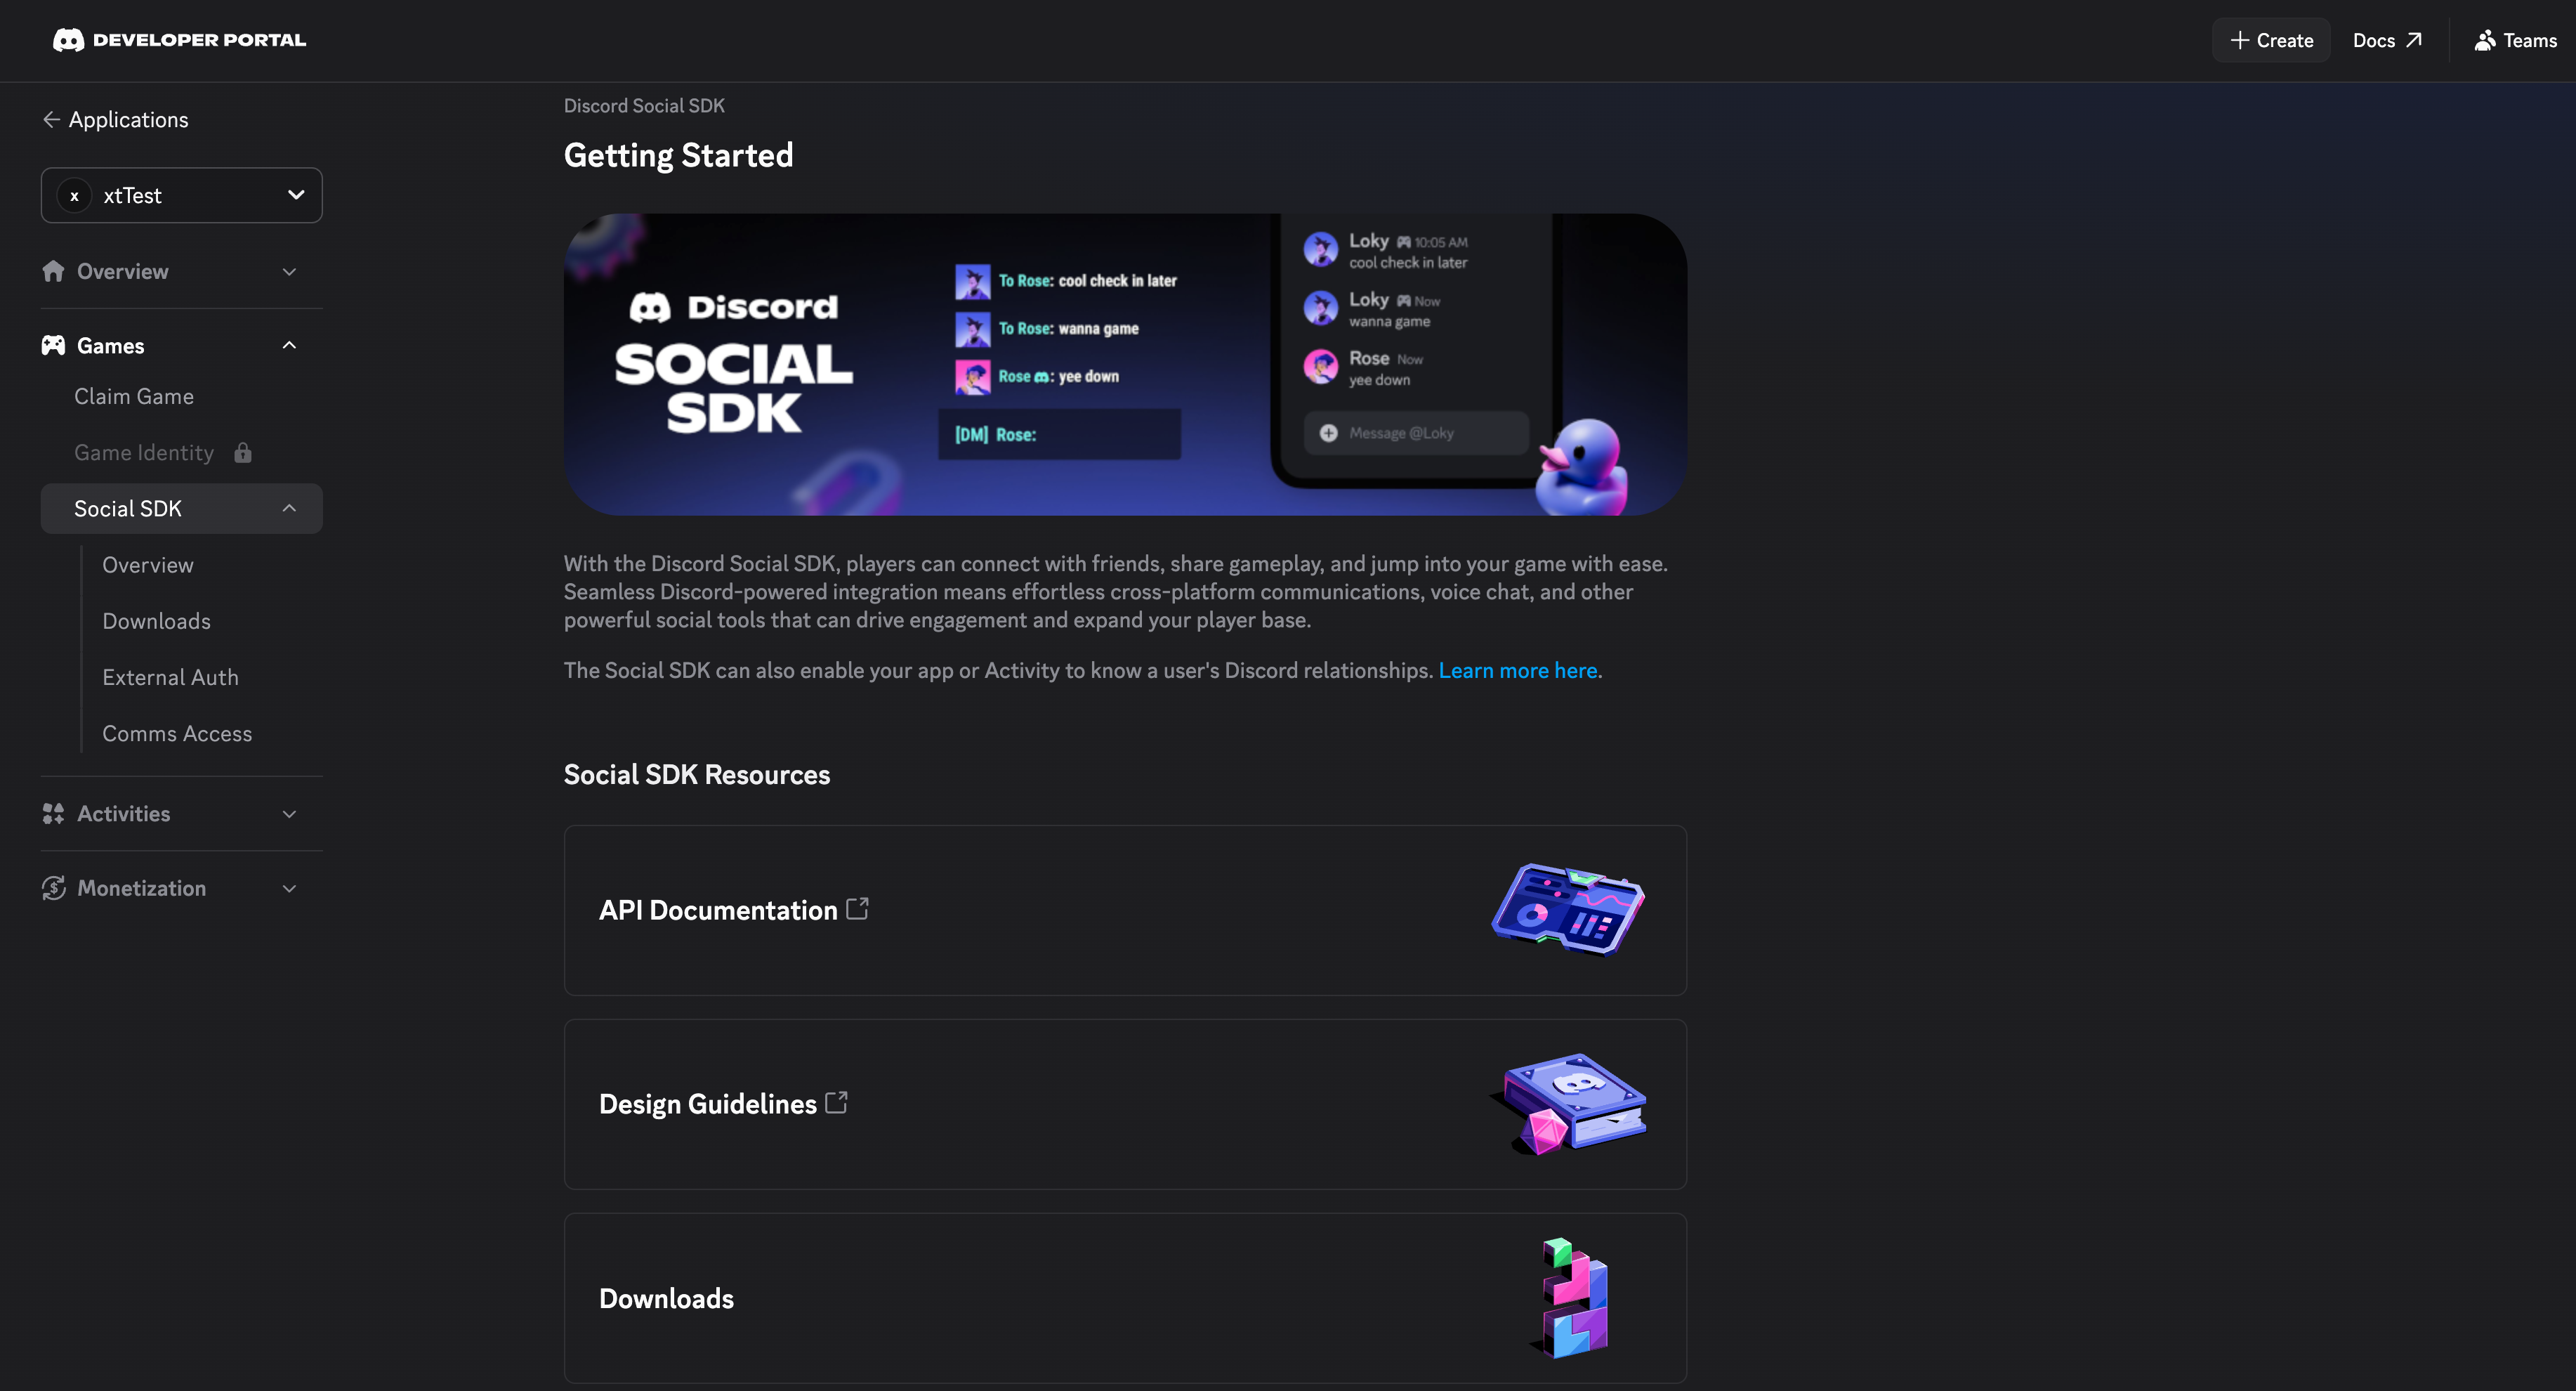
1.2. Apply for SDK Access
- Go to the Developer Platform
- Click Games - Social SDK, fill out the form, and submit
Before the official launch of your game, notify the Discord team in advance to enable production permissions.
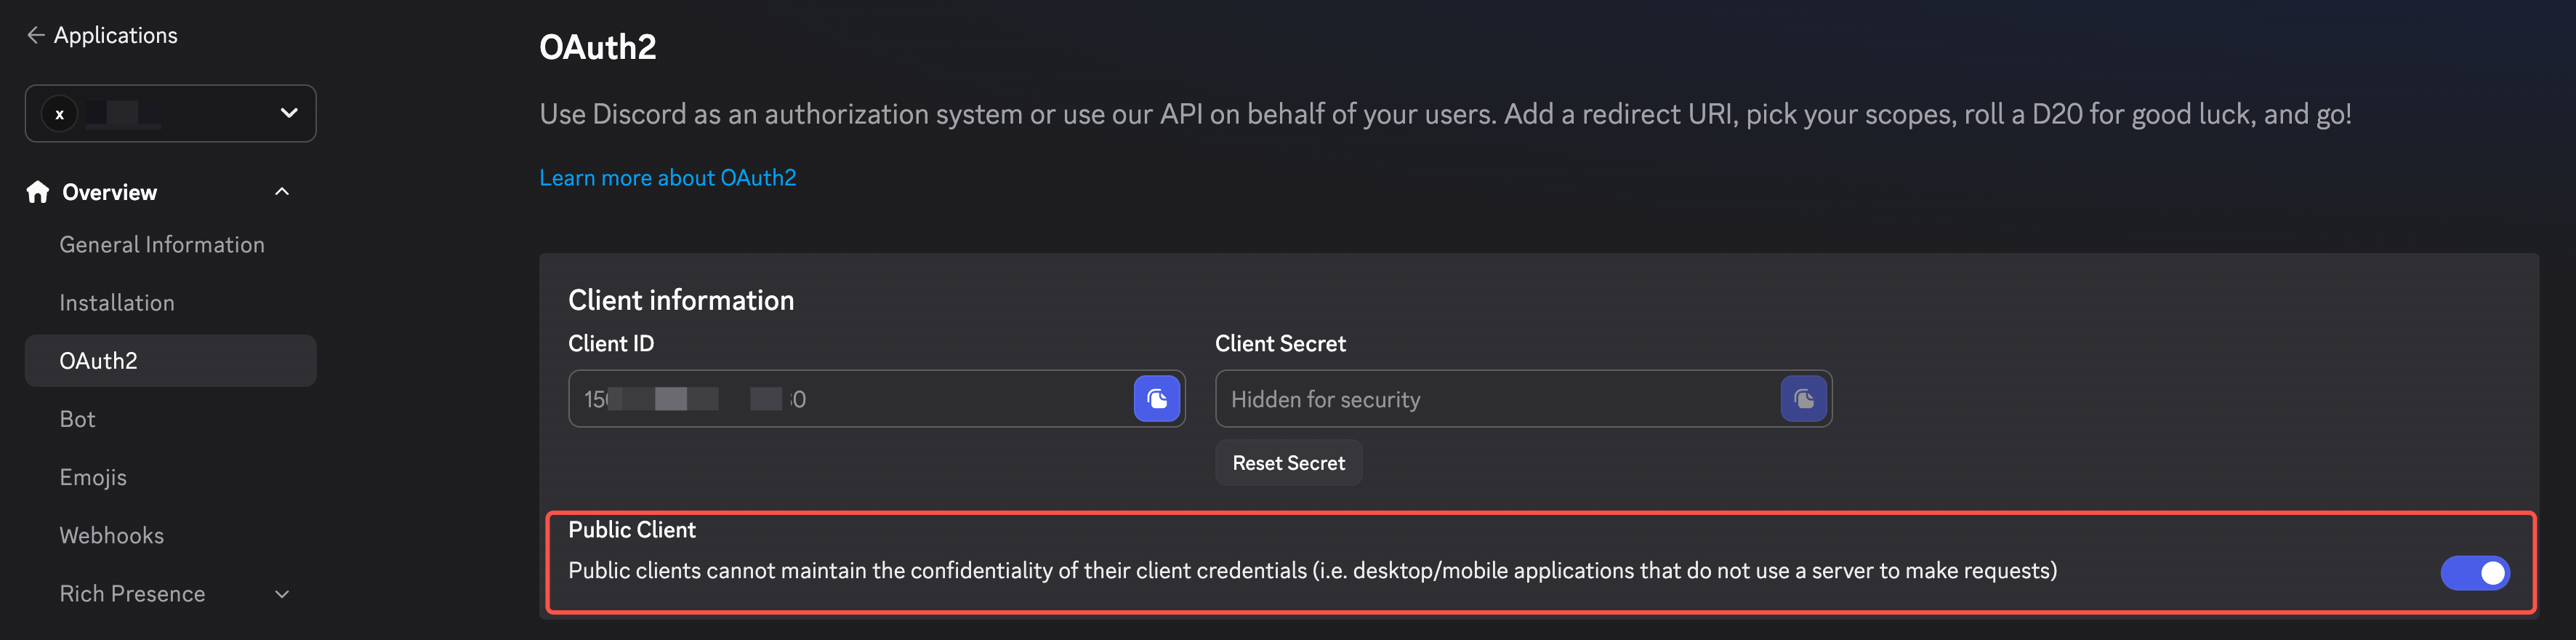
1.3. Configure OAuth2
- Click OAuth2 and turn on the PUBLIC CLIENT option
- Configure Redirects:
- Android/iOS:
discord-{YOUR_APP_ID}:/authorize/callback - PC:
http://127.0.0.1/callback - Web:
https://common-web.intlgame.com/jssdk/discordlogincallback.html,https://test-common-web.intlgame.com/jssdk/discordlogincallback.html
- Android/iOS:
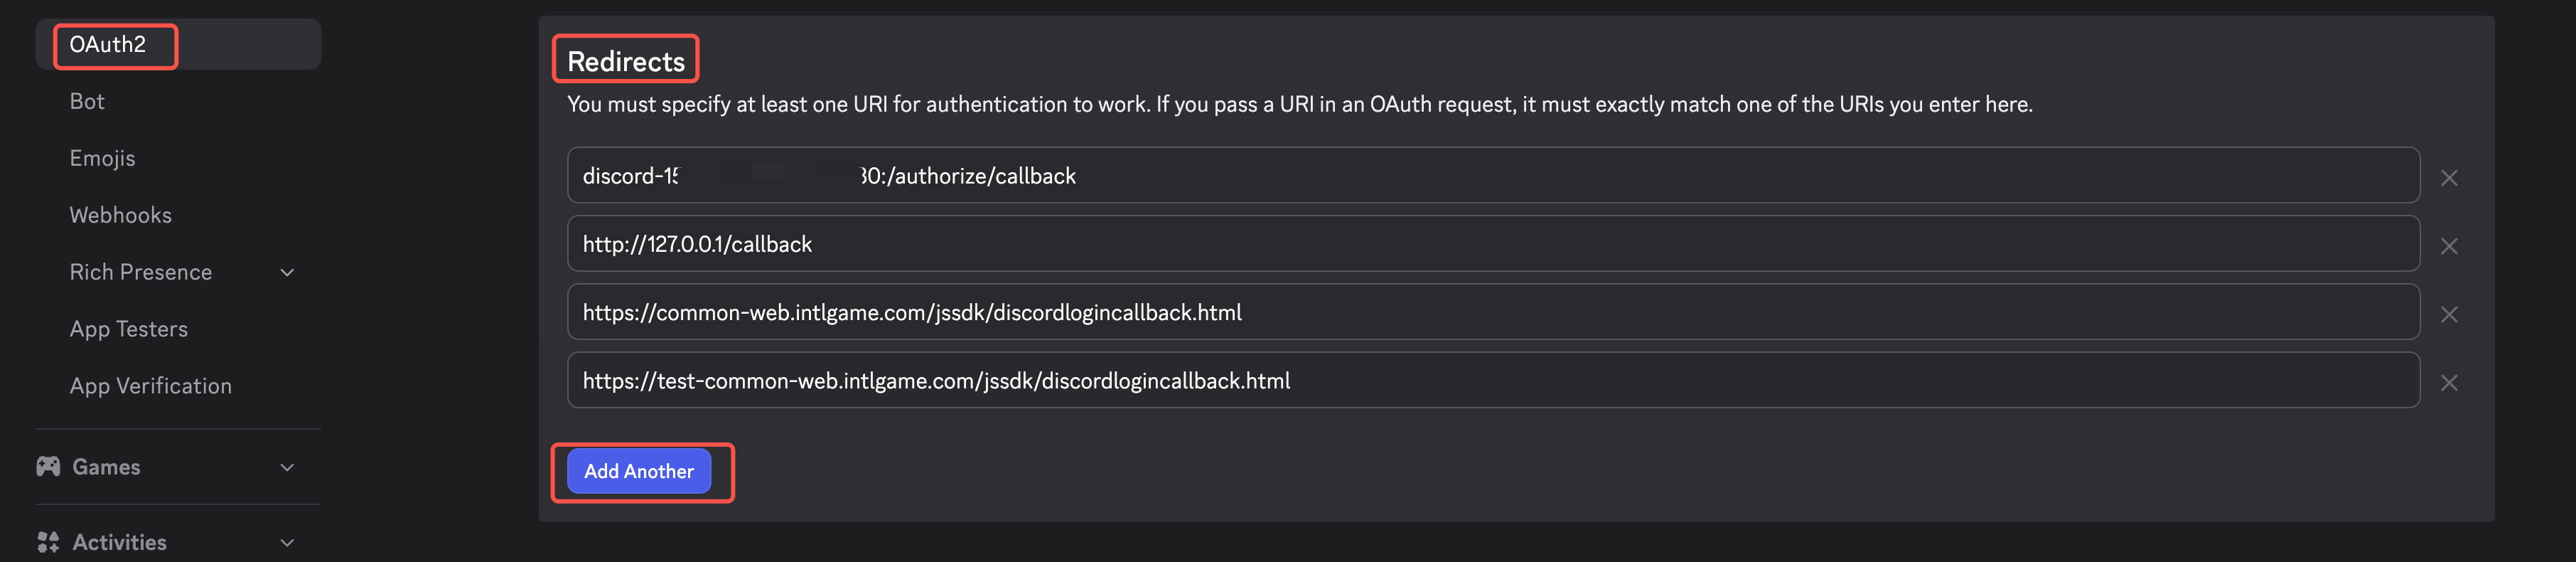
For multi-store channel packs:
Support for multi-store channel packages requires a separate REDIRECT_URL_SCHEME.An App ID supports 10 redirect URLs (about 4 multi-store channel packs).If the Project requires more than 4 multi-store channel packs, please request more App IDs.To use multiple application IDs, the game requires Configure multiple application IDs in INTLConfig.ini and Register multiple Discord applications on Player Network.
For mobile platforms, if the app needs to redirect back to the game, DeepLink must be configured: add the redirect URL under General Information → Deep Link URL

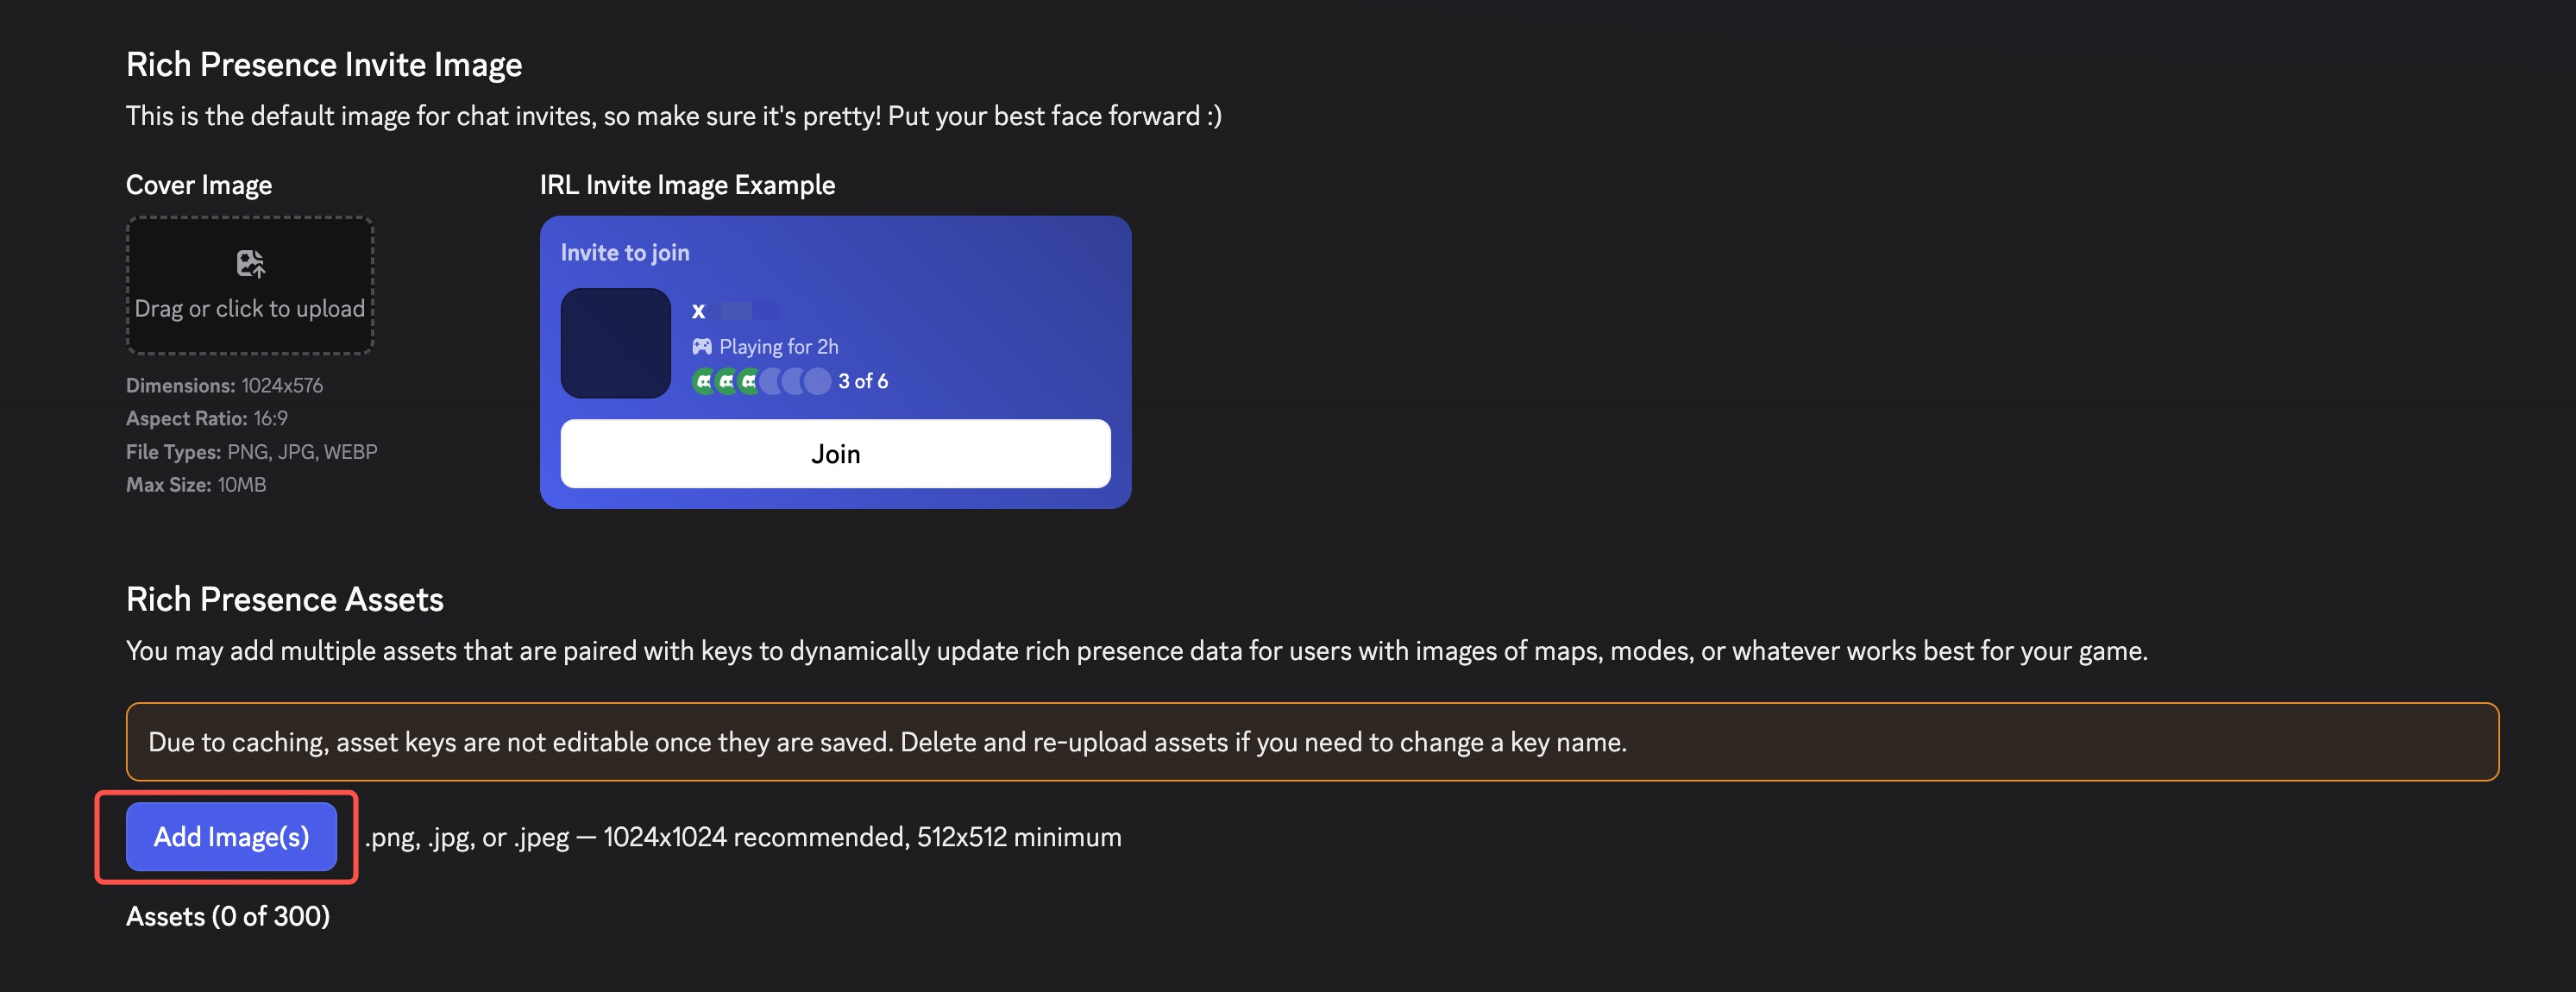
1.4. Configure Rich Presence Assets
- Click Rich Presence
- Click Add Image(s) to upload image assets
- Obtain Player Network console login account.
- Create a new project for the game, or join an existing project.
- Download SDK.
- Integrate the SDK.
- Add Discord as the login authentication method for the service in the Player Network console.
Step 1:Configuring the SDK for Discord Login
The Discord SDK is only compatible with iOS 12.0 and later.
Unreal Engine should first find the bundled resource path in the Plugins/INTLSDK/Source/INTLCore/INTLCore.Build.cs file:
AdditionalBundleResources.Add(new BundleResource(Path.Combine(ModuleDirectory, "Libs/iOS/INTLCore/INTLSDK.bundle"), bShouldLog: false));
1. Swift SDK Adapter
If the module uses Swift version SDK, this involves the integration of iOS' Swift and Objective-C. Xcode requires a bridging layer to align the class names, etc., of the two languages for compatibility. Follow these steps.
-
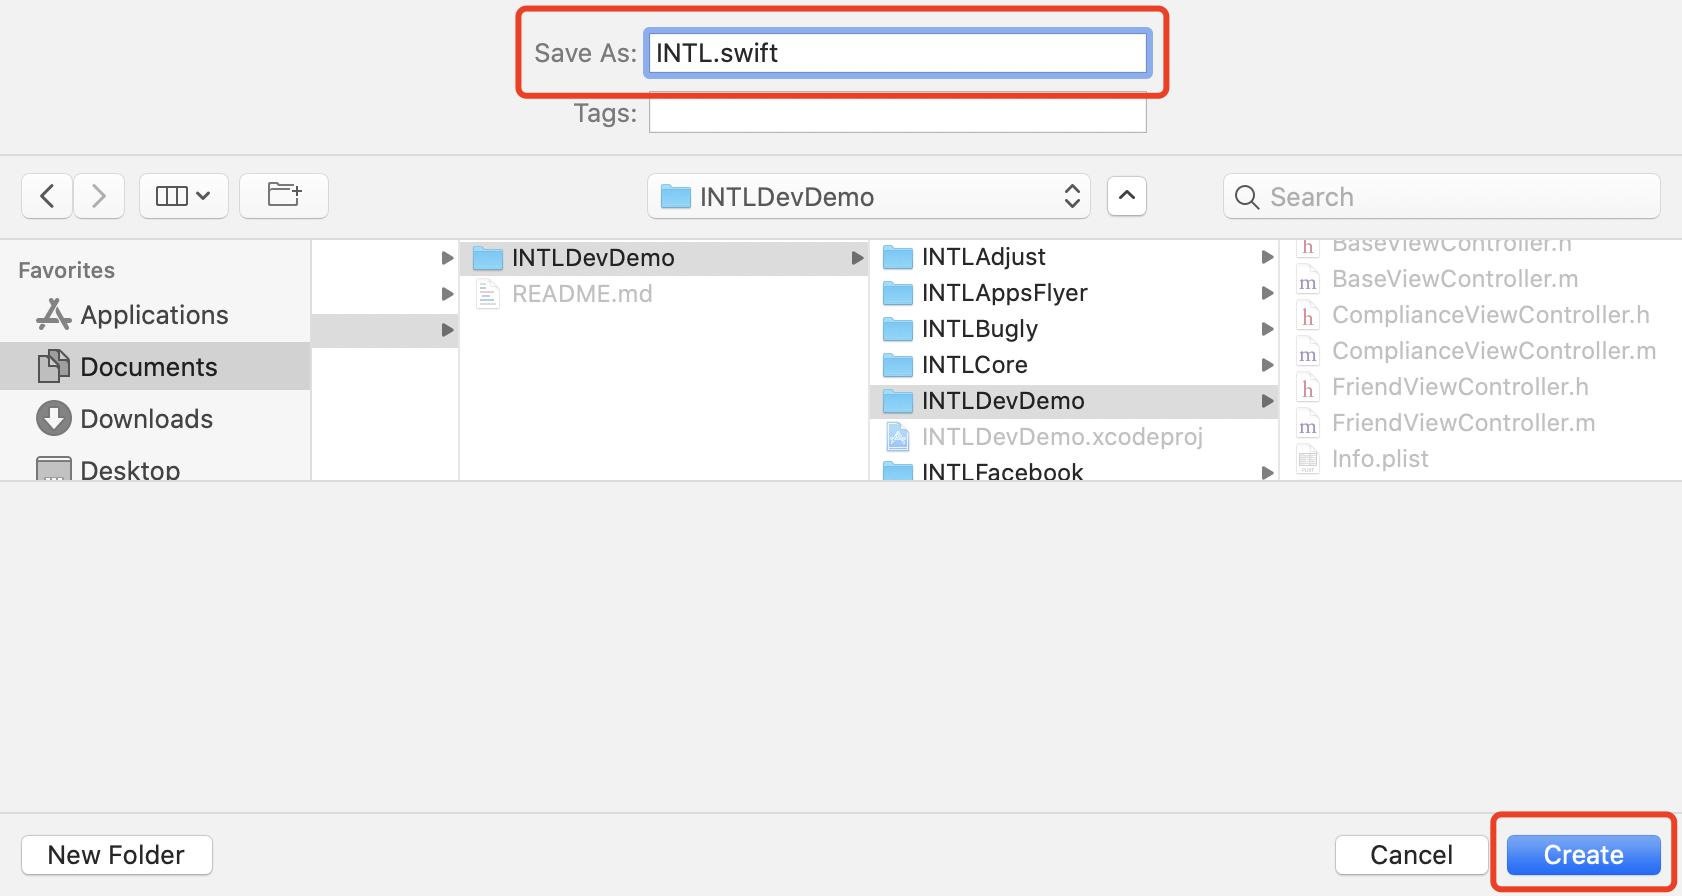
Create a new file and choose Swift File type.
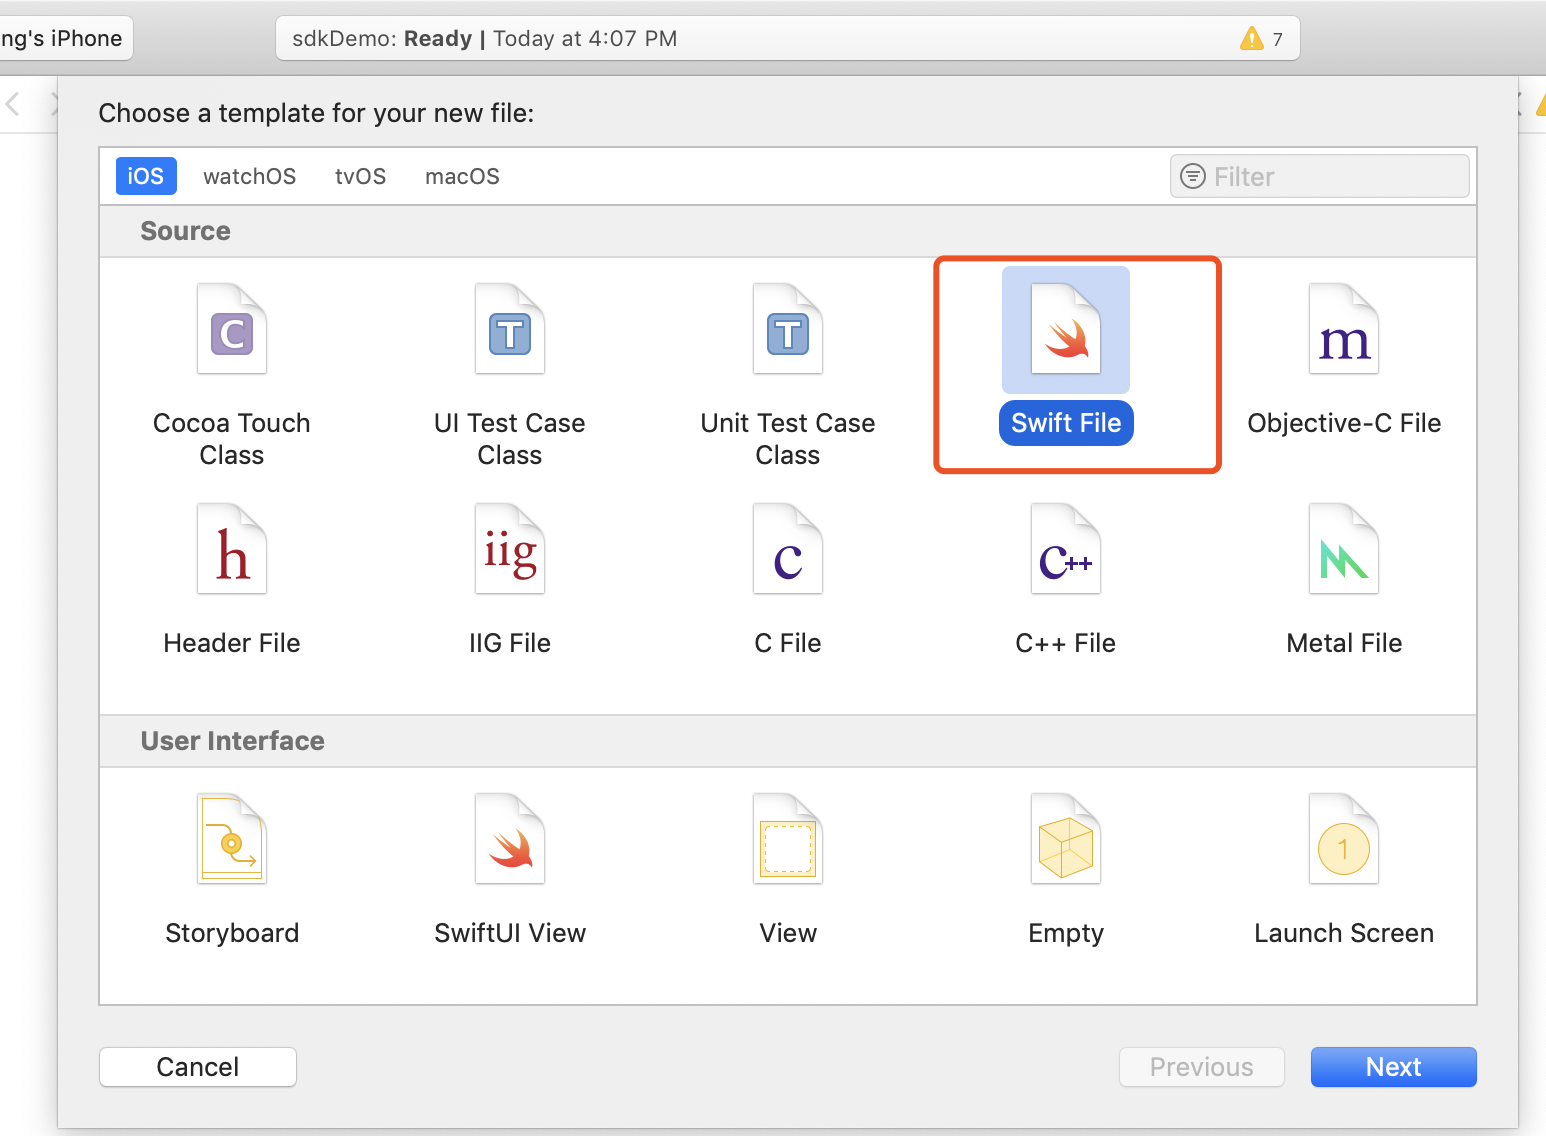
-
Name it according to your needs and ensure the file suffix is .swift, then click Create.
-
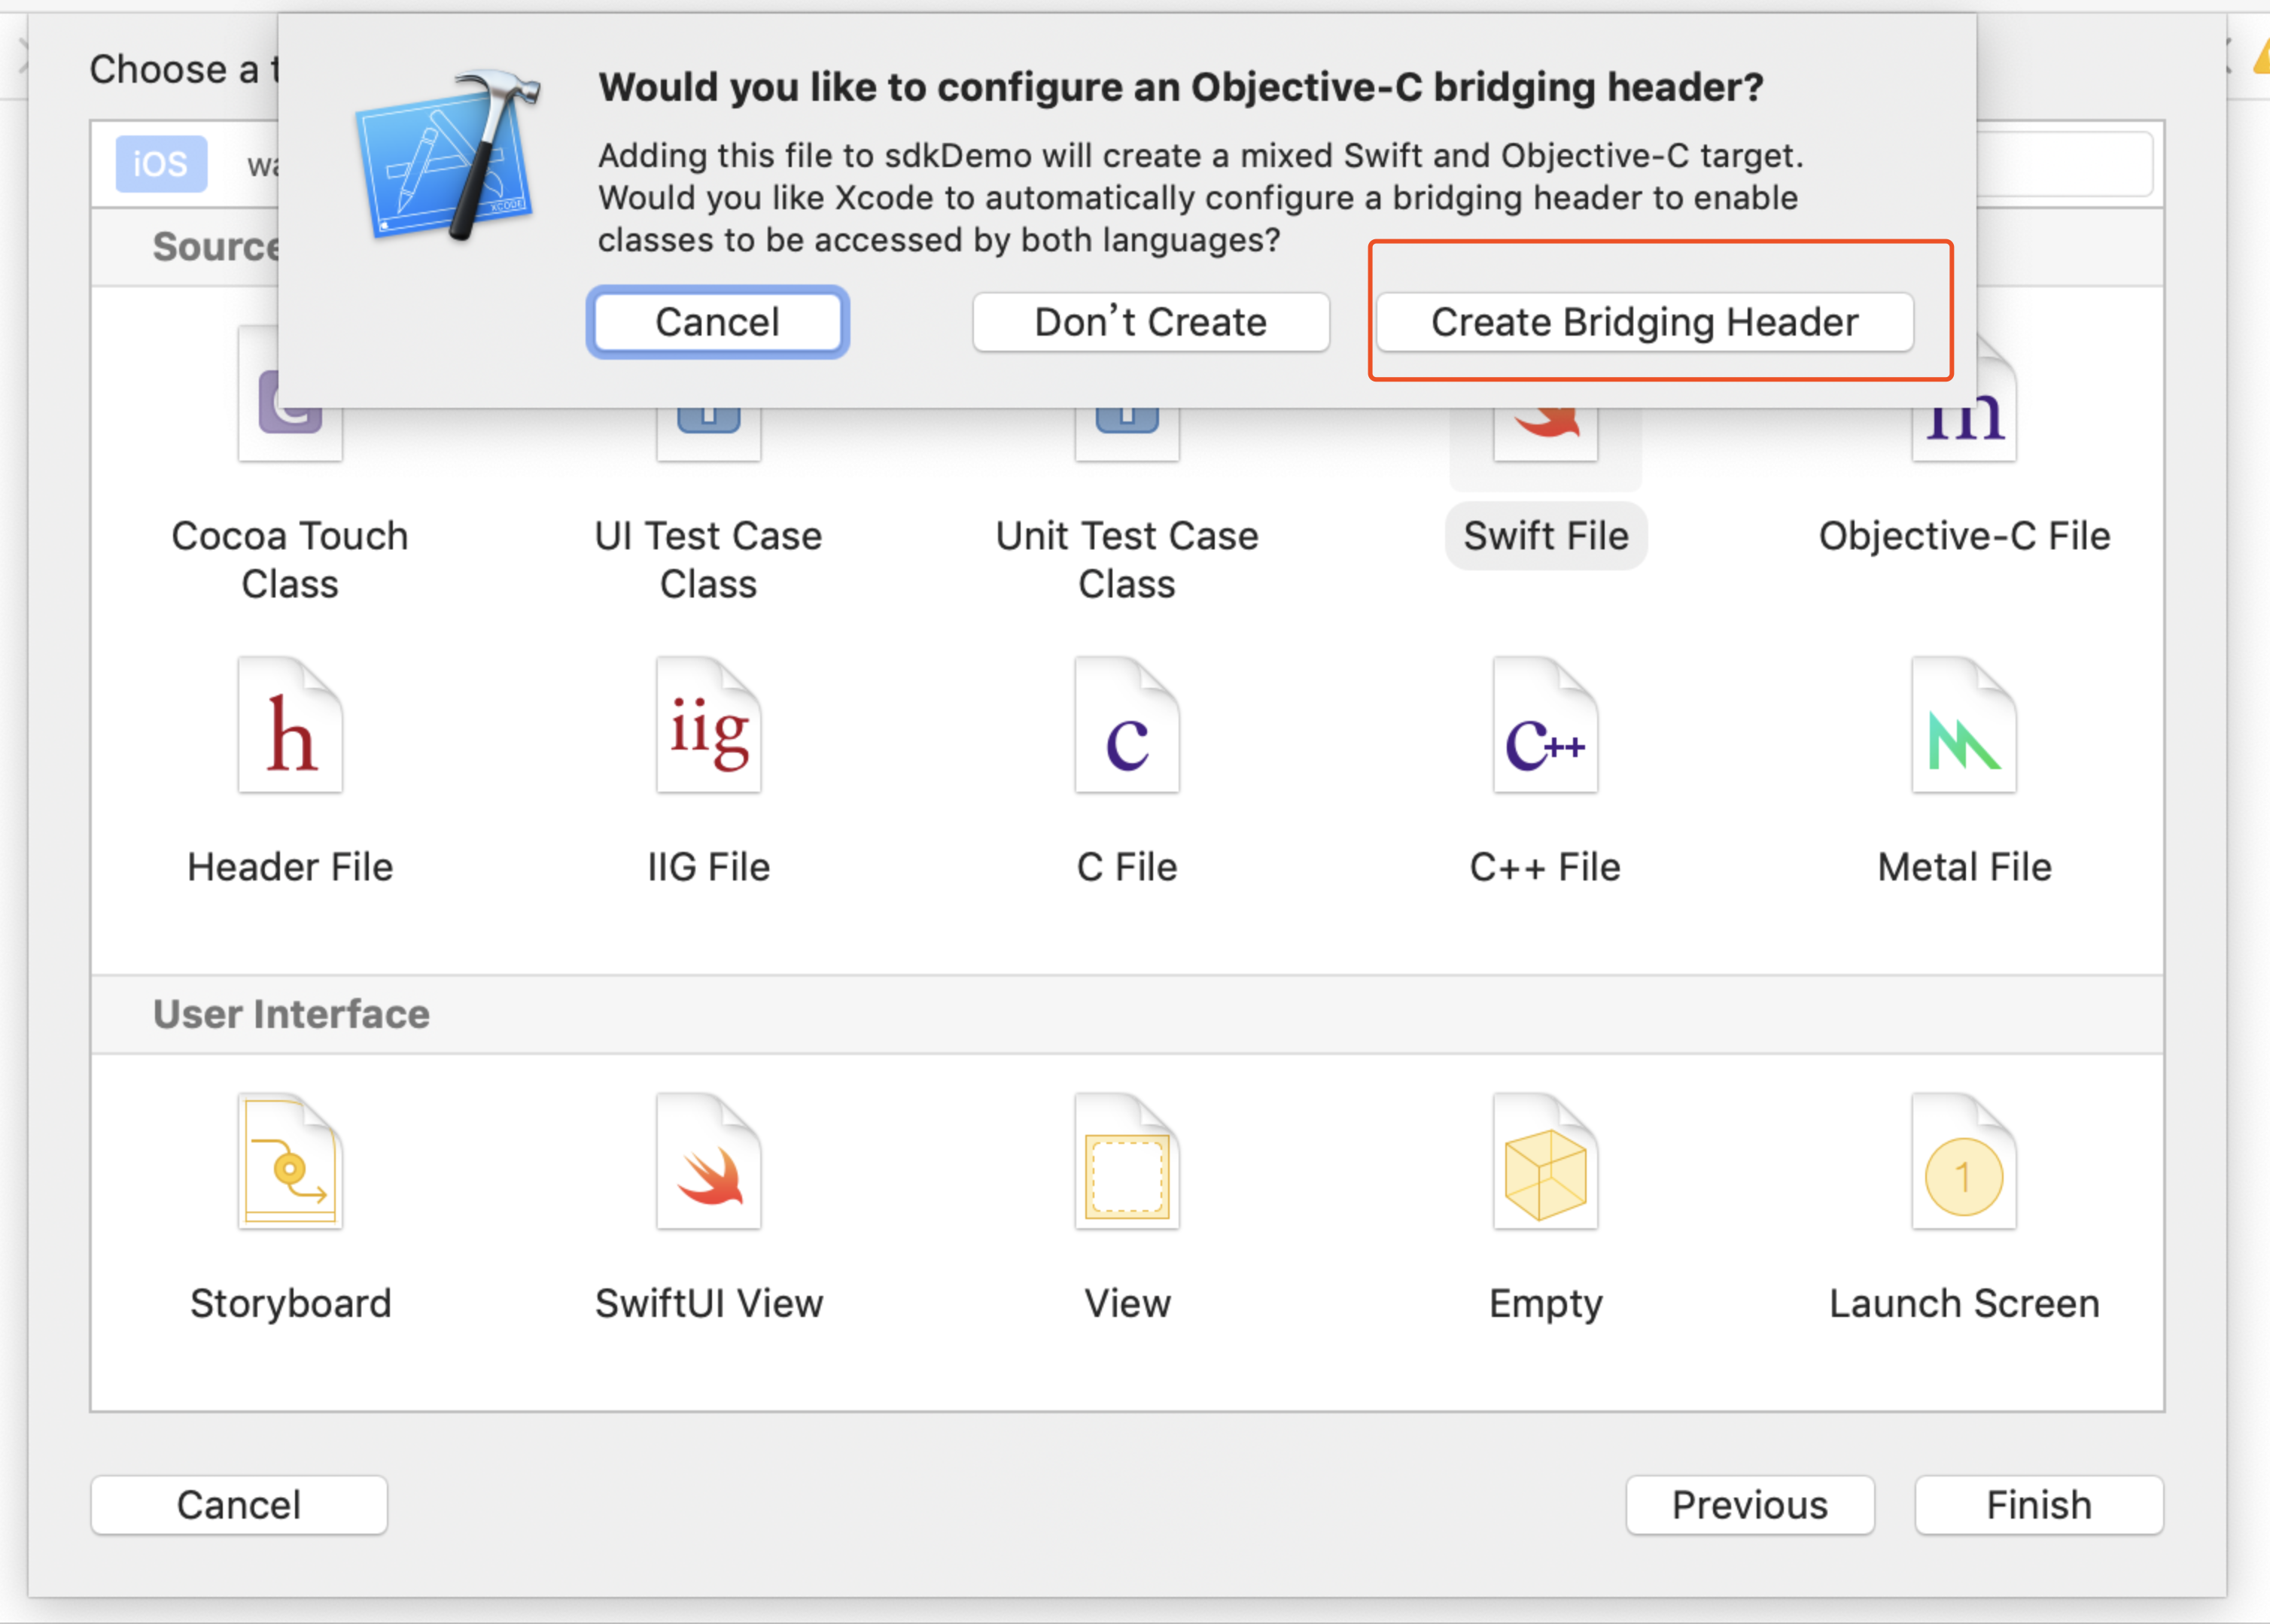
Click Create Bridging Header.
Make sure to select Create Bridging Header.Otherwise, Xcode will not create the bridging file.
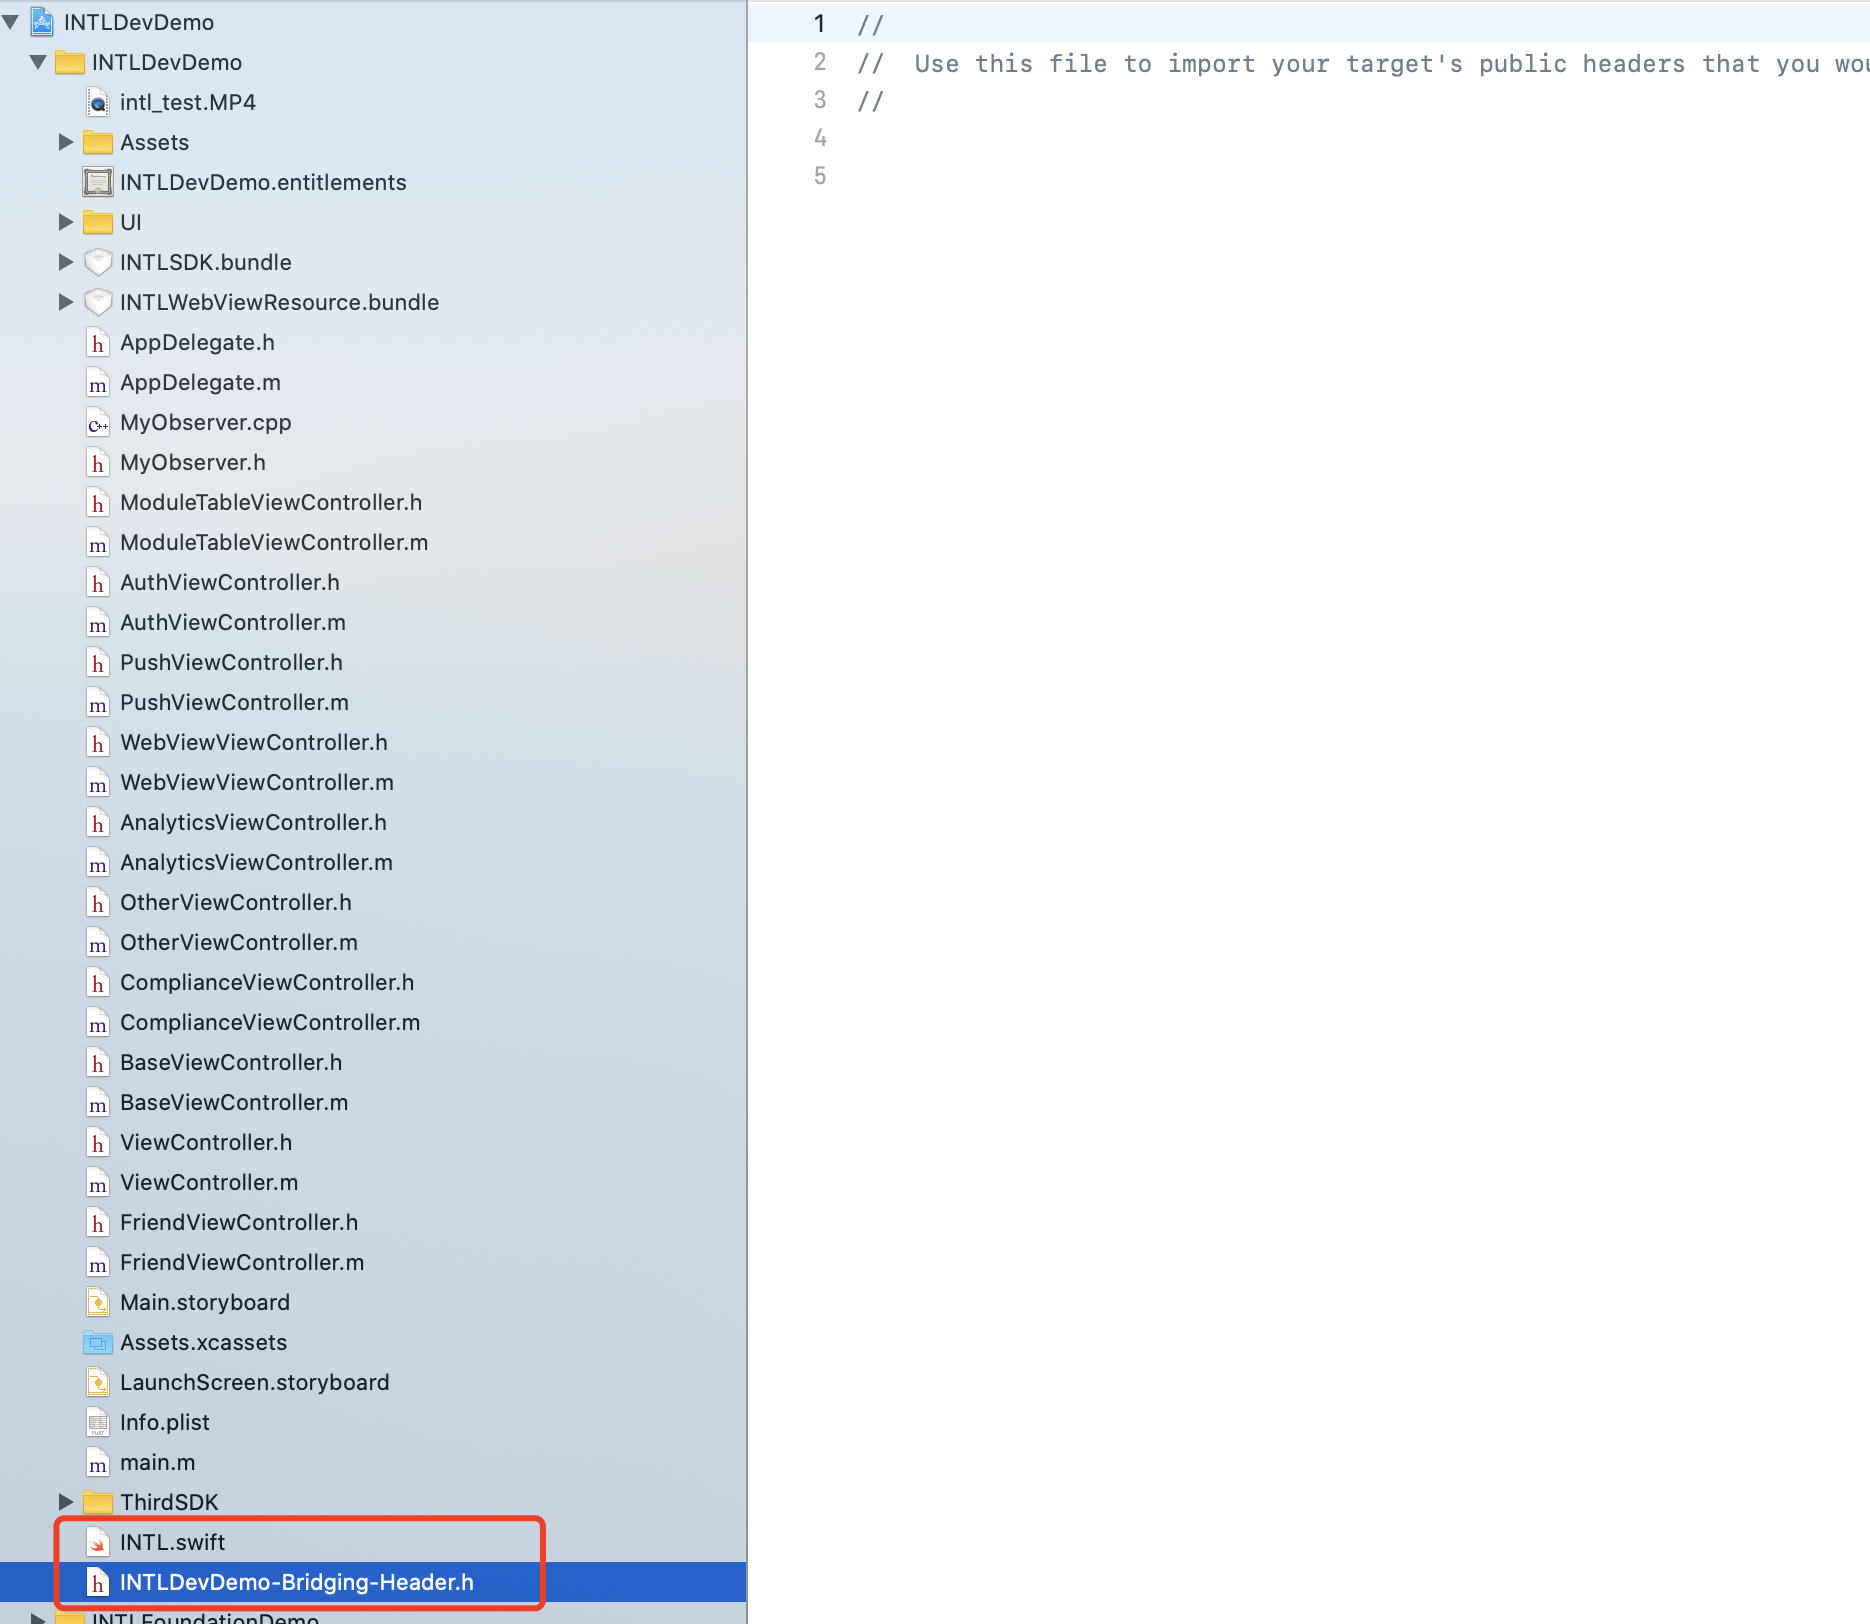
- Ensure two files are created in the Xcode project (one is the .swift file from step two, and the other is the automatically created project_name-Bridging-Header.h file).
No need to modify the file contents.
- Unity
- Unreal Engine
Not applicable.
Swift modules cannot be directly added to the iOS side in Unreal Engine, and engine configuration needs to be modified.
-
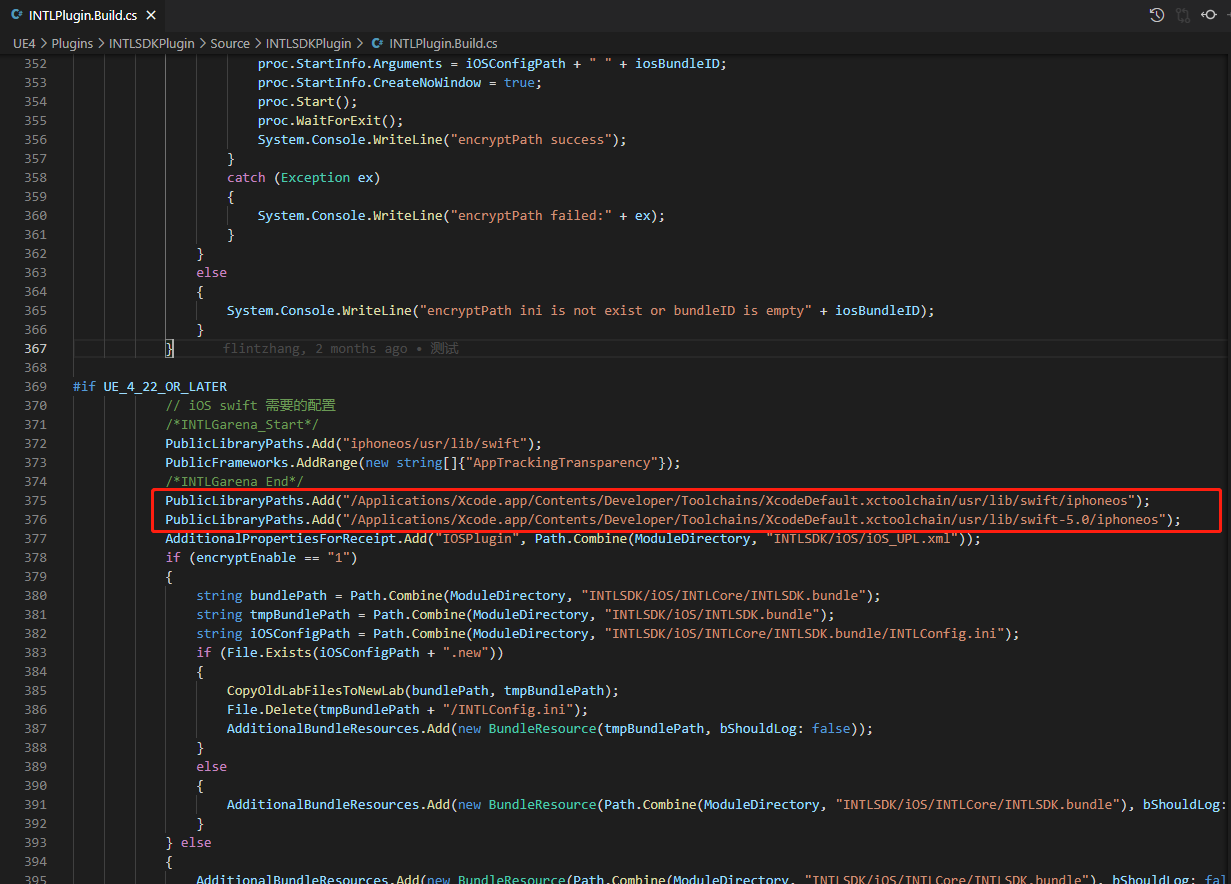
For Xcode 12 and later versions, add the following code in
/Plugins/INTLSDK/Source/INTLCore/INTLCore.Build.cs.PublicSystemLibraryPaths.Add("/Applications/Xcode.app/Contents/Developer/Toolchains/XcodeDefault.xctoolchain/usr/lib/swift/iphoneos");
PublicSystemLibraryPaths.Add("/Applications/Xcode.app/Contents/Developer/Toolchains/XcodeDefault.xctoolchain/usr/lib/swift-5.0/iphoneos");
Player Network SDK already includes the following configuration, so you can skip this step when using other versions of Xcode.
Because building Unreal Engine with Xcode 12 or higher's Swift lib may cause compilation errors, you only need this step when using Xcode 12 or later to resolve issues.

-
Modify the local Unreal Engine source code.
In the function
private void AppendProjectBuildConfiguration(StringBuilder Content, string ConfigName, string ConfigGuid)in /Your_UE_Installation_Path/Engine/Source/Programs/UnrealBuildTool/ProjectFiles/Xcode/XcodeProject.cs, add the following code.// Enable Swift
Content.Append("\t\t\t\tCLANG_ENABLE_MODULES = YES;" + ProjectFileGenerator.NewLine);
Content.Append("\t\t\t\tSWIFT_VERSION = 5.0;" + ProjectFileGenerator.NewLine);
Content.Append("\t\t\t\tLIBRARY_SEARCH_PATHS = \"$(TOOLCHAIN_DIR)/usr/lib/swift/$(PLATFORM_NAME)\";" + ProjectFileGenerator.NewLine);
if (ConfigName == "Debug")
{
Content.Append("\t\t\t\tSWIFT_OPTIMIZATION_LEVEL = \"-Onone\";" + ProjectFileGenerator.NewLine);
}
Content.Append("\t\t\t\tALWAYS_EMBED_SWIFT_STANDARD_LIBRARIES = YES;" + ProjectFileGenerator.NewLine);
Content.Append("\t\t\t\tEMBEDDED_CONTENT_CONTAINS_SWIFT = YES;" + ProjectFileGenerator.NewLine);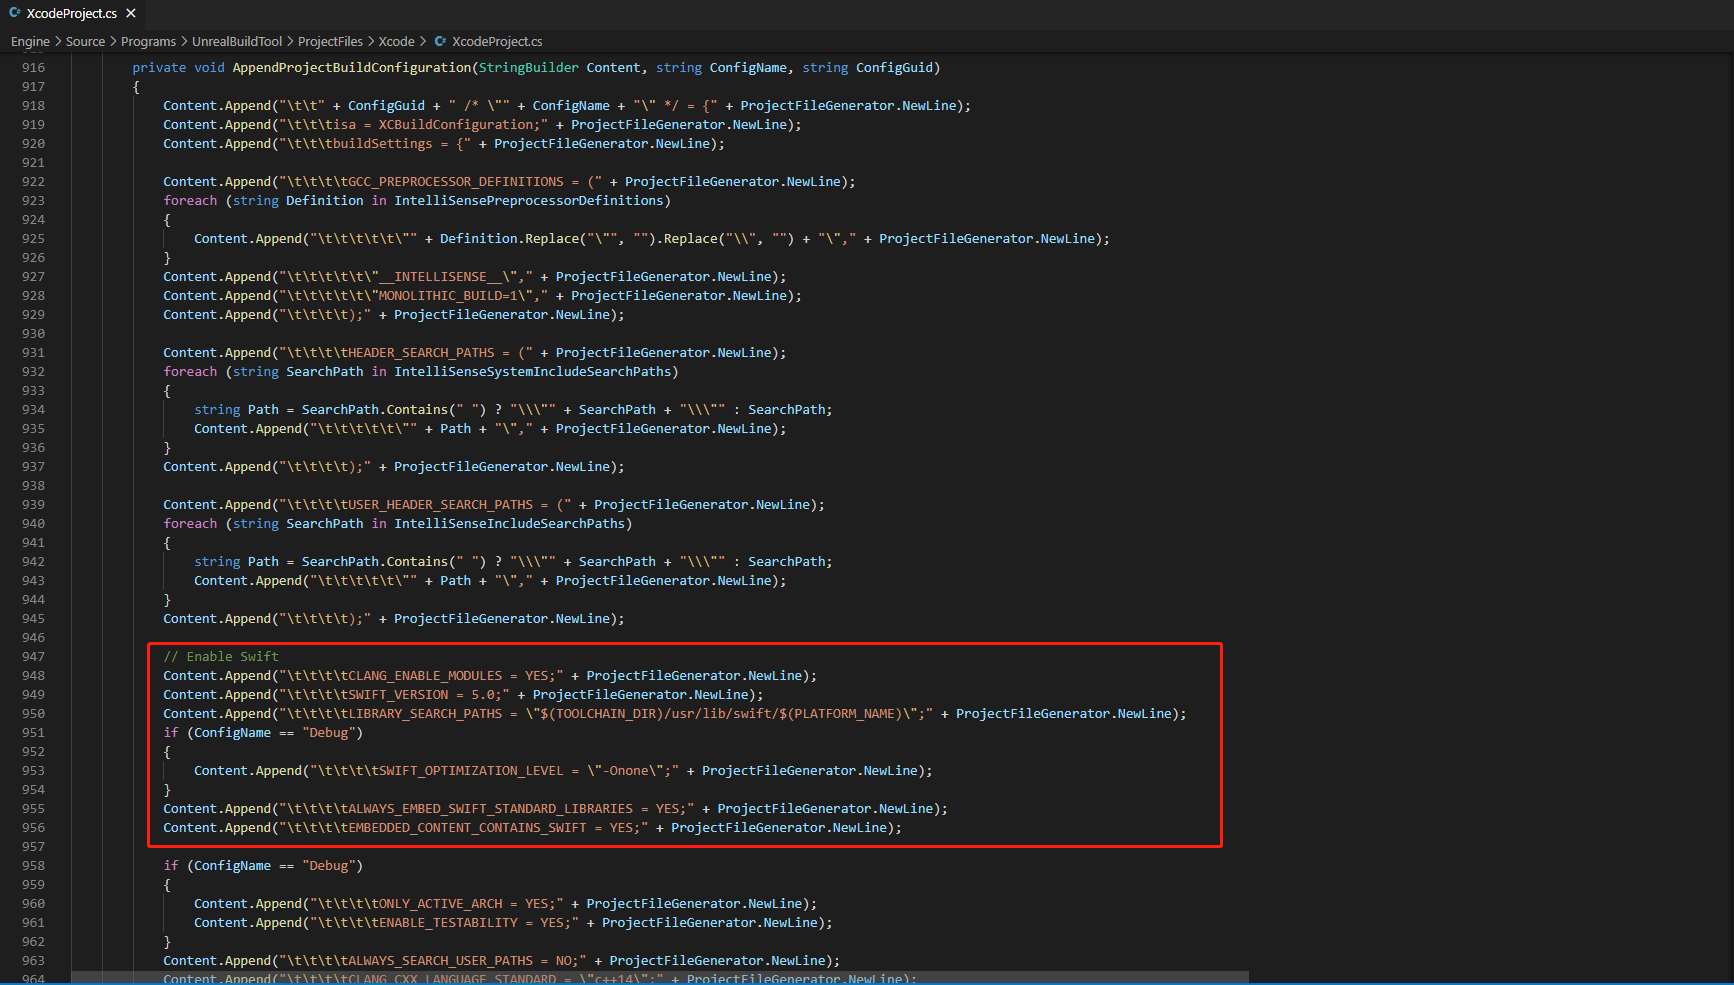
-
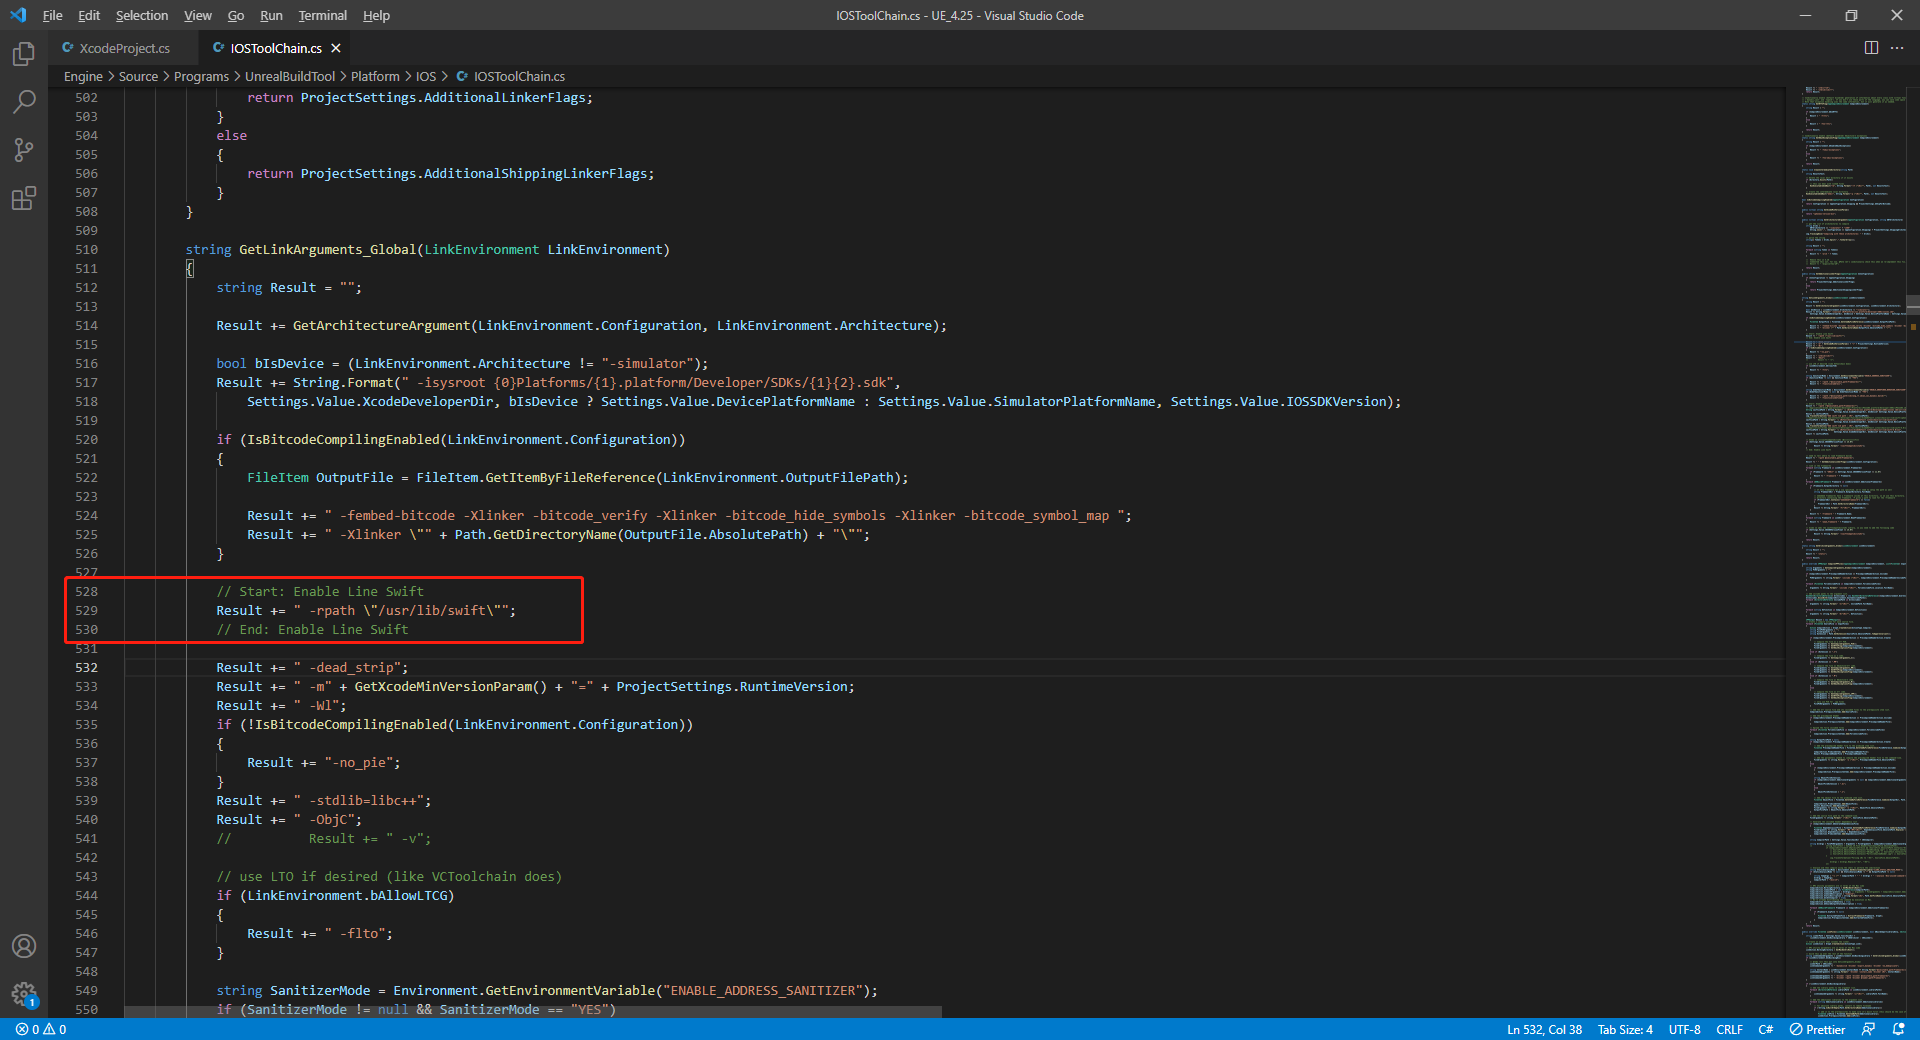
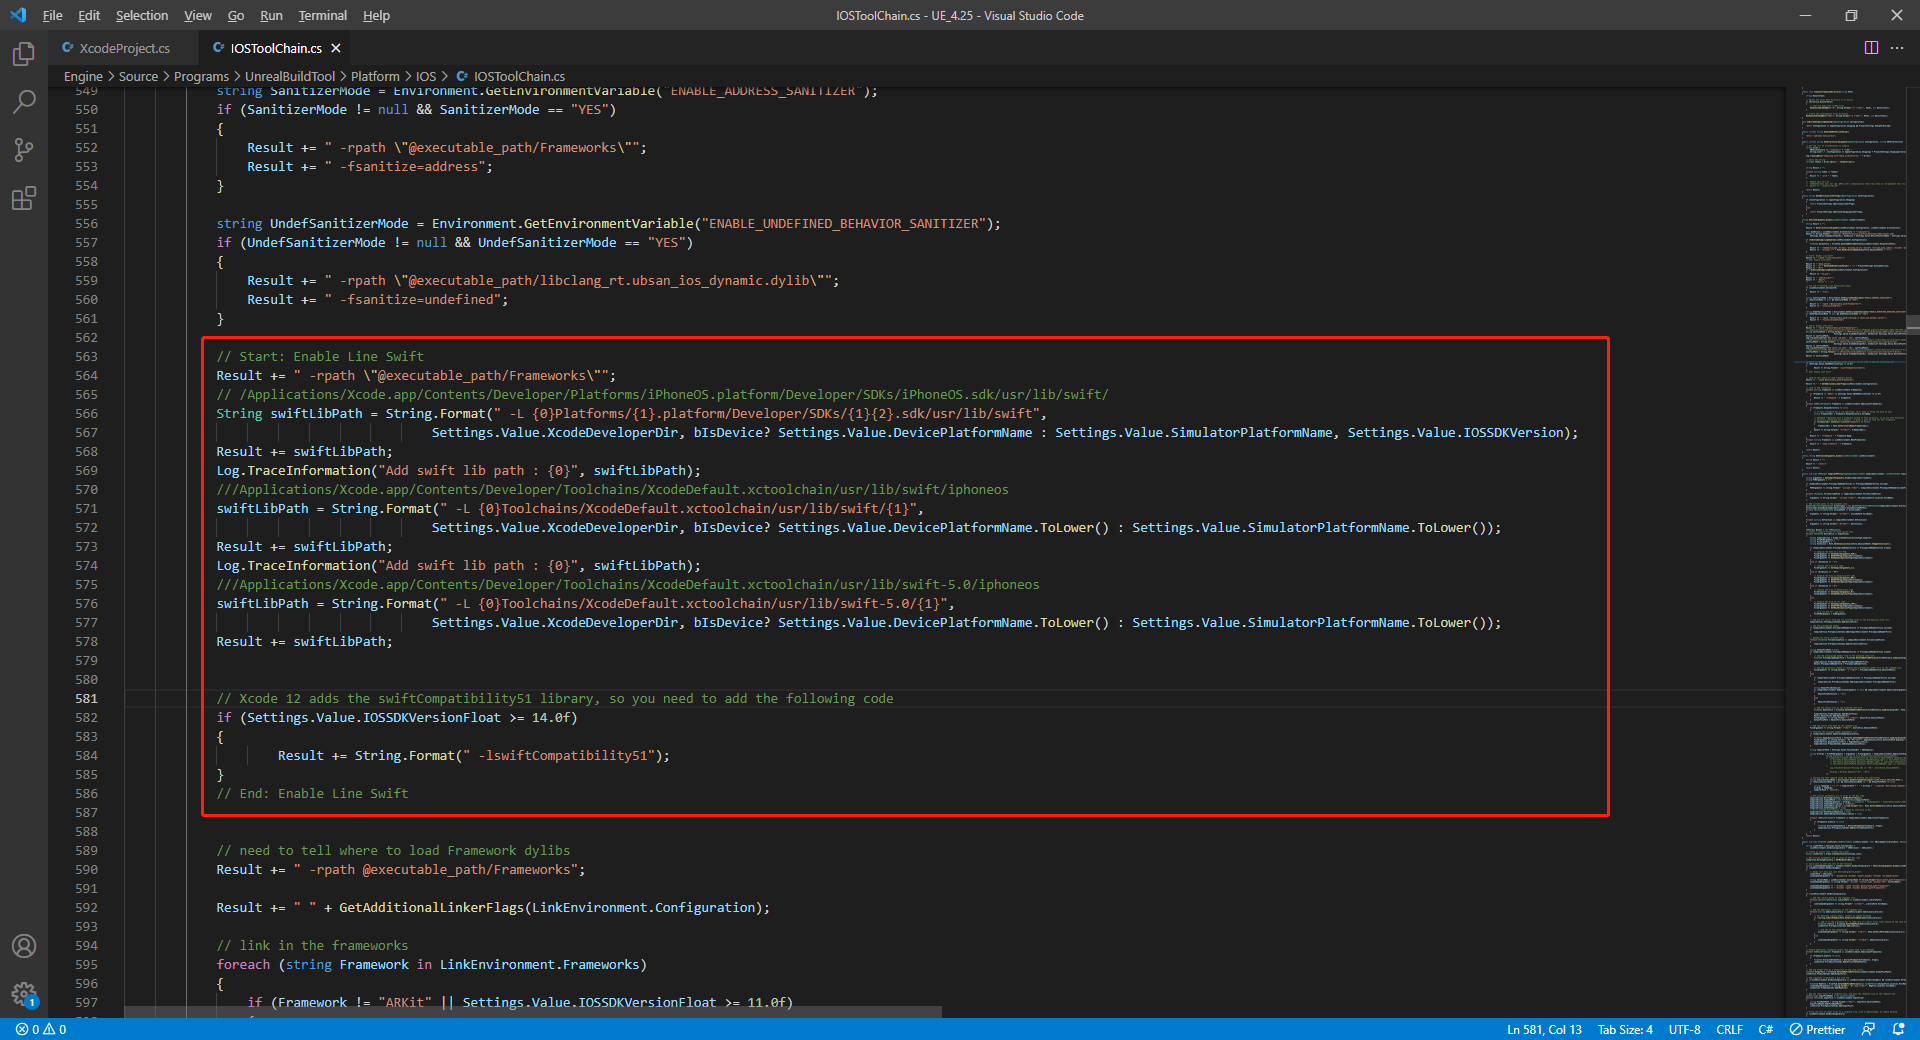
In /Your_UE_Installation_Path/Engine/Source/Programs/UnrealBuildTool/Platform/IOS/IOSToolChain.cs, add the following code in the
string GetLinkArguments_Global(LinkEnvironment LinkEnvironment)function.
- Before XCode 12
- XCode 12 and later
// enable swift support
Result += " -rpath \"/usr/lib/swift\"";
Result += " -rpath \"@executable_path/Frameworks\"";
// /Applications/Xcode.app/Contents/Developer/Platforms/iPhoneOS.platform/Developer/SDKs/iPhoneOS.sdk/usr/lib/swift/
String swiftLibPath = String.Format(" -L {0}Platforms/{1}.platform/Developer/SDKs/{1}{2}.sdk/usr/lib/swift",
                            Settings.Value.XcodeDeveloperDir, bIsDevice? Settings.Value.DevicePlatformName : Settings.Value.SimulatorPlatformName, Settings.Value.IOSSDKVersion);
Result += swiftLibPath;
Log.TraceInformation("Add swift lib path : {0}", swiftLibPath);
///Applications/Xcode.app/Contents/Developer/Toolchains/XcodeDefault.xctoolchain/usr/lib/swift/iphoneos
swiftLibPath = String.Format(" -L {0}Toolchains/XcodeDefault.xctoolchain/usr/lib/swift/{1}",
                            Settings.Value.XcodeDeveloperDir, bIsDevice? Settings.Value.DevicePlatformName.ToLower() : Settings.Value.SimulatorPlatformName.ToLower());
Result += swiftLibPath;
Log.TraceInformation("Add swift lib path : {0}", swiftLibPath);
///Applications/Xcode.app/Contents/Developer/Toolchains/XcodeDefault.xctoolchain/usr/lib/swift-5.0/iphoneos
swiftLibPath = String.Format(" -L {0}Toolchains/XcodeDefault.xctoolchain/usr/lib/swift-5.0/{1}",
                            Settings.Value.XcodeDeveloperDir, bIsDevice? Settings.Value.DevicePlatformName.ToLower() : Settings.Value.SimulatorPlatformName.ToLower());
Result += swiftLibPath;
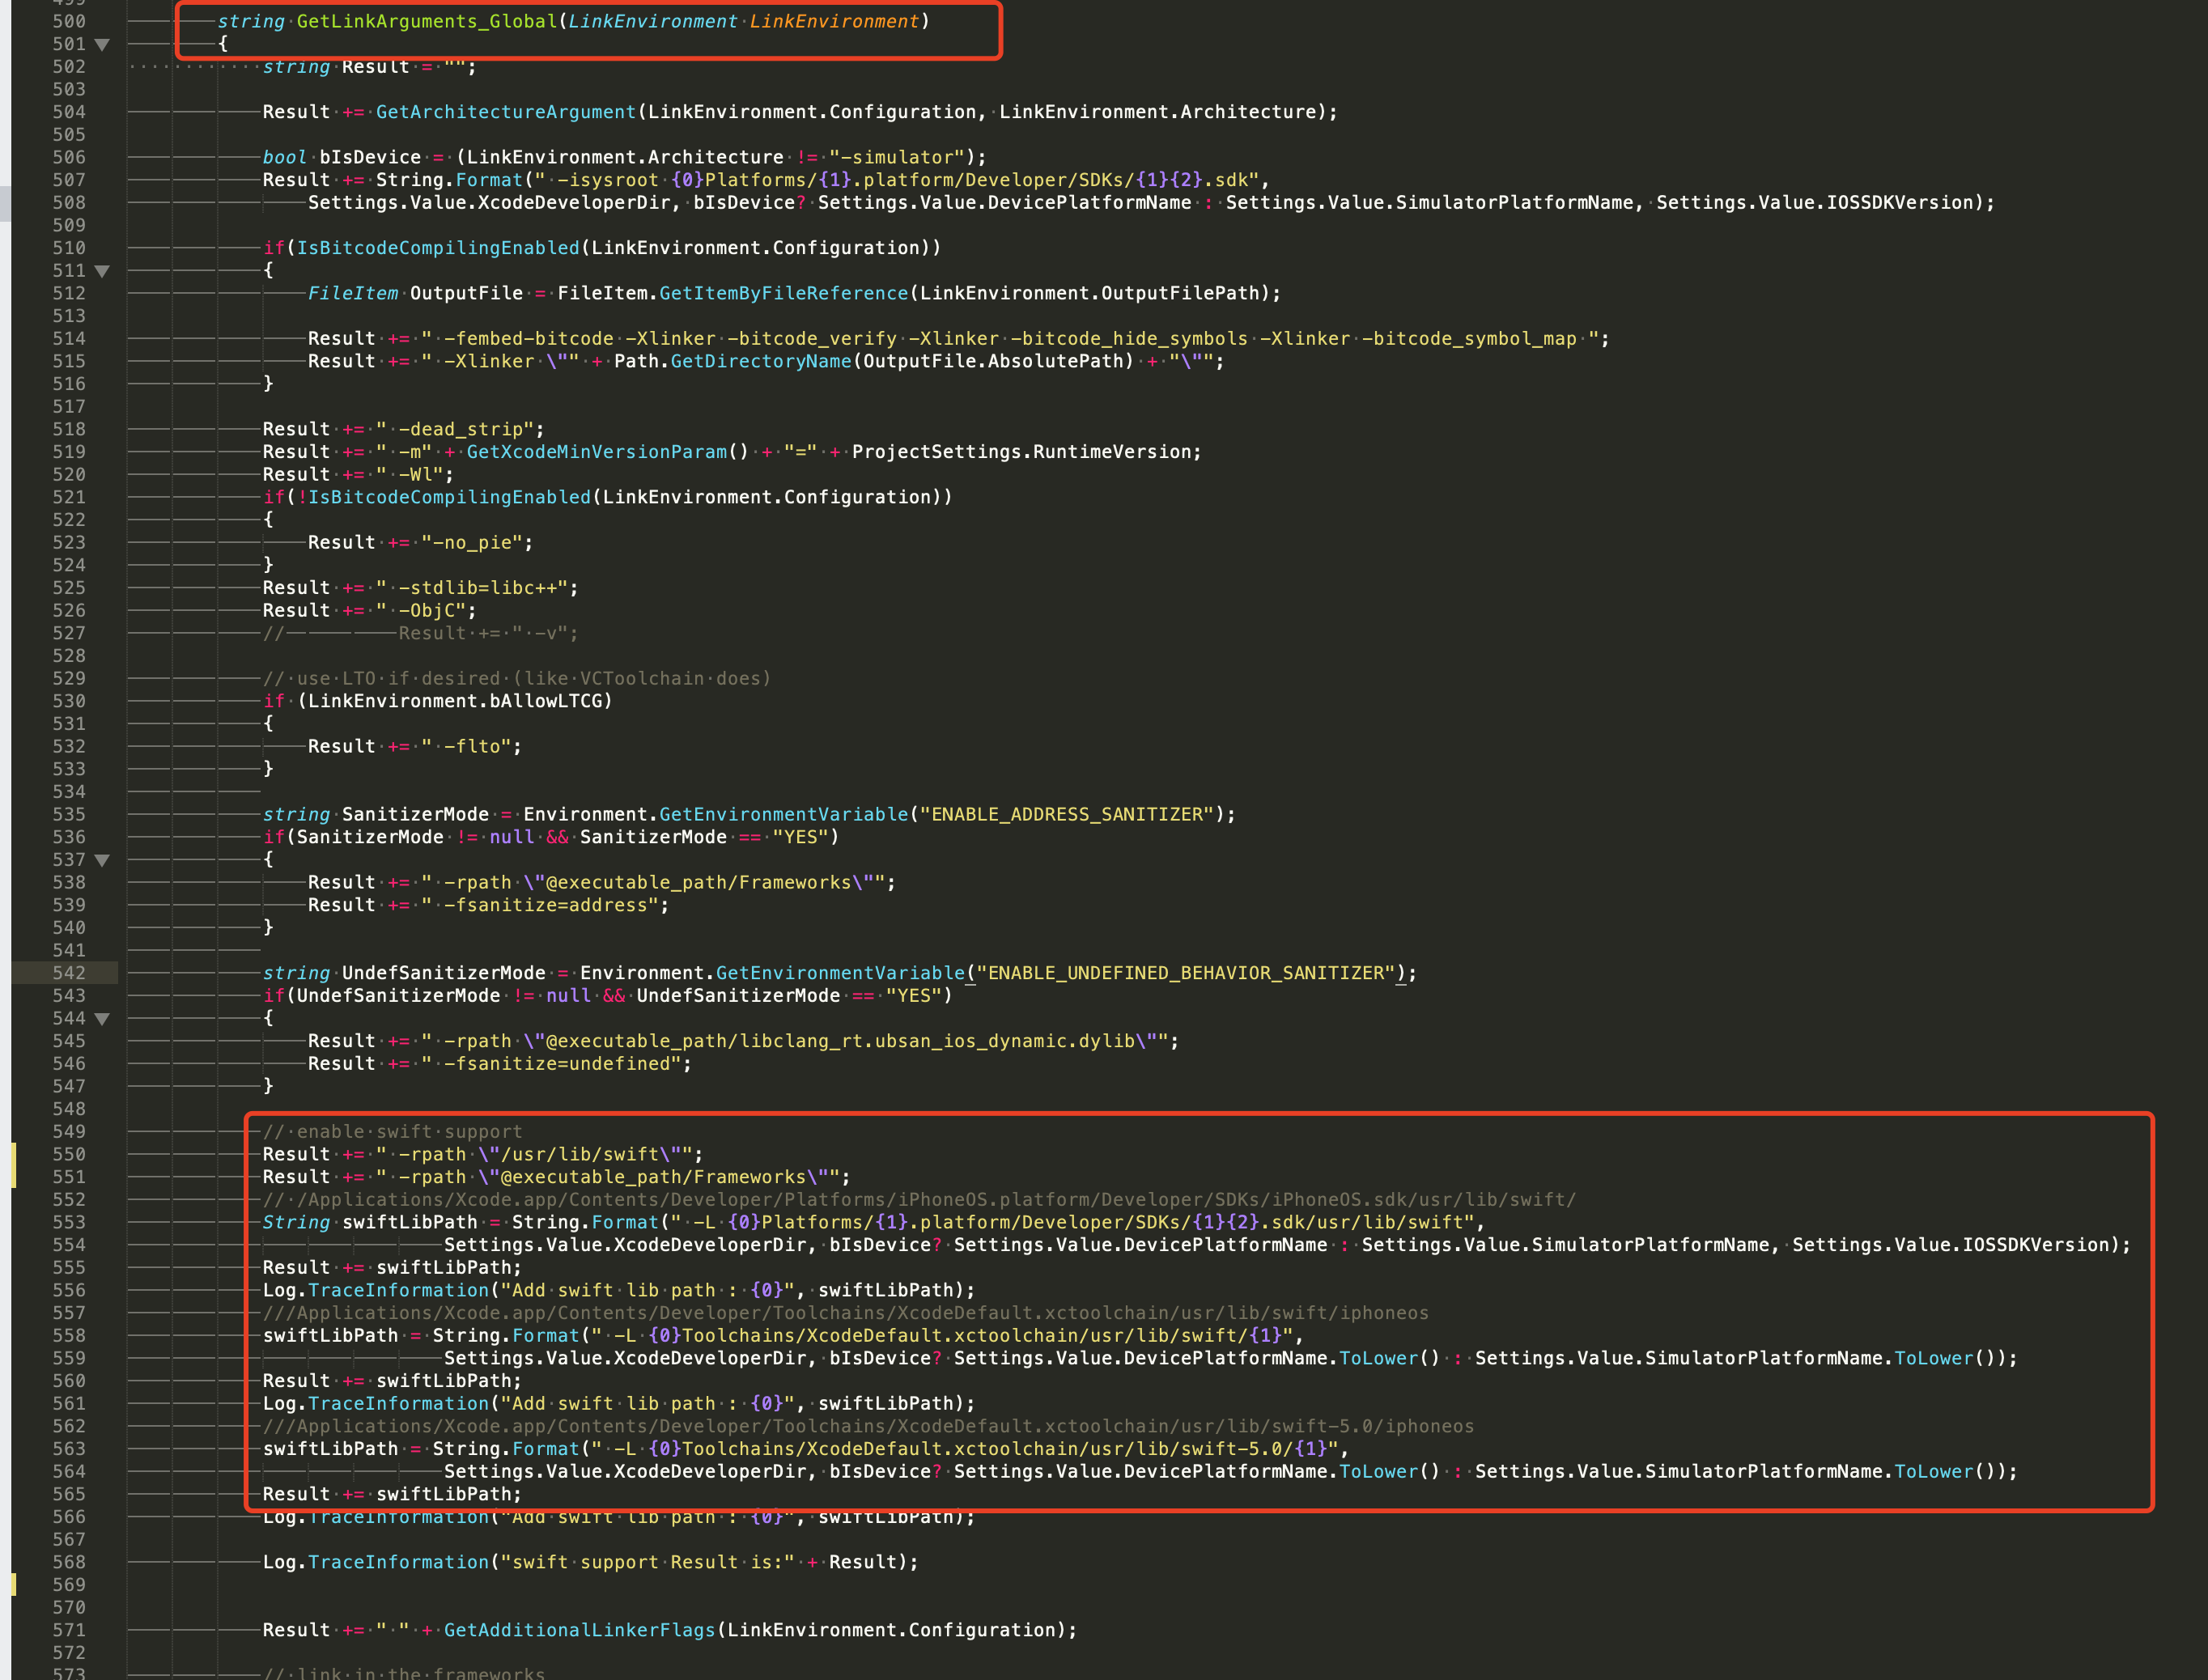
// This line of code should be placed earlier (see the example image below for the correct position)
// enable swift support, make sure '/usr/lib/swift' goes before '@executable_path/Frameworks'
Result += " -rpath \"/usr/lib/swift\"";
// enable swift support
Result += " -rpath \"@executable_path/Frameworks\"";
// /Applications/Xcode.app/Contents/Developer/Platforms/iPhoneOS.platform/Developer/SDKs/iPhoneOS.sdk/usr/lib/swift/
String swiftLibPath = String.Format(" -L {0}Platforms/{1}.platform/Developer/SDKs/{1}{2}.sdk/usr/lib/swift",
                            Settings.Value.XcodeDeveloperDir, bIsDevice? Settings.Value.DevicePlatformName : Settings.Value.SimulatorPlatformName, Settings.Value.IOSSDKVersion);
Result += swiftLibPath;
Log.TraceInformation("Add swift lib path : {0}", swiftLibPath);
///Applications/Xcode.app/Contents/Developer/Toolchains/XcodeDefault.xctoolchain/usr/lib/swift/iphoneos
swiftLibPath = String.Format(" -L {0}Toolchains/XcodeDefault.xctoolchain/usr/lib/swift/{1}",
                            Settings.Value.XcodeDeveloperDir, bIsDevice? Settings.Value.DevicePlatformName.ToLower() : Settings.Value.SimulatorPlatformName.ToLower());
Result += swiftLibPath;
Log.TraceInformation("Add swift lib path : {0}", swiftLibPath);
///Applications/Xcode.app/Contents/Developer/Toolchains/XcodeDefault.xctoolchain/usr/lib/swift-5.0/iphoneos
swiftLibPath = String.Format(" -L {0}Toolchains/XcodeDefault.xctoolchain/usr/lib/swift-5.0/{1}",
                            Settings.Value.XcodeDeveloperDir, bIsDevice? Settings.Value.DevicePlatformName.ToLower() : Settings.Value.SimulatorPlatformName.ToLower());
Result += swiftLibPath;

// Xcode 12 adds the swiftCompatibility51 library, so you need to add the following code
if (Settings.Value.IOSSDKVersionFloat >= 14.0f)
{
        Result += String.Format(" -lswiftCompatibility51");
}
- Open the solution and recompile
/Users/intl/UE4/UE_4.25/Engine/Source/Programs/UnrealBuildTool/UnrealBuildTool.sln.
2. Complete Player Network SDK configuration
- Open your project's INTLConfig.ini file:
[Discord channel configuration]
DISCORD_APP_ID = {INTL_DISCORD_APP_ID}
- Replace
{INTL_DISCORD_APP_ID}with the Discord App ID for the game.
- Adds the Discord to the
Info.plistfile.
- Unity
- Unreal Engine
When exporting the Xcode project from Unity, confirm that INTLDiscordKit.projmods already includes the Discord callback scheme configuration.
The Player Network SDK has already written this configuration into INTLDiscordKit.projmods, so game teams usually only need to verify that the configuration exists and do not need to add it manually.
"CFBundleURLTypes" :
[
    {
        "CFBundleTypeRole":"Editor",
        "CFBundleURLName":"Discord",
        "CFBundleURLSchemes":["discord-{INTL_DISCORD_APP_ID}"]
    }
]
Open the corresponding file according to the SDK version to modify:
- V1.24 and later:
INTLSDK/Source/INTLDiscord/Libs/iOS/INTLDiscord_UPL.xml - V1.18 to V1.23:
INTLSDK/Source/INTLConfig/Configs/iOS/Plist/INTLDiscord.plist
<key>CFBundleURLName</key>
<string>Discord</string>
<key>CFBundleURLSchemes</key>
<array>
    <string>discord-{INTL_DISCORD_APP_ID}</string>
</array>
Step 2:Add Discord Login
Discord does not require an application to be installed before logging in.If the app is installed, it will be opened for login; otherwise, login will be opened in the browser.
- Register login-related callbacks.
- Unity
- Unreal Engine
// Add callbacks
public void AddAuthObserver()
{
    INTLAPI.AddAuthResultObserver(OnAuthResultEvent);
}

// Remove callbacks
public void RemoveAuthObserver()
{
    INTLAPI.RemoveAuthResultObserver(OnAuthResultEvent);
}

// Process the INTLAuthResult callback
public void OnAuthResultEvent(INTLAuthResult AuthResult)
{
    Debug.Log($"MethodID: {AuthResult.MethodId}");

    string methodTag = "";
    switch (AuthResult.MethodId)
    {
        case (int)INTLMethodID.INTL_AUTH_LOGIN:
            methodTag = "Login";
            break;
        case (int)INTLMethodID.INTL_AUTH_BIND:
            methodTag = "Bind";
            break;
        case (int)INTLMethodID.INTL_AUTH_AUTOLOGIN:
            methodTag = "AutoLogin";
            break;
        case (int)INTLMethodID.INTL_AUTH_QUERY_USER_INFO:
            methodTag = "QueryUserInfo";
            break;
        case (int)INTLMethodID.INTL_AUTH_GET_AUTH_RESULT:
            methodTag = "GetAuthResult";
            break;
    }
}
C++ Event Handling (above v1.15)
//configure callback
FINTLAuthEvent authEvent;
authEvent.AddUObject(this, &OnAuthResult_Implementation);
UINTLSDKAPI::SetAuthResultObserver(authEvent);
// Remove callbacks
UINTLSDKAPI::GetAuthResultObserver().Clear();
void OnAuthResult_Implementation(FINTLAuthResult ret)
{
     UE_LOG(LogTemp, Warning, TEXT("MethodID: %d"), ret.MethodId);
}
Unreal Event Handling
void OnAuthResult_Implementation(FINTLAuthResult ret)
{
    UE_LOG(LogTemp, Warning, TEXT("MethodID: %d"), ret.MethodId);
}
- Call the
AutoLogininterface to log in automatically.
- Unity
- Unreal Engine
INTLAPI.AutoLogin();
UINTLSDKAPI::AutoLogin();
- If automatic login fails, call the
Logininterface to let the player log in manually.
- Unity
- Unreal Engine
INTLAPI.Login(INTLChannel.Discord, "identify", "");
INTLAPI.Login(INTLChannel.Discord, "identify,relationships.read,activities.write", ""); //Friend functions
UINTLSDKAPI::Login(EINTLLoginChannel::Discord, "identify", "");
UINTLSDKAPI::Login(EINTLLoginChannel::Discord, "identify,relationships.read,activities.write", ""); //Friend functions
- Synchronize client authentication status with the game backend and wait for the final verification result.
Step 3: Acceptance testing for login functionality
Search for the keyword "AuthResult" in the Player Network SDK logs to confirm whether the channel name and OpenID are returned correctly.If correct, it means the integration configuration is successful, and login functionality has been successfully added.
If you encounter problems during the integration process, please refer to Frequently Asked Questions.
